


 Netflix Basic
Nationwide Installation
Applying for
| UniFi Maxis Astro Njoi |
Frequently Asked Questions
Find your answers here.
We provide one stop service to apply Astro and Broadband for you.
You can avoid driving and queuing at the sales counter. We are the dealer that can help you to handle your application from the beginning to the end.
We do not charge you when you apply from us. There is no credit card information required to apply here. Charges are the same as you apply from the sales counter.
First, you can apply online, we will get back to you immediately during business hour. WhatsApp/Email/Fax us your Photocopy of IC (for malaysian) / Passport (for foreigners). When we receive all the information, we will proceed with your application immediately.
Once we receive your application with complete information, we will process your application immediately during business hour. The contractor from the service provider will then contact you for installation appointment once your application is approved.
Enjoy greater savings and hassle-free bill payment in one single bill for both Astro and Broadband. You get to enjoy Astro and Broadband at discounted price every month over the contract period of 24 months.
Astro offers multiple TV packs including Entertainment, Sports, Movies and Kids options. You can choose a pack that matches your viewing preferences and add optional streaming apps where available.
Yes, you may subscribe to Astro TV packs without bundling broadband. However, bundling Astro TV with Fibre Broadband may provide better monthly savings and convenience with a single bill.
For small households with light streaming and browsing, 100Mbps is usually sufficient. Larger families, gamers or heavy streamers may benefit from 500Mbps or 1Gbps plans for smoother performance across multiple devices.
Most Astro TV and Fibre broadband plans come with a 24-month contract. Early termination charges may apply if cancellation is made before the contract ends.
Yes, you may upgrade your TV pack or broadband speed at any time, subject to eligibility and coverage. A new contract period may apply depending on the upgrade.
Your monthly bill will be issued directly by Astro. You may receive it via email or access it through your Astro account. Bundled customers will receive a single combined bill for TV and broadband services.
Payment methods may include online banking, auto debit, credit card or other approved payment channels provided by Astro. Our team can guide you during the registration process.
If you experience any service interruption, you may contact Astro customer support for technical assistance. In many cases, issues can be resolved remotely or a technician will be arranged if necessary.
Yes, relocation is subject to service availability at your new address. Relocation charges and contract adjustments may apply depending on your plan.
No, you do not need a credit card to submit your application. Payment setup will be arranged directly with Astro after your service is approved.
Selected Astro TV packs allow optional add-ons such as streaming services depending on current promotions and availability. Additional monthly charges may apply.
Yes, a WiFi router is typically provided during fibre installation. The router model may vary depending on the selected broadband speed plan.
Yes, we will check the service coverage at your address before proceeding with your application to ensure broadband is available at your location.
For Malaysians, please provide a copy of your MyKad. For foreigners, provide a copy of your passport when submitting your broadband application.
After your application is approved, the service provider typically contacts you within 2 to 7 working days to arrange the broadband installation appointment.
Most Astro Broadband plans come with a 24-month contract starting from your installation date. If you relocate, a new 24-month contract may apply at your new address.
Yes, you can relocate your broadband service, subject to service availability at the new address. Your contract may reset for another 24 months from the new installation date.
Yes, you may request to relocate broadband devices within your home. Non-standard installation charges may apply and are payable to the installer directly after assessment.
Yes, you can switch to Astro Broadband. To avoid service interruption, it is recommended to activate the new service before terminating your current broadband contract.
Standard installations may be free during promotions, but non-standard installations (e.g., device relocation or complex wiring) may incur extra charges payable directly to the installer.
You may verify if your speed plan has been successfully upgraded during the installation process with your Astro installer before sign-off. If you would like to confirm the status of your speed upgrade after installation, you may contact Astro’s Contact Centre at 03-9543 1543 and an Astro agent will be available to assist you immediately.
If you need further help with the Astro Fibre app, you may call our Customer Contact Centre at 03 - 9543 1543 and an Astro agent will be available to assist you immediately.
Yes, Astro is bounded by the PDPA act. All information received will be used in accordance with our Privacy Notice.
STEP 1
Switch off the power for your box and make sure that the adapter's power light is off.

STEP 2
Locate the Smartcard at the front or right side and gently pull it out make sure that the adapter's power light is off.

STEP 3
Wipe the Smartcard's gold chip clean using a dry soft cloth.

STEP 4
Make sure the gold chip is facing upwards and reinsert it all the way in.

STEP 5
Switch on the power for your box and make sure that the adapter's power light is on. Please wait for 5 minutes.

STEP 6
Turn on your box. You should no longer be experiencing this problem.
If issue persist, please submit the issue in our Feedback Form and attach a picture of your General tab of the STB Diagnostics for assistance.

Each Astro customer is entitled up to 4 smart devices to be registered including mobile, laptops, tablets and Smart TV per household.
If you have maximised the registered device, you will be able to see the list of all your current registered devices on your mobile screen. Please remove any one device to allow the current Smart TV device to be included.

Do note that only 1 Smart TV device is allowed at any point in time.
STEP 1
On your remote, press the HOME button.

STEP 2
Navigate to SETTINGS icon and press "OK".

STEP 3
Navigate to Manage Satellite Frequency and press “OK”.

STEP 4
Choose Test Satellite Frequency and press “OK”.

STEP 5
Choose "Confirm" to continue Test Satellite Frequency and press “OK”.

STEP 6
Satellite Frequency Test progress screen will be displayed.

STEP 7
The test result will be displayed once completed.


You may proceed with the following troubleshooting steps and it shouldn't take you much longer than 15 min
1. Please standby a computer/laptop to access to the internet and connection must be via LAN cable (connect the LAN cable to the Yellow port at Tplink Router and direct to the computer/laptop).
2. You may open any web browser such as Google Chrome, Internet Explorer, Mozilla Firefox and etc.
3. On the address bar, please go to tplinkwifi.net and to access to below login page. Type the Username and Password, then click "Login".

The default login of the router is available on the sticker at the back of the router. If you have done a configuration on your router previously, the password may be different.

For example, below is the login details of the above router:
Username: admin
Password: TIMECE24
4. Once you have successfully login, the router's web-based setup page will appear. Please follow below steps for the configuration.
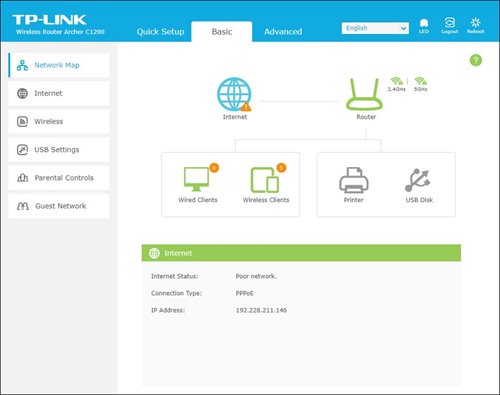
5. From the top menu, choose Advanced and click the Wireless tab on the left menu. Then, select Wireless Settings from the sub menu. Below screen will appear for 2.4GHz selection.

i. Please ensure to tick Enable Wireless Radio function.
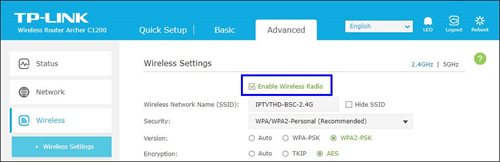
ii. To change the channel, click the drop-down arrow for Channel, then select your desired channel.
Choose between 1 to 13 (Suggested channels : 1,6,11). Then, click "Save" for the changes to take place.

iii. Click Save for the changes to take place. The router will auto reboot and connection will re-establish after few minutes.

iv. Next, select 5GHz to make changes on the wireless channel for 5GHz.
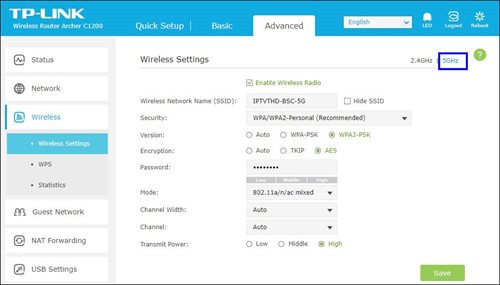
v. Click the drop-down arrow for Channel, then select your desired channel from the selection.

vi. Click Save for the changes to take place. The router will auto reboot and connection will re-establish after few minutes.

Yes, please WhatsApp "DH Help
- Router Positioning
- Most people underestimate the importance of picking a good spot for a Wi-Fi router. Even a small shift in positioning could end up being the difference between day and night.
- High vs. Low
- Put the router as high up as possible to extend the broadcasting range of the radio waves. This also helps clear the router of possible interferences.
- Concrete & Metals
- Make sure your router isn't blocked by any other objects, especially devices that are electronic. Also, avoid placing your router in your basement as this area is usually enclosed by a lot of concrete, which can be almost impossible for WiFi signals to penetrate.
- Distance to Router
- The further away from your router you get, the weaker the Wi-Fi signal. Therefore, the best option is to place your router as close to your devices as possible, but this is only practical if you have one main area where you tend to use your devices.
- Otherwise, you should place your router near the center of your home. After all, WiFi broadcasts in 360 degrees, so it doesn't make sense to put it at one end of the house.
- Wireless Interference & Noise
- You've probably never noticed but there are wireless signals all around you wherever you go and they're passing through you all the time. From where? Electronic devices, WiFi routers, satellites, cell towers, and more.
- Although WiFi is supposed to be on a different frequency than most of these devices, the amount of radio noise can still cause interference. Some common causes of interference include:
- Microwaves
- Bluetooth Devices
- Cordless Phone
- Surrounding Wi-Fi signals
- A truth of the modern world is that every household has their own WiFi network, which can cause issues with channel overlap. This can be somewhat problematic in a townhouse, but is especially problematic in housing complexes and apartments where there can be many routers within close proximity.
- Which is why it's important that you pick a good channel in your router settings. Modern routers can choose channels for you automatically, but sometimes it's better to investigate and find the best channel yourself.
- Usage
- More likely, however, is that the people on your network such as friends, roommates, or family members are participating in bandwidth-heavy activities like gaming and streaming Ultrabox/ Netflix.
- Fortunately, if this is the case, you can prioritize your own network traffic by enabling Quality of Service in your router settings.
If the problem persists, please run a Ping Test, Traceroute Test and attach the picture or screenshot of both test results in the Feedback Form below, in order for us to provide further assistances.
Quick Info
A Ping Test shows how long it takes for packets to reach host.
A Traceroute Test traces the route of packets to destination host from our server.


You may proceed with below troubleshooting and it shouldn't take you any longer than 15 minutes.
1. Please standby computer/laptop to access to the internet and connection must be via LAN (cable) [Connect the LAN (cable) to the blue port at Cisco Router and direct to computer/laptop].
2. You may open any web browser such as Google Chrome, Internet Explorer, Mozilla Firefox and etc.
3. On the address bar, please go to http://192.168.1.1 and below page will appear.

4. Type the Username and Password as below. Then click OK. (These are the defaults, if you have done previous configuration on your router the password may be different).
Username: admin
Password: admin (or time123)

5. The router's web-based setup page should now appear. Please follow below steps for the configuration.

i. On the setup page, click the Wireless tab then click on the Basic Wireless Settings sub-tab.
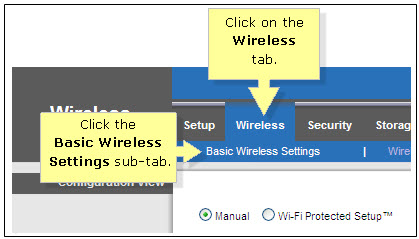
ii. On the Configuration View section, click the Manual radio button. Choosing the Manual setup will allow you to adjust your wireless channel according to your preference.

iii. Leave the Channel Width set to 20MHz Only.

iv. Click the drop-down arrow for Channel, then select your desired channel.
Choose between 1 until 11 (Suggested 1,6,11).
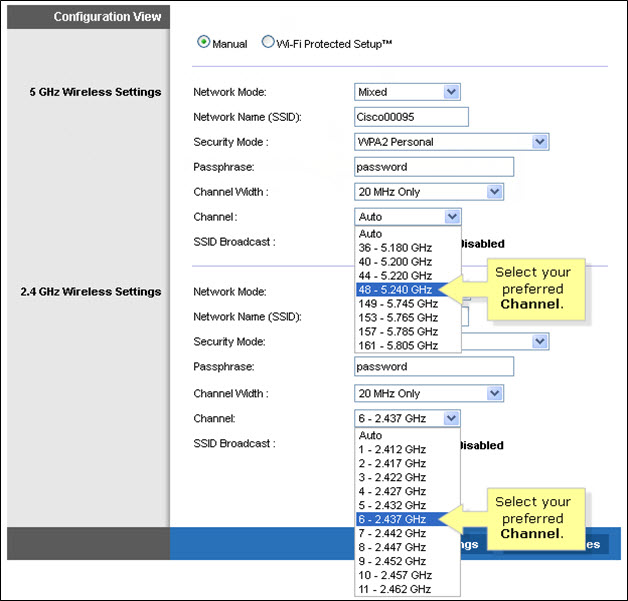
v. Click Save Settings to apply your changes. Router will auto reboot and connection re-establish after few minutes.
For information about the Disney+ Hotstar app functions and specifications, please visit help.hotstar.com or email disneyplus.my@hotstar.com.
You will regain access to your channels on Astro immediately once the equipment has been installed at your new house, provided your account is active. Customers can still enjoy viewing via Astro Go.
You may switch to E-mail Billing or Paper bills to be notified of your bill and make payment. Kindly note that if you select to have Paper Bills, you will be charged a RM10 fee per bill.
For My Astro App Users
Go to the "Account' tab and scroll to "Personal Info' section. Click "Name & contact info' to view and update your personal contact information.

For Ultra and/or Ulti Users
- Launch the My Astro app on your Home screen and you will land on your My Astro account dashboard. Then, press the yellow button on your Astro remote control to visit your "Account details".

- Press the down button to view the "Personal info".

- Press the left button and focus on the edit icon for the contact details, press on "OK" to change your contact details.

Currently, My Astro app and web supports TV pack upgrade. You can go to "Account' and scroll to "Subscription' section and select "TV pack'. You may reach out to us via WhatsApp at 03-9543 3838 for more details.
For Ultra and/or Ulti box users, launch the My Astro app on your Home screen and you will land on the My Astro account dashboard. Press ">' remote button to go to your Subscription card and "OK' button to proceed with the TV pack upgrade.
Your monthly bill of the previous and new pack will be prorated. This will be reflected into your bill accordingly.
Yes, customers who have upgraded their packages or reconnected their Astro service in February 2024 will be charged with 8% Service Tax from 1st March 2024, for services period on or after 1st March 2024.
Astro GO is a companion app that is complimentary for all Astro subscribers and allows up to 2 users to stream at the same time. 200 hours of cloud recording* come complimentary with your Pay TV subscription.
Astro GO+ is an add-on service that enables up to 4 users to stream Astro GO and/or Multiroom Smart TV** at the same time. The amount of cloud recording storage will also be increased to 1500 hours.

*Cloud recording hours are shared across your Astro Box, Astro GO and Multiroom Smart TV
** Provided that you have a Multiroom Smart TV subscription
To cancel your Multiroom (Smart TV) subscription, please call us at 03-9543 3838.
STEP 1
In the Kids Profile, press the Home button on your remote and the home menu will be displayed.
STEP 2
Navigate to Profile.
STEP 3
The Profile Selection Screen will be displayed.
STEP 4
Choose an Adult Profile.
STEP 5
Switching from a Kids to an Adult Profile will require you to enter a 4-digit PIN.
Please enter your PIN to proceed. If you have not set up your PIN, the default code is 0000.
STEP 6
After entering the PIN, you will be able to enter the Adult Profile.
- If you have signed up for a PVR (New customers), you will have to maintain your Astro subscription for 24 months, or a pro-rated penalty shall apply.
- If you have signed up for a PVR (Existing customers), you will have to maintain your Astro subscription for 24 months, or a pro-rated penalty shall apply.
- If you took up a PVR decoder at a special offer with the package subscription of Super Pack Lite/Super Pack/Super Pack Plus/monthly subscription > RM169.60 (price includes Govt tax), you will have to maintain your package subscription for a minimum of 6 months, or a flat penalty fee of RM106 (price includes Govt tax) shall apply.
Astro Fibre installation will come with 1 unit of TM fibre modem and 1 WiFi router with 24 months warranty period.
While warranty period for Mesh WiFi will be treated as one-to-one swap for faulty Mesh units at any point of time during your service tenure with active Mesh subscription.
Service will resume within 3 hours after payment is made.
You will be notified 30 days before the expiry on the renewal of subscription and can opt-out from auto renewal at least (2) days before the auto-renewal date.
If you want to opt-out of your auto-renewal for Disney+ Hotstar, please contact our Customer Contact Centre at 03 9543 3838 and speak to one of our customer service executives to change your package according to what suits you best at least two (2) days before the next auto-renewal date. Alternatively, please WhatsApp us at 03 9543 3838 and type DH Help for further assistance.
My Astro is available on web browser and app. The app can be downloaded for free from the Google Play Store, Apple App Store or Huawei App Gallery.
For Ultra and/or Ulti box users, My Astro app is now added to the Top Menu so you can easily access it to manage or update your account. You may find it in the Top Menu, located next to Settings. Please refer to the image below to see what it looks like:
electronic Know-Your-Customer (eKYC) is an online process of identifying and verifying individual customers using electronic means. This enables a person to be an Astro customer anytime and anywhere, hassle-free and helps to secure your Astro account by protecting it from unauthorised usage.
Yes, a charge of up to RM20.00 may be imposed upon reconnection.
This issue occurs because your TV does not support the higher resolution.
STEP 1
Switch off the power for your box and make sure that the adapter's power light is off.

STEP 2
Switch on the power for your box and make sure that the adapter's power light is on.

STEP 3
Press the standby button repeatedly after switch on the power.
The Startup Options screen will appear on your TV.

STEP 4
Press "987" to access the Advanced Startup Options menu.
Then, press "1" to initiate a reset setting.

STEP 5
Press "OK" to confirm restore to factory setting.

STEP 6
After the factory setting is restored, TV will turn blank.
Please wait until the box completes initiate setup.

STEP 7
Press "1" to initiate Linux download on the software.

STEP 8
Once completed, the following screen will appear on your TV.
Refer to Installation Setup guide here to complete the setup.

STEP 1
Identify your remote control:

a) Remote control with Astro logo at the bottom of the remote, proceed to STEP 2.
b) Remote control with Astro logo at the top of the remote, proceed to STEP 4
STEP 2 (Astro Logo at the bottom of the Remote)
On your remote, press the “set tv” button and set tv instructions will be displayed on top of your screen:

STEP 3
Follow the steps appear on the TV screen to sync your Astro remote and complete the setup.

STEP 4 (Astro Logo atthe top of the Remote)
Press and hold “tv input” key on bottom left of the remote for 3 seconds until the LED blinks twice.

STEP 5
Enter the 2-digit TV Code of your TV Brand and the LED will blink twice:

STEP 6
Try out the TV controls (TV Standby or adjust Volume) to check if they are working correctly.

STEP 7
Press ok and wait for the LED to blink twice to save the settings.
The main features and changes in this update are the revamped look and feel of Astro's user interface on the Astro Ultra/Ulti Boxes and Astro GO, which include redesigns to the Astro interface that consists of title rows at the Home Page to feature popular franchises, new live programmes posters and changes to the menu bar for easier navigation; auto-start Interactive Mode on Astro GO; as well as a Picture-in-Picture mode that shrinks your video player so you can keep watching your favourite shows while using other apps.
The details of each feature are:
- New Astro user interface
- Picture-in-picture mode
- Auto-start Interactive Mode on Astro GO
For more info, please read our dedicated FAQ on this here.
Astro is continuously improving our user interface and introducing new features to our platforms to ensure that your Astro experience is more seamless, efficient and user-friendly.
For details on our latest interface, Picture-in-Picture mode and auto-start interactive mode on Astro GO, please click here.
In addition, we have also recently introduced a new look to the Title Information Page, the ability to disable the Profile Selection Screen and adjustable auto-standby timing. For more information, please click here.
The charge for your Disney+ Hotstar subscription is reflected in your Astro subscription, and not on the Disney+ Hotstar app/website. For details on your subscription, please call our Customer Contact Centre or WhatsApp us "DH Help
Customers who subscribe to the Movies, Premium 1, Premium 3 or Platinum Pack will be able to access Disney+ Hotstar immediately and start streaming all their favourite Global, Regional and Malaysian hits upon activation.
WiFi router and fibre modem will be replaced upon checking and verification by Astro's Contact Centre /installer. It will be replaced without additional charge regardless contract tenure.
STEP 1
On your remote, press the Home button and the Home Page will be displayed your screen. 
STEP 2
Navigate to SETTINGS.
STEP 3
Navigate to Profile Selection on Startup and press “OK”.
STEP 4
Navigate to your preferred selection and press “OK”.
STEP 5
Navigate to Save and press “OK”.
For customers with Entertainment Plus, Movies Plus, Sports Plus, Premium 2, Premium 3, and Platinum Pack
- Launch Netflix from the home screen or via remote control.
- Click on Get Started
- If you are an existing Netflix customer, please fill in the email address and password associated with your Netflix account. Once successfully completed, all existing settings and watching history on your Netflix account will be brought over. If you are a new Netflix customer, create a new account by filling in your email address and a password for your new Netflix account.
- In the next screen, you will be shown your default Netflix package “Standard”, you can choose to upgrade to “Premium” here.
- The final screen provides a summary of your account including your email. Click Start Watching to enjoy Netflix on your Ultra/Ulti Box.
For Non-Entertainment Plus, Premium 2, Premium 3, and Platinum Pack Pack customers (New Netflix customers)
- Launch Netflix from the home screen or via remote control.
- Click on Join Now
- Create a new account by filling in your email address and a password for your new Netflix account.
- The final screen provides a summary of your account including your email. Click Start Watching to enjoy Netflix on your Ultra/Ulti Box.
Note: The Netflix plan will be defaulted to Premium, you may select ‘Change Plan’ to choose the ‘Standard’ plan.
For Non-Entertainment Plus Pack, Premium 2, Premium 3, and Platinum Pack customers (Existing Netflix customers)
- Launch Netflix from the home screen or via remote control
- Click on Sign-in
- If you are an existing Netflix customer, please fill in the email address and password associated with your Netflix account.
- You will be able to start watching Netflix on your Ultra/Ulti Box once you log in.
STEP 1
Switch off the power for your box and make sure that the adapter's power light is off.

STEP 2
Locate the SIM card at the left side and gently pull it out.

STEP 3
Wipe the SIM card's gold chip clean using a dry soft cloth.

STEP 4
Make sure the gold chip is facing down and reinsert it all the way in.

STEP 5
Switch on the power for your box and make sure that the adapter's power light is on.
Please wait for 5 minutes.

STEP 6
Turn on your Ultra Box. You should no longer be experiencing this problem.

If issue persist, please submit the issue on our Feedback Form with the error details and provide sim card number for assistance.
The Malaysia Communication and Multimedia Commission (MCMC)has issued a directive to all telecommunication companies (telcos) to block the sending and receiving of SMS with URL links. The move is aimed at preventing users from becoming victims of online scams. This exercise is applicable for all person-to-person SMS with URL links sent to or received from local and international mobile numbers, which has already taken effect as of 2 May 2023.
Yes, you can upgrade your internet speed. However, speed downgrade is not allowed.
Please follow the steps below to reset your password:
Starting 23 August 2022, Astro customers will progressively be able to access Disney+ Hotstar via the Ulti Box, in addition to the Ultra Box, mobile app and website.
(i) Head over to My Astro Portal and go to 'Bill & Payment'. Click on 'Payment History'
(ii) Contact us via one of these platforms. Please ensure you include your Astro Account Number.
Astro Multiroom is a 2nd Astro subscription that mirrors all the channels on your primary Astro at a discounted monthly fee. You can now enjoy Astro on different TVs in different rooms.
As a rule of thumb, this issue might happen when the devices are not equipped with minimum requirement above that supports the subscribed internet speeds:
- WiFi technology
- Network Interface Card (NIC)
As mentioned above however, it is important to note that despite meeting the device minimum requirements, it is not a guarantee that devices connected over WiFi will be able to achieve maximum subscribed internet speeds due to the following:
- Bad WiFi signal quality and coverage across the area due to:
- Distance from the RGW/Mesh AP with connected device
- Obstruction within the house (walls, metallic surfaces)
- Interference with other household appliances
- Congested bandwidth
- If there are too many devices connected to the WiFi network, then the bandwidth might be overloaded with traffic hence, slowing down the speed
- Devices are connected using WiFi instead of wired using LAN.
- It is important to note that wired connection offers better reliability and speed over WiFi.
- WiFi is more prone to interference compared to a wired connection which causes lower speeds and dropped signal.
- Router Positioning: Most people underestimate the importance of picking a good spot for a Wi-Fi router. Even a small shift in positioning could end up being the difference between day and night:
- High vs. Low: Put the router as high up as possible to extend the broadcasting range of the radio waves. This also helps clear the router of possible interferences.
- Concrete & Metals: Make sure your router isn’t blocked by any other objects, especially devices that are electronic. Also, avoid placing your router in your basement as this area is usually enclosed by a lot of concrete, which can be almost impossible for Wi-Fi signals to penetrate.
- Distance to Router: The further away from your router you get, the weaker the Wi-Fi signal. Therefore, the best option is to place your router as close to your devices as possible, but this is only practical if you have one main area where you tend to use your devices. Otherwise, you should place your router near the center of your home. After all, Wi-Fi broadcasts in 360 degrees, so it doesn’t make sense to put it at one end of the house.
- Usage
- More likely, however, is that the people on your network such as friends, roommates, or family members are participating in bandwidth-heavy activities like gaming and streaming Ultrabox/Netflix.
- Fortunately, if this is the case, you can prioritize your own network traffic by enabling Quality of Service in your router settings.
- If the problem persists, please run a Ping Test/Traceroute Test and attach the picture or screenshot of both test results in the Feedback Form below, in order for us to provide further assistances. Please make sure to attach the required screenshot(s) in ONE file (i.e. Microsoft Word document, PDF, Image file) before submitting the form.
Note:
Astro and its service providers will not offer any guarantees for compatibility of the customer's equipment (e.g., Personal Computer, Notebook, printers) nor provide on site troubleshooting for WiFi service issues related to the customer's equipment.

1. Please use a LAN ethernet cable and connect your computer/ laptop to the back of the Maxis Router.
2. You may open any web browser such as Google Chrome, Internet Explorer, Mozilla Firefox, etc.
3. On the address bar, please go to http://192.168.1.254 and the page below will appear.
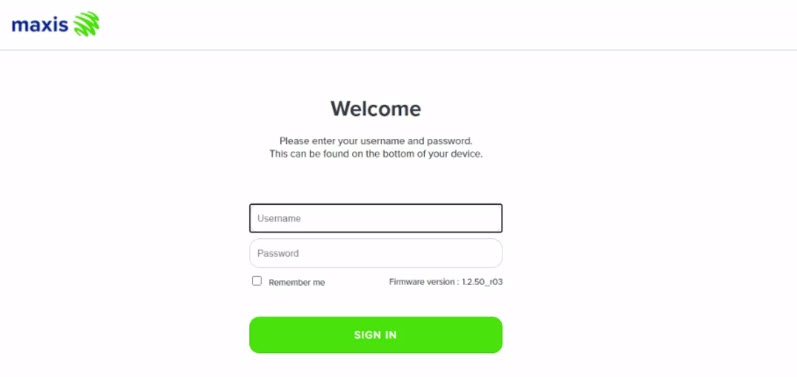
The default login of the router as below. If you have done a configuration on your router and changed your password previously, please use the password you have previously set.
Username: administrator
Password: Router S/N (Available on the sticker at the back of the router)
4. Once you have successfully login, the router's web-based setup page will appear.

5. From the left menu, select WIRELESS to access the screen below.

6. You may change the Channel selection by scrolling down to the Advanced Setup.
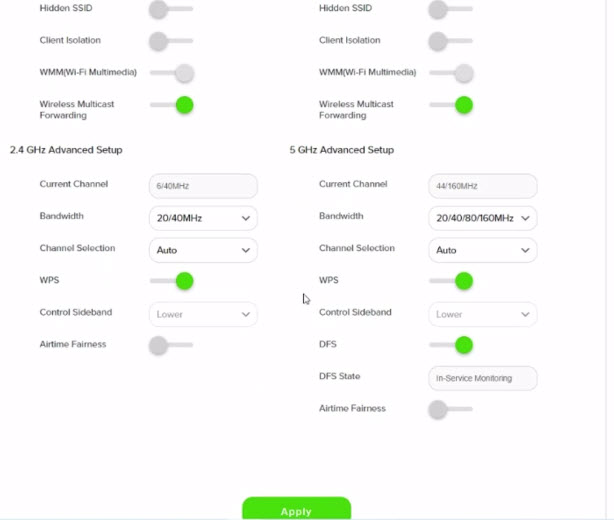
7. To change the channel on 2.4 GHz and 5 GHz, click the drop-down arrow for Channel, then select your desired channel.
Then, click "Apply" for the changes to take place.

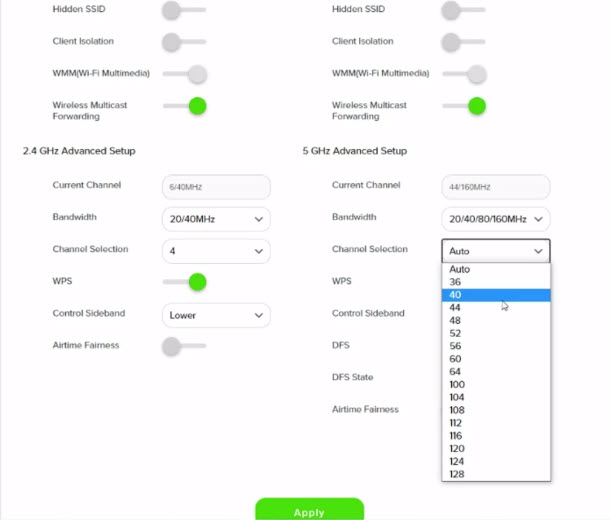
8. A warning box will popup, click "OK" for the changes to take place.

9. Please wait until the connection reestablish.

STEP 1
On your remote, press the HOME button and the home menu will be displayed on top of your screen.

STEP 2
Navigate to Settings.

STEP 3
Navigate to STB Diagnostics and press "OK".

STEP 4
Select Network Diagnostics and press "OK".

STEP 5
Details information of Network Diagnostics screen will be displayed.

The eKYC link is only valid for 3 days to complete the eKYC verification process. You will be required to submit a fresh Astro account application.
Yes, all existing Astro & Broadband customers within contract or out of contract can subscribe to Astro & Broadband offerings. The 24 months contract will be renewed upon signing up for the new packs.
All Astro customers and non-customers who have an Astro ID will no longer be able to log in to our digital platforms using their usernames. Users will experience this change if they currently do not use an email address or mobile number to login, for example: johndoe2023.
Yes, customers may need to provide additional documents such as bank-in slips or payment receipts. Any incomplete document, customer will be notified by Astro after validation is made.
