
A free satellite TV service from Astro. Watch lifetime entertainment, news, learning & information and more.
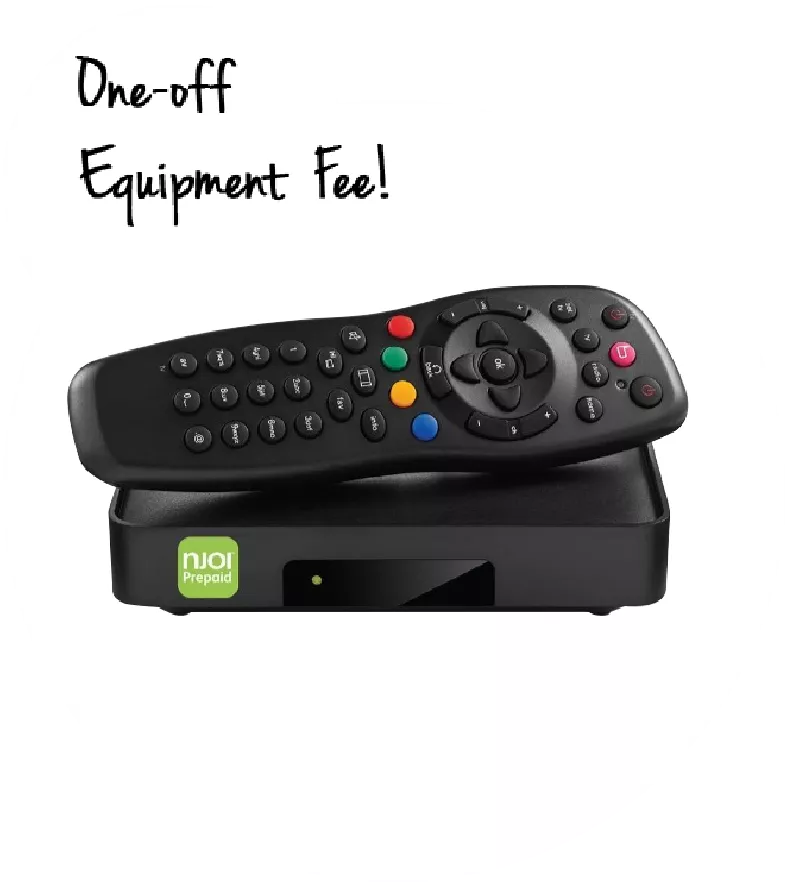
Pictures for illustration only.
Enjoy free access to 15+ TV channels & 10+ radio channels.
* Subject to Astro terms & conditions.


Step-1 |
Step-2 |
Step-3 |
Choose a plan & sign-up online. |
Sit back & wait for installation. |
Enjoy your new Astro / Broadband! |
A free satellite TV service from Astro. Watch lifetime entertainment, news, learning & information and more.
Pictures for illustration only.
New decoder only without satellite dish & cabling. You must have Astro/Njoi satellite dish and cable installed and working properly.
Including installation.
New decoder complete with satellite dish & cabling.
Including installation.
Applying for
| Njoi Astro UniFi Maxis |
Find your answers here.
We provide one stop service to apply Astro and Broadband for you.
You can avoid driving and queuing at the sales counter. We are the dealer that can help you to handle your application from the beginning to the end.
We do not charge you when you apply from us. There is no credit card information required to apply here. Charges are the same as you apply from the sales counter.
First, you can apply online, we will get back to you immediately during business hour. WhatsApp/Email/Fax us your Photocopy of IC (for malaysian) / Passport (for foreigners). When we receive all the information, we will proceed with your application immediately.
Once we receive your application with complete information, we will process your application immediately during business hour. The contractor from the service provider will then contact you for installation appointment once your application is approved.
Enjoy greater savings and hassle-free bill payment in one single bill for both Astro and Broadband. You get to enjoy Astro and Broadband at discounted price every month over the contract period of 24 months.
Astro offers multiple TV packs including Entertainment, Sports, Movies and Kids options. You can choose a pack that matches your viewing preferences and add optional streaming apps where available.
Yes, you may subscribe to Astro TV packs without bundling broadband. However, bundling Astro TV with Fibre Broadband may provide better monthly savings and convenience with a single bill.
For small households with light streaming and browsing, 100Mbps is usually sufficient. Larger families, gamers or heavy streamers may benefit from 500Mbps or 1Gbps plans for smoother performance across multiple devices.
Most Astro TV and Fibre broadband plans come with a 24-month contract. Early termination charges may apply if cancellation is made before the contract ends.
Yes, you may upgrade your TV pack or broadband speed at any time, subject to eligibility and coverage. A new contract period may apply depending on the upgrade.
Your monthly bill will be issued directly by Astro. You may receive it via email or access it through your Astro account. Bundled customers will receive a single combined bill for TV and broadband services.
Payment methods may include online banking, auto debit, credit card or other approved payment channels provided by Astro. Our team can guide you during the registration process.
If you experience any service interruption, you may contact Astro customer support for technical assistance. In many cases, issues can be resolved remotely or a technician will be arranged if necessary.
Yes, relocation is subject to service availability at your new address. Relocation charges and contract adjustments may apply depending on your plan.
No, you do not need a credit card to submit your application. Payment setup will be arranged directly with Astro after your service is approved.
Selected Astro TV packs allow optional add-ons such as streaming services depending on current promotions and availability. Additional monthly charges may apply.
Yes, a WiFi router is typically provided during fibre installation. The router model may vary depending on the selected broadband speed plan.
Yes, we will check the service coverage at your address before proceeding with your application to ensure broadband is available at your location.
For Malaysians, please provide a copy of your MyKad. For foreigners, provide a copy of your passport when submitting your broadband application.
After your application is approved, the service provider typically contacts you within 2 to 7 working days to arrange the broadband installation appointment.
Most Astro Broadband plans come with a 24-month contract starting from your installation date. If you relocate, a new 24-month contract may apply at your new address.
Yes, you can relocate your broadband service, subject to service availability at the new address. Your contract may reset for another 24 months from the new installation date.
Yes, you may request to relocate broadband devices within your home. Non-standard installation charges may apply and are payable to the installer directly after assessment.
Yes, you can switch to Astro Broadband. To avoid service interruption, it is recommended to activate the new service before terminating your current broadband contract.
Standard installations may be free during promotions, but non-standard installations (e.g., device relocation or complex wiring) may incur extra charges payable directly to the installer.
STEP 1
On your remote, press the HOME button and the home menu will be displayed on top of your screen.

STEP 2
Navigate to Settings.

STEP 3
Navigate to STB Diagnostics and press "OK".

STEP 4
Select Network Diagnostics and press "OK".

STEP 5
Details information of Network Diagnostics screen will be displayed.

Astro subscribers will have the freedom to subscribe to Netflix via Astro, or they may also choose to continue subscribing via Netflix directly on their own.

1. Please use a LAN ethernet cable and connect your computer/laptop to the back of the Maxis Router.
2. You may open any web browser such as Google Chrome, Internet Explorer, Mozilla Firefox, etc.
3. On the address bar, please go to http://192.168.1.254 and the page below will appear.

The default login of the router as below. If you have done a configuration on your router and changed your password previously, please use the password you have previously set.
Username: administrator
Password: Router S/N (Available on the sticker at the back of the router)
4. Once you have successfully login, the router's web-based setup page will appear.

5. At the top of the page, click Wi-Fi Configuration to configure the Wi-Fi parameters.

6. You may change the Wi-Fi Name and the Password to follow your preferences, then click "Save" for the changes to take place.

Please reconnect to the new wireless name with the new password once completed.
The new packs come with 200 hours of Cloud recording by default. If your current recordings exceed 200 hours, the system will delete the exceeded hours once your package has been changed, starting with the oldest recordings first.
If you would like to retain the previous recordings which exceed 200 hours, you may opt for a selection of 400 or 1500 Cloud Recording hours at a chargeable rate of RM12 or RM15 per month (excl. govt tax) respectively. Or else, you may subscribe to the Platinum pack which comes with complimentary access to 1500 hours of Cloud Recording.
1. Ensure power cable is connected tightly.
2. Try to use another power socket / power source to eliminate faulty power sockets/power sources which could cause the issue.

3. If the issue persists, submit your feedback form for further assistance.
STEP 1
On your remote, press the Home button and the Home Page will be displayed on your screen.
STEP 2
Navigate to Profile.
STEP 3
The Profile Selection Screen will be displayed. 
STEP 4
Navigate to Edit Profile.
STEP 5
Choose a profile to edit.
STEP 6
Choose a new Profile Picture and press “OK”.
Yes, as long as it is compatible with Open Mesh standards and Astro Fibre equipment. However, Astro will not be responsible for managing or configuring the device. For the optimum WiFi experience, please pair your Astro Fibre with Astro's Mesh WiFi.
All Astro customers with Disney+ Hotstar bundle/Add-on will be moved to the Disney+ Hotstar Premium Plan, with no changes to their current subscription pricing starting 24 April 2024. The new Disney+ Hotstar Premium Plan includes 3 concurrent streams, 10 maximum device logins, maximum video quality up to 4K Ultra HD (compatible devices required), and streaming on phone, tablet, laptop and TV.
If you have questions about your Disney+ Hotstar plan, please contact Astro Customer Contact Centre at 03 9543 3838. Alternatively, please WhatsApp Astro at 03 9543 3838 and type DH Help for further assistance.
You will need to bring along all devices to your new place as no new devices will be issued.
Relocation will be subjected to new 24 months recontract and standard relocation fee applies for both Maxis and Allo respectively.
We are working with the Sony team to ensure you will be able to enjoy these 4K UHD channels soon. We will keep you posted once these channels are available to you!
From 1st July 2023 onwards, Astro will ONLY accept cheques deposited at Public Bank Berhad.
To simplify your monthly payments, here are some recommended alternatives you can look into.
To find out more on how you can make your payments via these channels, kindly visit here.
Should you choose to continue with cheque payment, do ensure that you follow these steps below.
Step 1: Fill in the cheque
Step 2: Ensure that your 10-digit Astro account number is accurately written at the back of the cheque
Step 3: Go to your nearest Public Bank
Step 4: Locate the Cheque Deposit Machine
Step 5: Select “Bill Payment” on the screen
Step 6: Select “Astro”
Step 7: Drop your cheque in
Step 8: Collect your receipt
STEP 1
Check on the adapter's power light.
If the adapter's power light is ON, please refer to Blank Screen troubleshooting steps here.
Otherwise, if the adapter's power light is OFF, switch off the power for your box.

STEP 2
Ensure power cable is connected tightly.
Plug in power cable to different power socket and switch on the plug.
You should no longer be experiencing this problem.
If issue remains, proceed to STEP 3.

STEP 3
Try a different power socket to connect the equipment.
Turn on the power socket and check the adapter's power light.

If there is no light on your power adaptor's, please submit the issue on our Feedback Form and attach a picture of your smart card number for assistance.
Please indicate in the form if any lightning strike/thunderstorm/power trip occurred.
1. Tune to Astro channel 200 - select "Add-Ons"

2. Select the option for Monthly Subscription
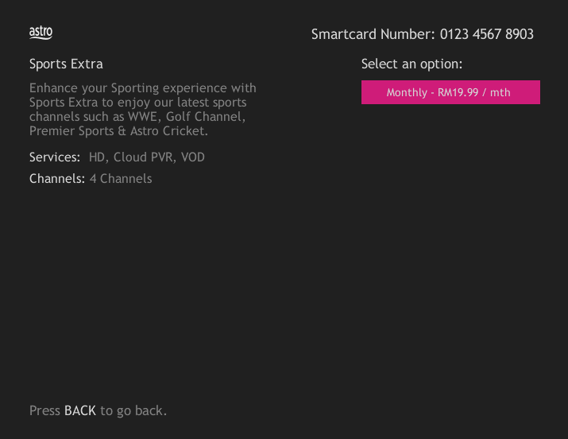
3. Send the WhatsApp code as per displayed on the TV screen

For existing Astro Fibre customers with the WiFi 6 Huawei K562e router, youwould need to upgrade to the latest RG21 router in order to access the AstroFibre with a one-off fee of RM300 (excluding SST). For any enquiries, please contact our Customer ContactCentre at 03 - 9543 1543and an Astro agent will be available to assist you immediately.

STEP 1
Switch on the power for your box and make sure that the adapter's power light is on.

STEP 2
Put the box on standby mode.

STEP 3
Press and hold the Home button on the box.

STEP 4
Wait until "boot" appear on the front panel and released.

STEP 5
New Installation Settings page will appear.
Click here for the guides to complete the setup.


STEP 1
Switch off the power of your box and ensure the adapter�s power light is off.

STEP 2
Switch on the power of your box and ensure the adapter�s power light is on.
STEP 3
Press and hold the Ch+ and Ch- keys on the box simultaneously when the "boot" message appears on the front panel.
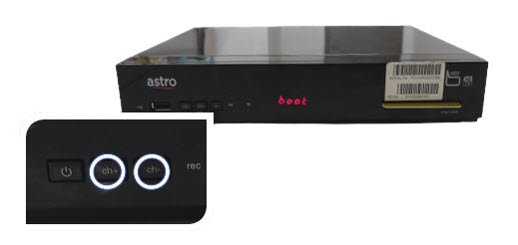
STEP 4
Wait until the "Clr" message appears on the front panel, then release the Ch+ and Ch- keys.

STEP 5
New Installation Settings page will appear.
Click here for the guides to complete the setup.

STEP 1
Ensure your box is on standby mode. (Red light on box's front panel).
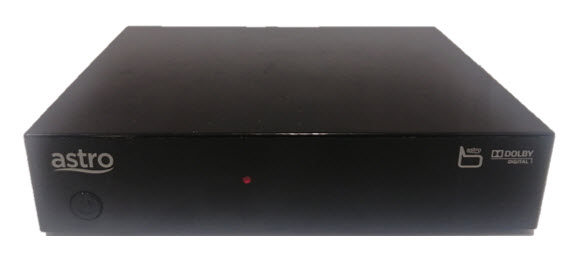
STEP 2
Press and hold the Standby button. Wait until the LED at front panel change from red to green for 3 times, then release the button.
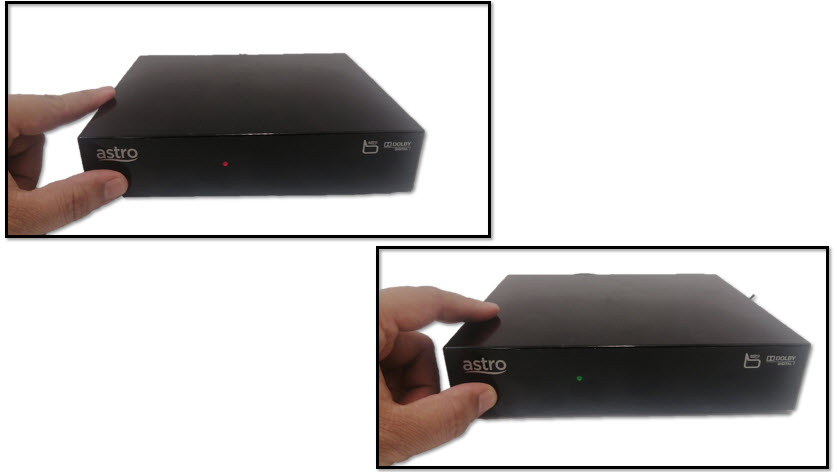
STEP 3
New Installation Settings page will appear.
Click here for the guides to complete the setup.

STEP 1
Switch off the power of your box and ensure that the adapter�s power light is off.
STEP 2
Switch on the power of your box and ensure that the adapter's power light is on.
STEP 3
Keep pressing the 'Power' button until the Startup Option screen appears.
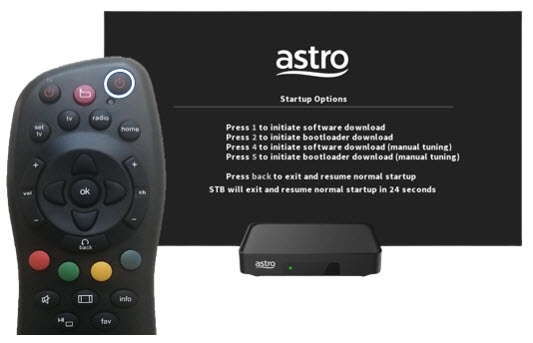
STEP 4
Press "369" on the remote control to trigger refresh box setting menu.
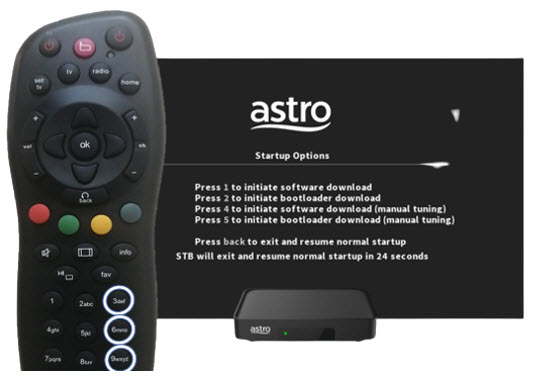
STEP 5
Press "OK" to proceed. The box will be refreshed to the original setting.

STEP 6
New Installation Settings page will appear.
Click here for the guides to complete the setup.
1. Tune to channel 200 - select on "MyAccount"

2. Select "View Channel Listing" and press "OK".
Yes, you will enjoy an Ulti box when subscribing to Primary/Entertainment/ Movie Pack OR an Ultra box when subscribing to Sports/Sports+/Movies+/Premium 1/Premium 2/Premium 3/Platinum Pack.
You will get FREE installation for both Ultra/Ulti box upon signing up with Astro & Broadband.
Please ensure that you have subscribed to the mentioned channel.
If you're subscribed to this channel, follow below steps.
STEP 1
You need to refresh the signal on your box.
Refer to Refresh signal of your box guide.
STEP 2
If issue persist after 30 minutes, proceed to submit report via WhatsApp or Feedback Form.
Please switch your current subscriptions to our new Astro packs to subscribe to Multiroom (Smart TV). To sign up, WhatsApp "SWITCH" to 03-9543 3838 and an agent will assist you.
Find out more of our new packs at https://product.astro.com.my/tv
Unfortunately, you will no longer be able to access Disney+ Hotstar via Astro if you cancel your Astro subscription with Disney+ Hotstar entitlement.
If band steering is enabled, you do not need to worry about which frequency band that your devices are connected to because the WiFi router will make the assessment and direct each device to appropriate frequency band.
However, it is important to note that quality and signal strength are not guaranteed due to unpredictability given that it is completely up to the connected devices and the WiFi router to intelligently decide on which band to connect.
This error indicates that you have reached the maximum number of simultaneous video streams across devices for one (1) account. To stop seeing this error, please stop streaming on one of your other devices.
• If you have recently purchased your Astro pack or made any changes to your pack on or after 9th November you can stream on two (2) concurrent screens
• If you have not made any changes you can stream on four (4) concurrent screens.
If you are still having issues, proceed to submit report via WhatsApp or Feedback Form.
Your Astro account number is a 10-digit combination e.g.08XXXXXXXX. You may log on to My Astro Portal, select "Account" , and you may find your 10-digit account number above your address, or refer to the top right-hand corner of your bill.
The Personal Video Recorder (PVR) is Astro's High Definition (HD)decoder which comes with a recording function and can be connected to Wi-Fi to access videos on demand. The PVR comes with the following features:
HIGH DEFINITION (HD):High Definition offers greater detail than Standard Definition including vibrant colour and multi-dimensional audio.
CONTROL LIVE TV: Record, Pause, Play & Rewind your favourite TV programmes at any moment. The PVR comes with storage capacity of 500GB (200 hours of HD recording)
ON DEMAND: Experience the new way of watching Astro. Gain access to a library of up to 50,000 On Demand titles that you can pick and watch instantly.
Upon successful subscription, you will be able to view your chosen HD channels within 3 hours by keying in the channel numbers into your remote control. Please note that subscription through Channel 200 will take effect within 24 hours.
STEP 1
On your remote, press the HOME button.

STEP 2
Navigate to SETTINGS icon and press "OK".

STEP 3
Navigate to Manage Satellite Frequency and press “OK”.

STEP 4
Choose Test Satellite Frequency and press “OK”.

STEP 5
Choose "Confirm" to continue Test Satellite Frequency and press “OK”.

STEP 6
Satellite Frequency Test progress screen will be displayed.

STEP 7
The test result will be displayed once completed.

The recommended home internet speed for a smooth viewing is 10Mbps.
STEP 1
Press "HOME" button on your remote control.

STEP 2
Navigate to Settings and press "OK".

STEP 3
Navigate to STB Diagnostics and press "OK".

STEP 4
Take a look at the Smart Card Status.

ransfer of Equipment Ownership
A request to transfer the equipment’s ownership from the existing account holder to a new account holder.
Note: Transfer of Equipment Ownership is not applicable for IPTV and NJOI account.
Merge of Equipment
A request from the account holder to merge the equipment from two different accounts into one account, provided the equipment must be within the same service address and registered under the same accountholder’s name.
Split of Equipment
A request from the account holder to split the equipment from one account to two different accounts and registered under the same account holder’s name.
No additional subscription is required. Video On-Demand (VOD) is a value-added service for all Astrro customers with connected Astro boxes (Ultra Box, Ulti Box, HD-PVR & PVR boxes). All you have to do is connect your decoder to your home Wi-Fi and you'll be able to access the world of on demand. Binge-watch, rewind, fast-froward and stream all your favourite shows anytime.
Starting 23 August 2022, Astro customers will progressively be able to access Disney+ Hotstar via the Ulti Box, in addition to the Ultra Box, mobile app and website.
Yes, an existing IPTV customer is eligible to switch to Astro Fibre. However, your IPTV services will be switched to a Plug & Play service, and your existing Astro PVR / B.yond Box will be upgraded to the Ultra/Ulti box. There is no additional charge for the Astro Ultra/Ulti upgrade. Please note that you will be re-contracted for 24 months upon installation.
STEP 1
On your remote, press the ... button and the Channel Guide page will be displayed on your screen.

STEP 2
Select the channel you would like to remove as favourite and press "OK".

STEP 3
Select "Remove from Favourite" and press "OK".

STEP 4
You are successfully removed the channel from favourite list when this screen appears.

1. Ensure power cable is connected tightly.
2. Try to use another power socket / power source to eliminate faulty power sockets/power sources which could cause the issue.

3. If the issue persists, submit your feedback form for further assistance.
-The Mesh unit can only be used indoors. It can be mounted onto a wall or be placed horizontally on a desktop. Do not install it in other mode, such as on the ceiling.
-Keep a clearance of at least 10 cm around the device to ensure proper ventilation.
-Keep the device away from electrical appliances that generate strong magnetic or electric fields, such as microwave ovens.
You can track your ticket status by contacting us via WhatsApp or call us at 03-9543 3838.
The Ultra Box is Astro's latest generation of 4K UHD enabled box with Cloud recording feature, redesigned new interface, and UHD resolution. Just connect the all-new Ultra Box to the internet and take control of your entertainment and explore over 110,000 videos that are waiting to be streamed, anytime. With the ability to record as many shows as you want simultaneously.
The new interface on Astro Ultra Box offers an enhanced viewing experience with a brand-new look and feel with features such as:
· New Home Screen - Everything you see is yours
· Discover VOD - Discover 110k videos, stream anytime, anywhere including in 4K UHD
· Search - Search faster and easier
· Play from Start - You missed the start? Just restart
· Stop Here, Continue There - Stop on one screen and continue on another device
· Multi-Screen - Stream seamlessly across any device
· Cloud Recording - Record all the programmes you want at the same time
. **Continuous viewing - Enable to continue watching your favorite shows during raining
Note: ** Except 4K UHD, Astro First and all radio channels
Yes, existing Astro & Broadband customers within contract or out of contract can subscribe to Astro Fibre Bundle. The 24-month contract will be renewed.
However, your contract with Maxis/Allo needs to be terminated before signing up to this offer. An early cancellation fee applies if you are still within contract.
*Subject to Terms &Conditions of your contract
I am sorry you can't. While we understand the value customers see in choosing their preferred service/pack individually, the packaging of channels/services in the new packs are necessary for us to offer content/services at an affordable price to our customers.
To set up a Mesh WiFi network around your house, the Mesh unit will need to be paired with the WiFi router. Steps to pair these two devices are as follows:
i. Place the Mesh unit close to the WiFi router (within 2 meters) and power it on
ii. After the Mesh unit starts up, press and hold the WPS buttons of the Mesh unit and the WiFi router for 3 - 5 seconds in turn within 2 minutes
iii. After the WLAN and Internet indicators of the Mesh turns steady blue, the Mesh is connected to the Internet
iv. Move the Mesh to the desired place where you need to expand WiFi and power it on. After the Internet indicator turns steady blue, WiFi is expanded successfully.
1. Clearly indicate full name of Astro customer, contact number and Astro subscription account number when making each payment (e.g. on bank-in slips)
2. For Direct Debit, please contact your bank for standing instructions. Provide the full name of Astro customer and Astro account number. The Direct Debit service may not be available with all banks. Please check with your bank for confirmation of Direct Debit service.
3. Please inform us of any changes in billing address/information by contacting us via one of these platforms.
IMPORTANT NOTICE: To avoid any problems in payment processing, please pay only at authorised Astro payment channels
You can proceed with below troubleshooting if the weather is good. Otherwise, you may try again later.
STEP 1
On your remote, press the “HOME” button and the home menu will be displayed at the bottom of your screen.

STEP 2
Navigate to SETTINGS and press “OK”.

STEP 3
Navigate to STB DIAGNOSTICS and press “OK”.

STEP 4
Refer to the signal strength % shown on the top left of your screen.
If it is 65% or higher, please take the screenshot and submit your Feedback Form.
If it is below 65%, please go to Step 5.

STEP 5
Switch off the power for your box and make sure that the adapter’s power light is off.

STEP 6
Unscrew the satellite cable from the box and pull it out.

STEP 7
Plug the satellite cable back into the box and screw it back securely.

STEP 8
Switch on the power for your box and make sure that the adapter’s power light is on.
Please wait for 5 minutes.

STEP 9
Turn on your box. You should no longer be experiencing this issue.
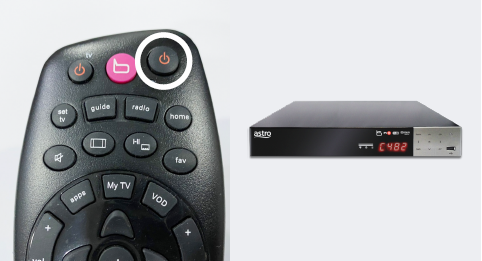
If issue persist, please submit the issue on our Feedback Form and attach a picture of your General tab of the STB Diagnostics for assistance.
Centralized Dish
If issue persist under a centralized satellite dish, please refer to your respective Building Management before contacting our agents.
Please follow the steps below:
Step1: Fill in Merge/Split Equipment Form (Part A & Part B)
Step2: A full payment to be made on any outstanding balance for all related accounts (if any).
Step3: Submit all documents via feedback form or walk in to nearest Astro Customer Service Centre (CSC).
Step4: Customer will expect a call from our validation team (Note: Turnaround time for merge/ split of account is 3-5 working days upon receiving all complete documentation).
Note:
1. There might be a loss of transmission during the processing of transfer equipment ownership, split or merge of equipment.
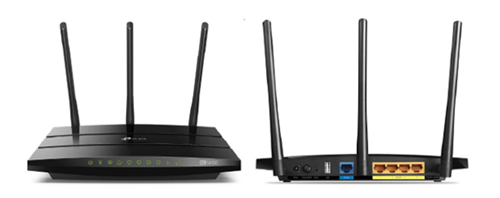
You may proceed with the following troubleshooting steps and it shouldn’t take you much longer than 15 minutes.
1. Please standby a computer/laptop to access to the internet and connection must be via LAN cable (connect the LAN cable to the Black port at D-Link Router and direct to the computer/laptop).
2. You may open any web browser such as Google Chrome, Internet Explorer, Mozilla Firefox and etc.
3. On the address bar, please go to tplinkwifi.net and to access to below login page. Type the Username and Password, then click "Login".

The default login of the router is available on the sticker at the back of the router. If you have done a configuration on your router previously, the password may be different)
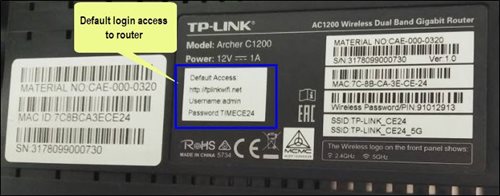
For example, below is the login details of the above router:
Username: admin
Password: TIMECE24
4. Once you have successfully login, the router's web-based setup page will appear. Please follow below steps for the configuration.
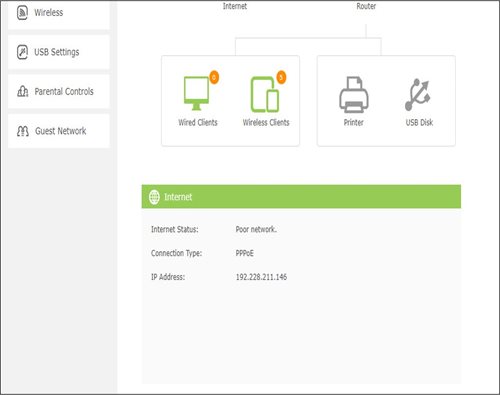
5. From the top menu, choose Basic and then click Wireless tab on the left menu to access to below screen.

6. Since this is a dual band router, you will have 2 Wireless Network Names (SSID) i.e. 2.4GHz and 5GHz. You may connect to any of the SSID, preferably with a stronger signal available.
7. You may change the Wireless Network Name (SSID) and the Password to follow your preferences, then click "Save" for the changes to take place.
Please reconnect to the new wireless name with the new password once completed.
The New Astro First serves as the one-stop, ultimate home cinema offering the biggest and latest local and international blockbuster films where you can:-
STEP 1
On your remote, press the HOME button and the home menu will be displayed on top of your screen.
STEP 2
Navigate to Settings.
STEP 3
Navigate to STB Diagnostics and press "OK".
STEP 4
Select Advanced Diagnostics and press "OK".

STEP 5
Details information of Advanced Diagnostics screen will be displayed.

STEP 6
Press down arrow on your remote to get more information.

By adding a Netflix account to your Astro bill, your Netflix account is already activated. No additional steps for activation are required.
Astro ID and / or account deletion is permanent. Upon deletion, it will be unlinked from your TV subscription account and you will be logged out from all the associated Astro apps and / or services connected including the partner apps that you have logged in using the same Astro ID. If you have any queries regarding Astro ID or would like to request for Astro ID account deletion, click on submit your request here, fill in the required details and our Astro representative will get back to you within 3 business days for security verification purposes.
STEP 1
On your remote, press the HOME button and the home menu will be displayed on top of your screen.

STEP 2
Navigate to Settings.

STEP 3
Navigate to HDMI Audio and press "OK".

STEP 4
Navigate to your preferred selection and press “OK”.

Please close and re-launc hthe Astro Fibre app, and you will be able to log in.