
Nationwide Installation
Applying for
| Maxis UniFi Astro Njoi |
Frequently Asked Questions
Find your answers here.
We provide one stop service to apply Astro and Broadband for you.
You can avoid driving and queuing at the sales counter. We are the dealer that can help you to handle your application from the beginning to the end.
We do not charge you when you apply from us. There is no credit card information required to apply here. Charges are the same as you apply from the sales counter.
First, you can apply online, we will get back to you immediately during business hour. WhatsApp/Email/Fax us your Photocopy of IC (for malaysian) / Passport (for foreigners). When we receive all the information, we will proceed with your application immediately.
Once we receive your application with complete information, we will process your application immediately during business hour. The contractor from the service provider will then contact you for installation appointment once your application is approved.
Enjoy greater savings and hassle-free bill payment in one single bill for both Astro and Broadband. You get to enjoy Astro and Broadband at discounted price every month over the contract period of 24 months.
Astro offers multiple TV packs including Entertainment, Sports, Movies and Kids options. You can choose a pack that matches your viewing preferences and add optional streaming apps where available.
Yes, you may subscribe to Astro TV packs without bundling broadband. However, bundling Astro TV with Fibre Broadband may provide better monthly savings and convenience with a single bill.
For small households with light streaming and browsing, 100Mbps is usually sufficient. Larger families, gamers or heavy streamers may benefit from 500Mbps or 1Gbps plans for smoother performance across multiple devices.
Most Astro TV and Fibre broadband plans come with a 24-month contract. Early termination charges may apply if cancellation is made before the contract ends.
Yes, you may upgrade your TV pack or broadband speed at any time, subject to eligibility and coverage. A new contract period may apply depending on the upgrade.
Your monthly bill will be issued directly by Astro. You may receive it via email or access it through your Astro account. Bundled customers will receive a single combined bill for TV and broadband services.
Payment methods may include online banking, auto debit, credit card or other approved payment channels provided by Astro. Our team can guide you during the registration process.
If you experience any service interruption, you may contact Astro customer support for technical assistance. In many cases, issues can be resolved remotely or a technician will be arranged if necessary.
Yes, relocation is subject to service availability at your new address. Relocation charges and contract adjustments may apply depending on your plan.
No, you do not need a credit card to submit your application. Payment setup will be arranged directly with Astro after your service is approved.
Selected Astro TV packs allow optional add-ons such as streaming services depending on current promotions and availability. Additional monthly charges may apply.
Yes, a WiFi router is typically provided during fibre installation. The router model may vary depending on the selected broadband speed plan.
Yes, we will check the service coverage at your address before proceeding with your application to ensure broadband is available at your location.
For Malaysians, please provide a copy of your MyKad. For foreigners, provide a copy of your passport when submitting your broadband application.
After your application is approved, the service provider typically contacts you within 2 to 7 working days to arrange the broadband installation appointment.
Most Astro Broadband plans come with a 24-month contract starting from your installation date. If you relocate, a new 24-month contract may apply at your new address.
Yes, you can relocate your broadband service, subject to service availability at the new address. Your contract may reset for another 24 months from the new installation date.
Yes, you may request to relocate broadband devices within your home. Non-standard installation charges may apply and are payable to the installer directly after assessment.
Yes, you can switch to Astro Broadband. To avoid service interruption, it is recommended to activate the new service before terminating your current broadband contract.
Standard installations may be free during promotions, but non-standard installations (e.g., device relocation or complex wiring) may incur extra charges payable directly to the installer.

STEP 1
Switch on the power for your box and make sure that the adapter's power light is on.

STEP 2
Put the box on standby mode.

STEP 3
Press and hold the Home button on the box.

STEP 4
Wait until "boot" appear on the front panel and released.

STEP 5
New Installation Settings page will appear.
Click here for the guides to complete the setup.


STEP 1
Switch off the power of your box and ensure the adapter�s power light is off.

STEP 2
Switch on the power of your box and ensure the adapter�s power light is on.
STEP 3
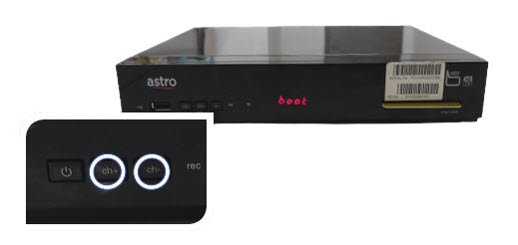
Press and hold the Ch+ and Ch- keys on the box simultaneously when the "boot" message appears on the front panel.
STEP 4
Wait until the "Clr" message appears on the front panel, then release the Ch+ and Ch- keys.

STEP 5
New Installation Settings page will appear.
Click here for the guides to complete the setup.

STEP 1
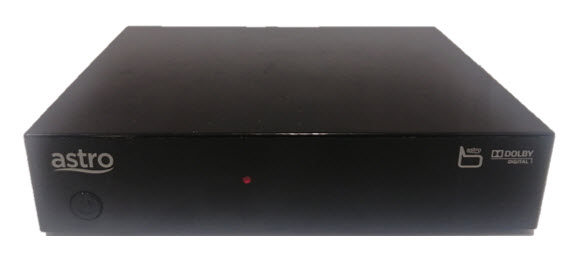
Ensure your box is on standby mode. (Red light on box's front panel).
STEP 2
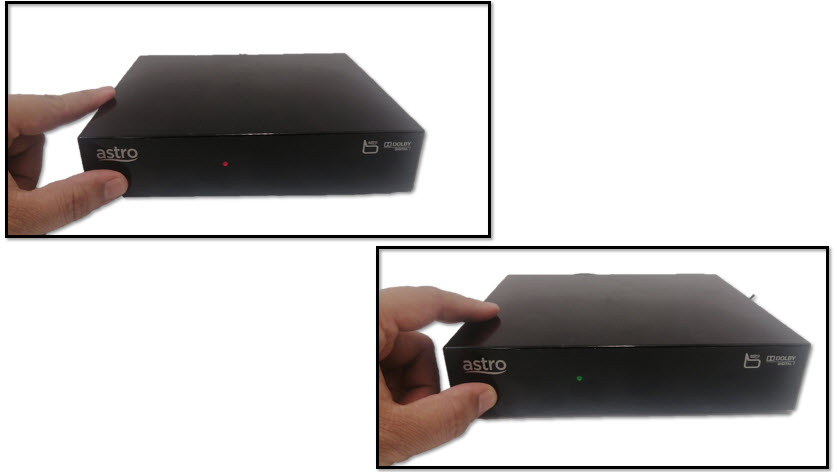
Press and hold the Standby button. Wait until the LED at front panel change from red to green for 3 times, then release the button.
STEP 3
New Installation Settings page will appear.
Click here for the guides to complete the setup.

STEP 1
Switch off the power of your box and ensure that the adapter�s power light is off.
STEP 2
Switch on the power of your box and ensure that the adapter's power light is on.
STEP 3
Keep pressing the 'Power' button until the Startup Option screen appears.
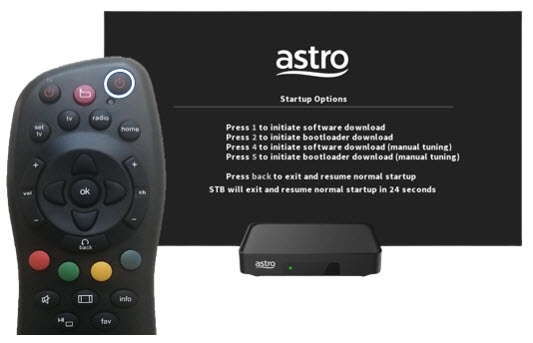
STEP 4
Press "369" on the remote control to trigger refresh box setting menu.
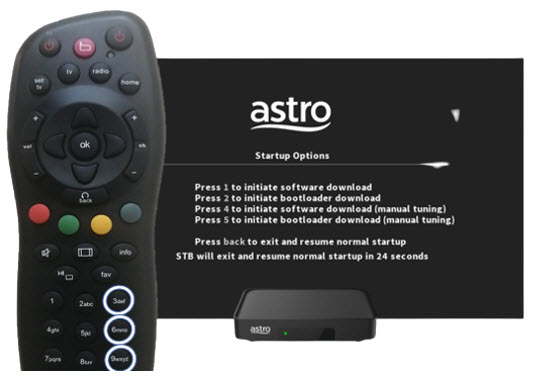
STEP 5
Press "OK" to proceed. The box will be refreshed to the original setting.

STEP 6
New Installation Settings page will appear.
Click here for the guides to complete the setup.
If you are interested to upgrade your box, you can do so via Astro's retailers or online as follows:
I. Visit https://hub.astro.com.my/#5
II. Select `Box Upgrade` and log in with your Astro ID
III. Select the box you would like to upgrade
The entire eKYC verification process may be completed within 5 minutes.
Starting 1 April, access to TVBAnywhere+ is no longer available to Astro customers. However, you can continue to enjoy TVB content via On Demand and TVB Jade (CH310) and Astro AOD (CH311). If you would like to subscribe to the TVBAnywhere+ app, you may still do so by purchasing it directly from TVB.
For app, you may go to "Manage' > "Support' section and provide your feedback either through the feedback form or chat with us via WhatsApp at 03-9543 3838.
For web, you may go to "Support' menu and provide your feedback either through the feedback form or chat with us via WhatsApp at 03-9543 3838.
For Ultra and/or Ulti box, you may chat with us via WhatsApp at 03-9543 3838.
Astro customers can make payments via Auto-debit, WhatsApp,Astro Quick Pay and other authorised payment channels withoutsurcharge for the easiest and fastest way to pay their Astro bills.
Bill payments at selected petrolstations, convenience stores, retail/mobile shops, kiosks, and e-Wallets, may incur a surcharge of up to RM0.50 per transaction by the appointed collection agencies of RMS (Razer), ATX, MobilityOne and e-Pay.
The surcharge is imposed by third-party payment collection partners for services rendered.
You can refer to all our payment options below. Those marked with ‘*’ will be subject to a surcharge by appointed collection agencies.
A. HASSLE-FREE METHODS
Auto-Debit:
Click here for step-by-stepinstructions on how to activate auto-debit payment via My Astro Portal.
WhatsApp:
- Save Astro’s WhatsApp number 03-9543 3838 into your contacts and send “Hi”to us via WhatsApp.
- Follow the instructions in the menu to proceed with your payments.
JomPAY:
Look for the JomPAY logo on your latest bill, log into your preferred online banking platform, and submit your payment details.
• Biller Code: 9639 (unique to Astro only)
• Ref-1: <10-digit Astro account number> (E.g. 08XXXXXXXX)
B. ASTRO SELF-SERVICE METHODS
Astro Quick Pay:
- Visit pay.astro.com.my.
- Just enter your 10-digit Astro Account Number and proceed with theinstructions that follow.
My Astro Portal:
- Login to My Astro Portal to conveniently make your payment online.
- Select ‘PAY BILL’ and proceed with the instructions that follow.
- You can also use this portal to check your billing and payment history.
Channel 200:
- Tune into CH200.
- Select 'My Account'.
- Click on 'Make Payment' and follow the instructions displayed on the screen.
- SMS the code shown on your TV to 33777.
- Wait for the SMS reply with an attached link to proceed with your payment.
My Astro App:
- Download My Astro app (available for FREE on both Google Play & Apple App Store).
- Register/Login/Link account and provide a valid email address and mobile number.
- Select 'My Account' on the menu bar to view your outstanding balance and click on 'Let’s Pay' to make your bill payments.
- You will receive a push notification in your message inbox verifying that your payment has been made, upon successful payment.
C.BANKS
Maybank:
- ATM
- Online banking
Visit maybank2u.com.my for more information.
Public Bank:
- ATM
- Cash Deposit Machine & Cheque Deposit
- Online banking
Visit pbebank.com for moreinformation.
Bank Simpanan Nasional:
- ATM
- Cash Deposit Machine
- Online banking
- SMS banking
- BSN Ejen Bank Berdaftar (EBB)
- Over-the-counter payments
Visit mybsn.com.my for more information.
Agrobank:
- ATM
- Online banking
- Over-the-counter payments
Visit agrobank.com.my for more information.
D. e-WALLETS
ATX*
Boost, GoPayz, KelantanPay, Zcity (GEM REWARD), SabahPay, Tapay, GoPay,MerchantTradeMoney, ToneGroup, Elinking, Mpay, Mcash, and other various smaller wallets.
e-Pay*
Touch n Go (TnG), Grab Pay, Shopee, BigPay, True Money
E. OTHER METHODS
Associated Retailers:
RMS (Razer/ MOL)*
7-Eleven, 99 Speedmart, Caring Pharmacy
ATX*
RedONE Shop, Mobile Money, Runcit Hero (telecommunication shops), Parcel Hub (courier shops), Kiosk, DHL
Mobility One*
Kedai D’mart, Happy Mart, Pasaraya Sakan, PusatKomuniti Desa (PKD), Aeon Big and various sundry shops
e-Pay*
Petrol stations (Petronas, Shell, BHP, Caltex, Petron), KK Mart, Mydin, MyNews, SenHeng, Hai-O, Giant, TF ValueMart, Billion, Big Pharmacy
You may visit any of Astro's digital platform that you would like to log into. Then, create a new Astro ID using your existing email address or mobile number. After creating your new Astro ID, please use it to log into our digital platforms moving forward.
At this point in time, the Disney+ Hotstar app on the Ultra or Ulti Box does not support Dolby audio. We are working to enable this in a future update.
The recommended home internet speed for a smooth viewing is 10Mbps.
The service tax rate for Astro Pay TV will be increased from 6% to 8%. The service tax for Astro Fibre, which falls under the category of telecommunication service, will remain at 6%.
This error indicates that you are streaming on Astro GO while being connected to a VPN. Please close your VPN application and try streaming again.
If you are still having issues, proceed to submit report via WhatsApp or Feedback Form.
Astro Fibre installation will come with 1 unit of TM fibre modem and 1 WiFi router with 24 months warranty period.
While warranty period for Mesh WiFi will be treated as one-to-one swap for faulty Mesh units at any point of time during your service tenure with active Mesh subscription.
Yes, switching package is allowed. However, switching package from Non-Deal to Deal bundle will refresh a new 24-month contract.
STEP 1
Check on your TV input to ensure correct input selected.
If issue remains, switch off the power for your box and make sure that the adapter's power light is off.

STEP 2
Unplug the HDMI cable from your box and plug it back in securely.

STEP 3
Switch on the power for your box and make sure that the adapter's power light is on. Please wait for 5 minutes.

STEP 4
Turn on your box. You should no longer be experiencing this problem.

If issue persist, please submit the issue on our Feedback Form with the error details and provide sim card number for assistance.
We are thrilled to announce that as part of your subscription, you are able to enjoy exclusive coverage of live matches in HD on Astro channels, On Demand and Astro GO! This means that you'll have access to all the latest games, highlights, and analysis, right at your fingertips.
With this new addition, you'll be able to follow your favourite teams and players closer than ever before, keeping you up-to-date with all the action on and off the field. Whether you're a die-hard fan or a casual spectator, this new content is sure to provide you with endless hours of entertainment.
To ensure that we continue offering the best choice in sports content, our Sports Pack will now be priced at RM104.99/month (for 12 months contract) or RM99.99/month (for 24 months contract) and Premium Pack 1 will now be priced at RM139.99/month (for 12 months contract) or RM129.99/month (for 24 months contract) starting 9 February 2023, and this applies to all new customers.
Note that there will no changes for existing Sports Pack & Premium 1 customers in 24 or 12 month contract being renewed before 1st June 2023.
We appreciate your continued support and can't wait for you to experience this exciting new addition to your Sports Pack subscription.
Please refer to the table below for the full revised pricing for the following packs:

We hope you continue to enjoy your Astro experience with us.
· Bill
· Log into your Astro Self-Service (location)
Each Astro customer can subscribe to a maximum of one (1) Multiroom (Smart TV) subscription. If you need additional Multiroom access, you may subscribe to Multiroom (Astro Box). All subscription has to be used within the same location as per the main subscription.
Yes, Astro is bounded by the PDPA act. All information received will be used in accordance with our Privacy Notice.
Service Tax will not be imposed on any CSR projects accounts. Any tax payable will be borne by Astro.
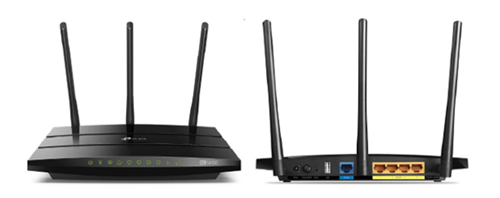
You may proceed with the following troubleshooting steps and it shouldn’t take you much longer than 15 minutes.
1. Please standby a computer/laptop to access to the internet and connection must be via LAN cable (connect the LAN cable to the Black port at D-Link Router and direct to the computer/laptop).
2. You may open any web browser such as Google Chrome, Internet Explorer, Mozilla Firefox and etc.
3. On the address bar, please go to tplinkwifi.net and to access to below login page. Type the Username and Password, then click "Login".

The default login of the router is available on the sticker at the back of the router. If you have done a configuration on your router previously, the password may be different)
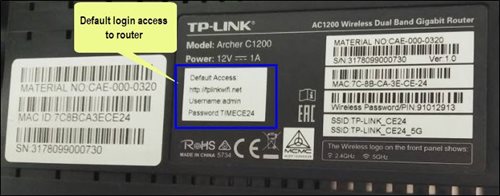
For example, below is the login details of the above router:
Username: admin
Password: TIMECE24
4. Once you have successfully login, the router's web-based setup page will appear. Please follow below steps for the configuration.
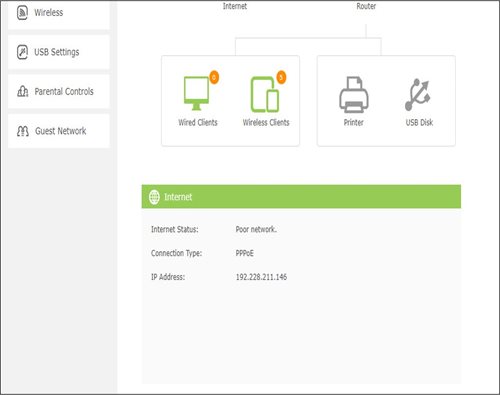
5. From the top menu, choose Basic and then click Wireless tab on the left menu to access to below screen.

6. Since this is a dual band router, you will have 2 Wireless Network Names (SSID) i.e. 2.4GHz and 5GHz. You may connect to any of the SSID, preferably with a stronger signal available.
7. You may change the Wireless Network Name (SSID) and the Password to follow your preferences, then click "Save" for the changes to take place.
Please reconnect to the new wireless name with the new password once completed.
We encourage customers to ensure their TV compatibility with the Astro Multiroom (Smart TV) app first before making any purchase here.
If you are still experiencing any issues, please contact us at wecare@astro.com.my or call or WhatsApp us at 03-9543 3838 and our agents will be happy to assist you.
Yes, the monthly subscription fee will be prorated into your Astro bill.
1. Ensure power cable is connected tightly.
2. Try to use another power socket / power source to eliminate faulty power sockets/ power sources which could cause the issue.

3. If the issue persists, submit your feedback form for further assistance.
No, if you already have an Ulti box you will not be required to swap the box to enjoy the new packs. However, if you would like to access 4K UHD content, you may upgrade to Ultra Box. Installation and activation fees will be chargeable depending on your package selection.
Please ensure that you have subscribed to the mentioned channel.
If you're subscribed to this channel, follow below steps.
STEP 1
You need to refresh the signal on your box.
Refer to Refresh signal of your box guide.
STEP 2
If issue persist after 30 minutes, proceed to submit report via WhatsApp or Feedback Form.

1. Please standby computer/laptop to access to the internet and connection must be via LAN (cable) [Connect the LAN (cable) to the yellow port in Maxis Router and direct to computer/laptop].
2. You may open any web browser such as Google Chrome, Internet Explorer, Mozilla Firefox and etc.
3. On the address bar, please go to http://192.168.1.254 and below page will appear.

If below box appear, please enter required details as below:

USERNAME: Administrator
PASSWORD: (ACCESS KEY AT THE RGW STICKER)
(These are the defaults, if you have done previous configuration on your router the password may be different)
4. Once enter into the page ‘’TECHNICOLOR TG784N V3’’, you may follow below step for the wireless information.
i. Click "Configure”

ii. Once clicked configure button, below screen will appear.
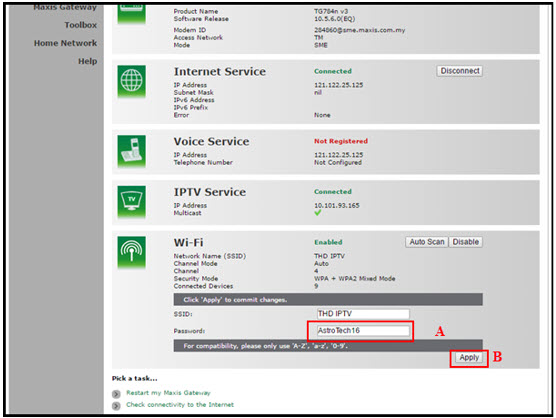
A. This is your current password. Please delete and enter the new password.
B. Once completed the selection; click the "Apply" button. Router will auto reboot and connection re-establish after few minutes.
Please re-connect your wireless using the new password.
You can proceed with below BTS if the weather is good. Otherwise, you may try again later.
STEP 1
On your remote, press the HOME button and the home menu will be displayed on top of your screen.

STEP 2
Navigate to SETTINGS.

STEP 3
Navigate to Satellite Settings and press “OK”.

STEP 4
Navigate to Diagnostics and press “OK”.

STEP 5
Refer to the signal strength on your screen.
If it is 65 or higher, please take the screenshot and submit your feedback form.
If it is below 65, please go to Step 6.

STEP 6
Switch off the power for your box and make sure that the adapter’s power light is off.

STEP 7
Unscrew the satellite cable from the box and pull it out.

STEP 8
Plug the satellite cable back into the box and screw it back securely.

STEP 9
Switch on the power for your box and make sure that the adapter’s power light is on. Please wait for 5 minutes.

STEP 10
Turn on your box. You should no longer be experiencing this issue.
If issue persist, please submit the issue on our Feedback Form with error details and attach a picture of your General tab of the STB Diagnostics for assistance.
Centralized Dish
If issue persist under a centralized satellite dish, please refer to your respective Building Management before contacting our agents.
If Astro does not receive your payment by the stated due date, your service may be disrupted as our system will automatically suspend your account. If you then wish to reconnect your subscription account, a charge of up to RM42.40 (inclusive of SST) will be imposed upon reconnection.
Find out more about the reconnection fee here.
You will regain access to your channels on Astro immediately once the equipment has been installed at your new house, provided your account is active. Customers can still enjoy viewing via Astro Go.
STEP 1
On your remote, press the HOME button and the home menu will be displayed on top of your screen.

STEP 2
Navigate to Settings.

STEP 3
Navigate to S/PDIF Audio and press "OK".

STEP 4
Navigate to your preferred selection and press “OK”.

Step 1:
Type ASTRO EBILL <Your 10-Digit Smart Card Number> <Your Email Address>
Example: ASTRO EBILL 0156123412 abcdabcd@gmail.com
Step 2:
Send SMS to 66688
Note: This request must be sent from account holder’s mobile/primary number
*Standard telco charges and Terms & Conditions apply
The promotion period of Astro Fibre’s Speed Upgrade Campaign is from 24 November 2023 until 31 May 2024.
You may switch to E-mail Billing or Paper bills to be notified of your bill and make payment. Kindly note that if you select to have Paper Bills, you will be charged a RM10 fee per bill.
For Platinum Pack and Multiroom Smart TV customers, Astro GO+ is included in your subscription at no extra charge. For customers on other packages, you will be able to add-on Astro GO+ to your subscription for RM 5.99/month.
Starting 28 April 2022, Astro customers can access Disney+ Hotstar via Ultra Box, mobile app and website. We are working towards making Disney+ Hotstar available via the Ulti Box. Stay tuned for updates.
â€
There will be no changes to your account. However, by paying 5 days earlier, your transactions will be processed in a timely manner and to allow you to enjoy uninterrupted viewing before the next bill is generated for the following month.

1. Please use a LAN ethernet cable and connect your computer/laptop to the back of the Maxis Router.
2. You may open any web browser such as Google Chrome, Internet Explorer, Mozilla Firefox, etc.
3. On the address bar, please go to http://192.168.1.254 and the page below will appear.

The default login of the router as below. If you have done a configuration on your router and changed your password previously, please use the password you have previously set.
Username: administrator
Password: Router S/N (Available on the sticker at the back of the router)
4. Once you have successfully login, the router's web-based setup page will appear.

5. At the top of the page, click Wi-Fi Configuration to configure the Wi-Fi parameters.

6. You may change the Wi-Fi Name and the Password to follow your preferences, then click "Save" for the changes to take place.

Please reconnect to the new wireless name with the new password once completed.


Option 1
- Please turn off all devices (Modem and Router). By restarting your modem, you can isolate the possibility of overloaded processes in the modem, which would impact its performance.
- Ensure both cables on Modem (LAN Port 1) and Router (Internet Port) are properly connected.
Modem connection

Router connection


3. Please make sure the LAN cable is connected properly from router (Port 1-4 - LAN port) to PC/Laptop.
4. If you have change the password in Selfcare Time portal recently, please change the router configuration follows the new password made in Selfcare, but if you didn't make any changes, please go to Step 5.
5. If the issue persists, submit your feedback form and attach your modem light indicator picture/video for further assistance.
Option 2 / Option 3
1. Please turn off all devices (Modem and Router). By restarting your modem, you can isolate the possibility of overloaded processes in the modem, which would impact its performance.
2. Gently remove fiber optic cable and blow / wipe the tip of the fibre cable. This is to clean up the cable in order to avoid any interferences.
3. Re-insert the fiber cable to the optical port behind the modem.
4. Ensure both cables on Modem (LAN Port 1) and Router (Internet Port) are properly connected.
Modem Connection

Router Connection


5. Make Sure both cables on Modem (LAN Port 4 /LAN Port 3 for second decoder) and Astro Decoder (Network Port) are properly inserted.

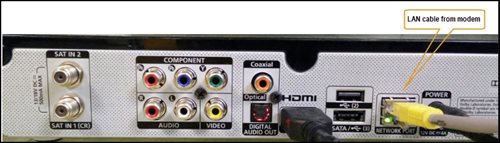
6. Switch on modem and router and please wait for 2 minutes to stabilise the devices after reboot.
5. If the issue persists, submit your feedback form and attach your modem light indicator picture/video for further assistance.
Option 4
1. Ensure Modem/Router are connected tightly to the power socket.

2. Try to use another power socket / power source to eliminate faulty power sockets/ power sources which could cause the issue.
3. If the issue persists, submit your feedback form for further assistance.
Option 5
1. Please ensure LAN cable is directly connected to modem port LAN 1.
2. Please use different LAN port if LAN 1 port is still off / not working.
3. If the issue persists, submit your feedback form for further assistance.
Starting 12 December 2023, users have to use their registered email address, mobile number or a social account (Facebook, Google or Apple) to log into any of Astro's digital platforms, including My Astro, Astro GO and Astro's official website. Usernames as an Astro ID is no longer available. This change was made to ensure details linked to your Astro account are always updated and to improve the overall user experience on our platforms.
For technical visit, the current fees will remain unchanged i.e.: 8% Service Tax absorbed by Astro. As for installation fees, current fees will remain unchanged i.e.: 6% Service Tax has already been included in installation fees, as 2% will be absorbed by Astro.
Want to return or recycle your satellite TV devices? It's simple and free!
Here's what you can do with your unused satellite TV devices:
If you have an Ultra or Ulti Box, you may:
1. Return your device to us via Arranged Pick-up:
Step 1: Please call Astro's Contact Centre at 03-9543 3838 to schedule an arranged pick-up by one of our Astro agents.
Step 2: Just sit back and relax! Our courier partner, Citylink will come to your doorstep, dismantle the satellite dish for you and retrieve the devices.
2. Return your device to us via Dropoff:
Step 1: Please gather your device(s) and click here to find a Customer Service Centre (CSC) or Astro Authorised Retailer (AAR) near you.
Step 2: Don't worry, it's free! Simply walk in during opening hours and hand over the device(s) to one of our Astro agents.
Note: An installer's visit is required to dismantle your satellite dish. However, if you have a Box or other satellite TV devices at home that do not require dismantling, you may walk into any of our authorised dealers and hand them over to the agent.
If your Satellite TV device is NOT an Ultra or Ulti Box, you may:
1) Recycle your device:
For all Ultra or Ulti Boxes, please return them to Astro via drop-off at a CSC or AAR near you or schedule a pick-up appointment via 03-9543 3838.
For other older Boxes or Satellite TV devices, you are required to discard them only at registered collection centres for proper handling and management of e-waste in an environmentally sound manner. Click here to find a registered collection centre near you.
Note: Upon termination of your Astro service, all Ultra and Ulti Box customers are required to return their devices to Astro. Failure to do so within 14 days of termination may incur a fee of RM100 (not inclusive of Govt. Tax). For customers on all other boxes, please discard your box only at registered collection centres to ensure we all play our part in protecting the environment.
Frequently Asked Questions
Arranged Pick-Ups
1) I missed the pickup appointment; what do I do now?
Our agent will make two attempts to retrieve the device(s) and dismantle your satellite dish within a period of 14 days, failing which the penalty of RM100 (not inclusive of Govt. tax) would be imposed.
2) Can I reschedule my pickup date?
Yes! Please call Astro's Contact Centre at 03-9543 3838 to reschedule your pickup date.
3) My old devices do not require dismantling; do I have to pack them before handing them over to the delivery agent?
Please pack your device(s) in their original box/packaging if possible. If this option is not available to you, just hand the device(s) over to the delivery agent without any packaging. You will not be charged any fees if the original packaging has been damaged/lost.
4) Do I have to print anything or fill in any forms before handing my device(s) over to the Astro agent?
No, you do not have to prepare any documents before handing your device(s) over to the Astro agent. All you have to do is get your device(s)ready before the Astro agent arrives to ensure a smooth handover process.
5) I have an old/unused satellite dish at my home and I am not an Astro customer; can I still schedule an installer visit to dismantle and return it?
Yes! Not to worry, you can still schedule an installer visit to dismantle the satellite dish from your home.
Drop-offs
1) Do I have to pack my device(s) before handing it over to the Astro agent?
Please pack your device(s) in their original box/packaging if possible. If this option is not available to you, just hand the device(s) over to the Astro agent without any packaging. You will not be charged any fees if the original packaging has been damaged/lost.
2) There are no Customer Service Centre (CSCs) or Astro Authorised Retailers (AARs) near me; what do I do now?
Please opt for courier pick-up if there are no CSCs or AARs near you. Call 03-9543 3838 now to schedule a pick-up appointment by one of our courier partners if you are holding an Ultra or Ulti Box For non-Ultra or Ulti boxes, you may recycle your box at a registered collection center. Click here to find a registered collection center near you.
3) Do I have to print anything or fill in any forms before handing my device(s) over to the Astro agent?
No, you do not have to prepare any documents before handing your device(s) over to the Astro agent. All you have to do is hand the device(s)over to the agent and you're done! You will also receive an acknowledgment slip after successful handover.
4) I found my Box and Smart card, however, the cable(s) that came with it is lost; will there be any penalty fees?
No, please return your old Plug & Play Boxes and Smartcard. There will be no penalty fees if the cable is damaged or lost.
Recycle via Registered Collection Centres
For all recycling-related questions, please click here.
Still Need a Hand?
Not to worry, we are only a phone call or a message away! Call or WhatsApp our Customer Contact Centre at 03-9543 3838 and an Astro agent will be available to assist you immediately.
STEP 1
On your remote, press the HOME button and the home menu will be displayed on top of your screen.

STEP 2
Navigate to SETTINGS and press "OK".

STEP 3
Navigate to STB Diagnostics and press "OK".

STEP 4
Navigate to Network Diagnostics and press "OK" .

STEP 5
Please ensure the Tunes service multicast status is Multicast Up.
If the status is Multicast is Not Available, please reboot the decoder and router before verifying this status.
If issue persists, please submit the issue on our Feedback Form with error details and attach a picture of your Network Diagnostics.
The expiry date is when your current Disney+ Hotstar entitlement ends, except if your Astro subscription is out of contract, in which case this expiry date may not apply to you. For details on your subscription expiry date, please call our Customer Contact Centre or WhatsApp us "DH Help
Information of the PPV CH200 cessation has been announced on CH200 from 1 - 7 October prior to the PPV cessation. Once again, we regret any inconvenience caused.
Please make sure that:
- You are inserting the correct account holder's information while linking, ie: I/C number, passport number, Astro account number or Smart card number.
- You are linking to an Astro account (NJOI customers will not be able to log into Astro GO).
- Your Astro account is not currently linked to any other Astro ID. If your Astro account is currently linked to another Astro ID, you will see a red notice.
To find out which Astro ID is currently linked to your account, you may submit a feedback form. Kindly select feedback type "I have an enquiry/issue with Apps
A security question will be asked when making payments with credit cards over the phone. All other payment channels will not require any form of verification.
This Service Tax is imposed on customers of Pay TV broadcasting services by the Government. As such the Service Tax will be passed on to the customers.
Connect your PVR to Wi-Fi and enjoy access to our library of Video On Demand. Replay old seasons, catch-up latest episodes of your favourite shows, anytime you want. To connect your PVR, follow the steps below depending on your box type:
(a) Wi-Fi Enabled PVR (DMT5)

· Press the “Home” button and select “Settings” > “Network” > “Wi-Fi”
· Allow the PVR to scan Wi-Fi networks available and subsequently choose your home Wi-Fi network > Enter your Wi-Fi password if required
· Once connected, the icon below will appear on the screen.

Tip: Use the alpha-numeric keyboard on your Astro Remote to key in your password
· Press the “Home” button and select “On Demand” to start watching videos on demand!
(b) Non-Wi-Fi Enabled PVR (HD PVR)

There are two ways to connect your HD PVR decoder to your home Wi-Fi
(i) Using the Ethernet (LAN) cable
· Plug in the LAN cable from your modem into the PVR network port
· Once connected, the icon below will appear on the screen
· Press the “Home” button and select “On Demand” to start watching videos on demand!
(ii) Using an Astro Wi-Fi dongle as per shown below

Step 1 - Plugin the Wi-Fi dongle into the front USB part of your PVR decoder.
Step 2 - A prompt will appear stating "Do you wish to connect to a wireless network?", select "Yes, continue."
Step 3 - Once connected, the Wi-Fi icon will appear on the screen. Now you are ready to download and enjoy Astro's on demand entertainment.
Step 4 - Press the “Home” button and select “On Demand” to start watching videos on demand!
*The Wi-Fi dongle is only applicable for the non-Wi-Fi enabled PVR (as per the picture).
STEP 1
Switch OFF the power of your Ultra / Ulti box and make sure that the adapter's power light is off.

STEP 2
Switch ON the power of your Ultra / Ulti box and make sure that the adapter's power light is on.

STEP 3
On your remote control, press the standby button repeatedly until the Startup Options appear on TV.

STEP 4
Press "1".

STEP 5
Press "1".

STEP 6
The Software Update progress screen will appears.
The update will take 10 - 15 minutes to complete.
Please be patience.

STEP 1
Switch off the power for your box and make sure that the adapter's power light is off.

STEP 2
Locate the Smartcard at the front or right side and gently pull it out.
Make sure that the adapter's power light is off.

STEP 3
Wipe the Smartcard's gold chip clean using a dry soft cloth.

STEP 4
Make sure the gold chip is facing upwards and reinsert it all the way in.

STEP 5
Switch on the power for your box and make sure that the adapter's power light is on. Please wait for 5 minutes.

STEP 6
Turn on your box. You should no longer be experiencing this problem.

If issue persist, please submit the issue on our Feedback Form and attach a picture of your smart card number for assistance.
