
Nationwide Installation
Applying for
| Maxis UniFi Astro Njoi |
Frequently Asked Questions
Find your answers here.
We provide one stop service to apply Astro and Broadband for you.
You can avoid driving and queuing at the sales counter. We are the dealer that can help you to handle your application from the beginning to the end.
We do not charge you when you apply from us. There is no credit card information required to apply here. Charges are the same as you apply from the sales counter.
First, you can apply online, we will get back to you immediately during business hour. WhatsApp/Email/Fax us your Photocopy of IC (for malaysian) / Passport (for foreigners). When we receive all the information, we will proceed with your application immediately.
Once we receive your application with complete information, we will process your application immediately during business hour. The contractor from the service provider will then contact you for installation appointment once your application is approved.
Enjoy greater savings and hassle-free bill payment in one single bill for both Astro and Broadband. You get to enjoy Astro and Broadband at discounted price every month over the contract period of 24 months.
Astro offers multiple TV packs including Entertainment, Sports, Movies and Kids options. You can choose a pack that matches your viewing preferences and add optional streaming apps where available.
Yes, you may subscribe to Astro TV packs without bundling broadband. However, bundling Astro TV with Fibre Broadband may provide better monthly savings and convenience with a single bill.
For small households with light streaming and browsing, 100Mbps is usually sufficient. Larger families, gamers or heavy streamers may benefit from 500Mbps or 1Gbps plans for smoother performance across multiple devices.
Most Astro TV and Fibre broadband plans come with a 24-month contract. Early termination charges may apply if cancellation is made before the contract ends.
Yes, you may upgrade your TV pack or broadband speed at any time, subject to eligibility and coverage. A new contract period may apply depending on the upgrade.
Your monthly bill will be issued directly by Astro. You may receive it via email or access it through your Astro account. Bundled customers will receive a single combined bill for TV and broadband services.
Payment methods may include online banking, auto debit, credit card or other approved payment channels provided by Astro. Our team can guide you during the registration process.
If you experience any service interruption, you may contact Astro customer support for technical assistance. In many cases, issues can be resolved remotely or a technician will be arranged if necessary.
Yes, relocation is subject to service availability at your new address. Relocation charges and contract adjustments may apply depending on your plan.
No, you do not need a credit card to submit your application. Payment setup will be arranged directly with Astro after your service is approved.
Selected Astro TV packs allow optional add-ons such as streaming services depending on current promotions and availability. Additional monthly charges may apply.
Yes, a WiFi router is typically provided during fibre installation. The router model may vary depending on the selected broadband speed plan.
Yes, we will check the service coverage at your address before proceeding with your application to ensure broadband is available at your location.
For Malaysians, please provide a copy of your MyKad. For foreigners, provide a copy of your passport when submitting your broadband application.
After your application is approved, the service provider typically contacts you within 2 to 7 working days to arrange the broadband installation appointment.
Most Astro Broadband plans come with a 24-month contract starting from your installation date. If you relocate, a new 24-month contract may apply at your new address.
Yes, you can relocate your broadband service, subject to service availability at the new address. Your contract may reset for another 24 months from the new installation date.
Yes, you may request to relocate broadband devices within your home. Non-standard installation charges may apply and are payable to the installer directly after assessment.
Yes, you can switch to Astro Broadband. To avoid service interruption, it is recommended to activate the new service before terminating your current broadband contract.
Standard installations may be free during promotions, but non-standard installations (e.g., device relocation or complex wiring) may incur extra charges payable directly to the installer.
You may call Astro's Contact Centre at 03-9543 3838 or wait for an Astro representative to be in contact with you within 2 working days to assist you with your order.
STEP 1
On your remote, press the HOME button and the home menu will be displayed on top of your screen.

STEP 2
Navigate to Settings.

STEP 3
Navigate to Video Resolution and press “OK”.

STEP 4
Navigate to your preferred selection and press “OK”.
Recommended to select Auto.

STEP 5
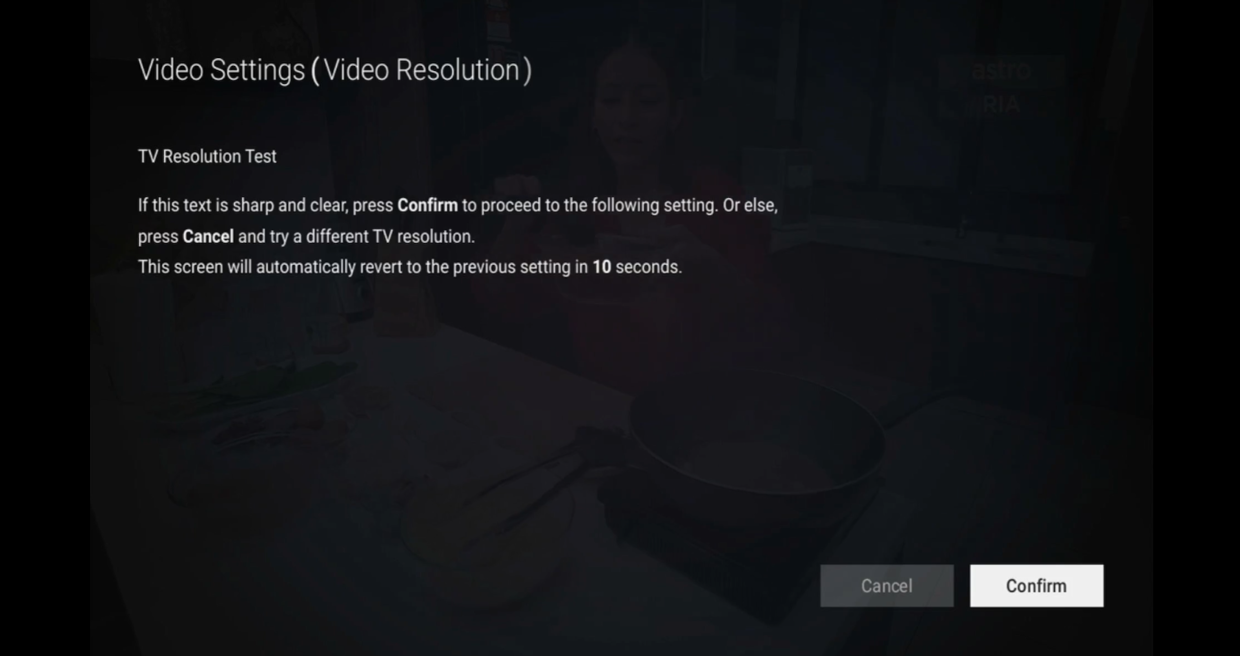
Navigate to Save and press "OK" to confirm your selection if able to read the text properly.
Otherwise, navigate to Cancel to revert to previous settings.
Kindly ensure that your mobile number is the same as the registered phone number of the Astro account holder as the OTP will only be sent to the registered number. For further assistance, please call or WhatsApp us at 03-9543 3838. Alternatively, you may submit a request via our online Feedback Form here: astro.com.my/contactus/form.aspx.
electronic Know-Your-Customer (eKYC) is an online process of identifying and verifying individual customers using electronic means. This enables a person to be an Astro customer anytime and anywhere, hassle-free and helps to secure your Astro account by protecting it from unauthorised usage.
Not to worry, you will only need to verify your Astro ID once. After that, you may log in to your account as usual.
Yes, you may cancel your Astro Fibre order before service activation, however, kindly note that there is a cancellation charge of RM212 (inclusive of SST) for any service cancellation done 48 hrs before scheduled appointment.
Your purchase will be reflected on your next monthly Astro bill. For example, if you rented a movie for RM 15.00 for 2 days and your next bill statement is in 2 weeks. RM 15.00 will be reflected in your Astro subscription bill in two weeks' time.
Astro subscribers will have the freedom to subscribe to Netflix via Astro, or they may also choose to continue subscribing via Netflix directly on their own.
Upon completion of the termination process, customer will receive one last closing bill stating the total amount due to Astro according to their billing option.
For customers who had opted to switch their billing option to e-bill or SMS bill, they will receive their final bill accordingly.
For customers who opted for paper bill, they will receive the final bill via paper bill. (The Paper Bill Charge will be applied).
STEP 1
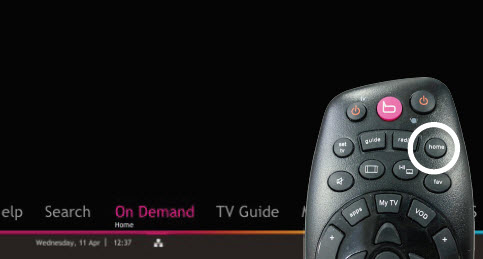
Press "HOME" button on your remote control.
STEP 2
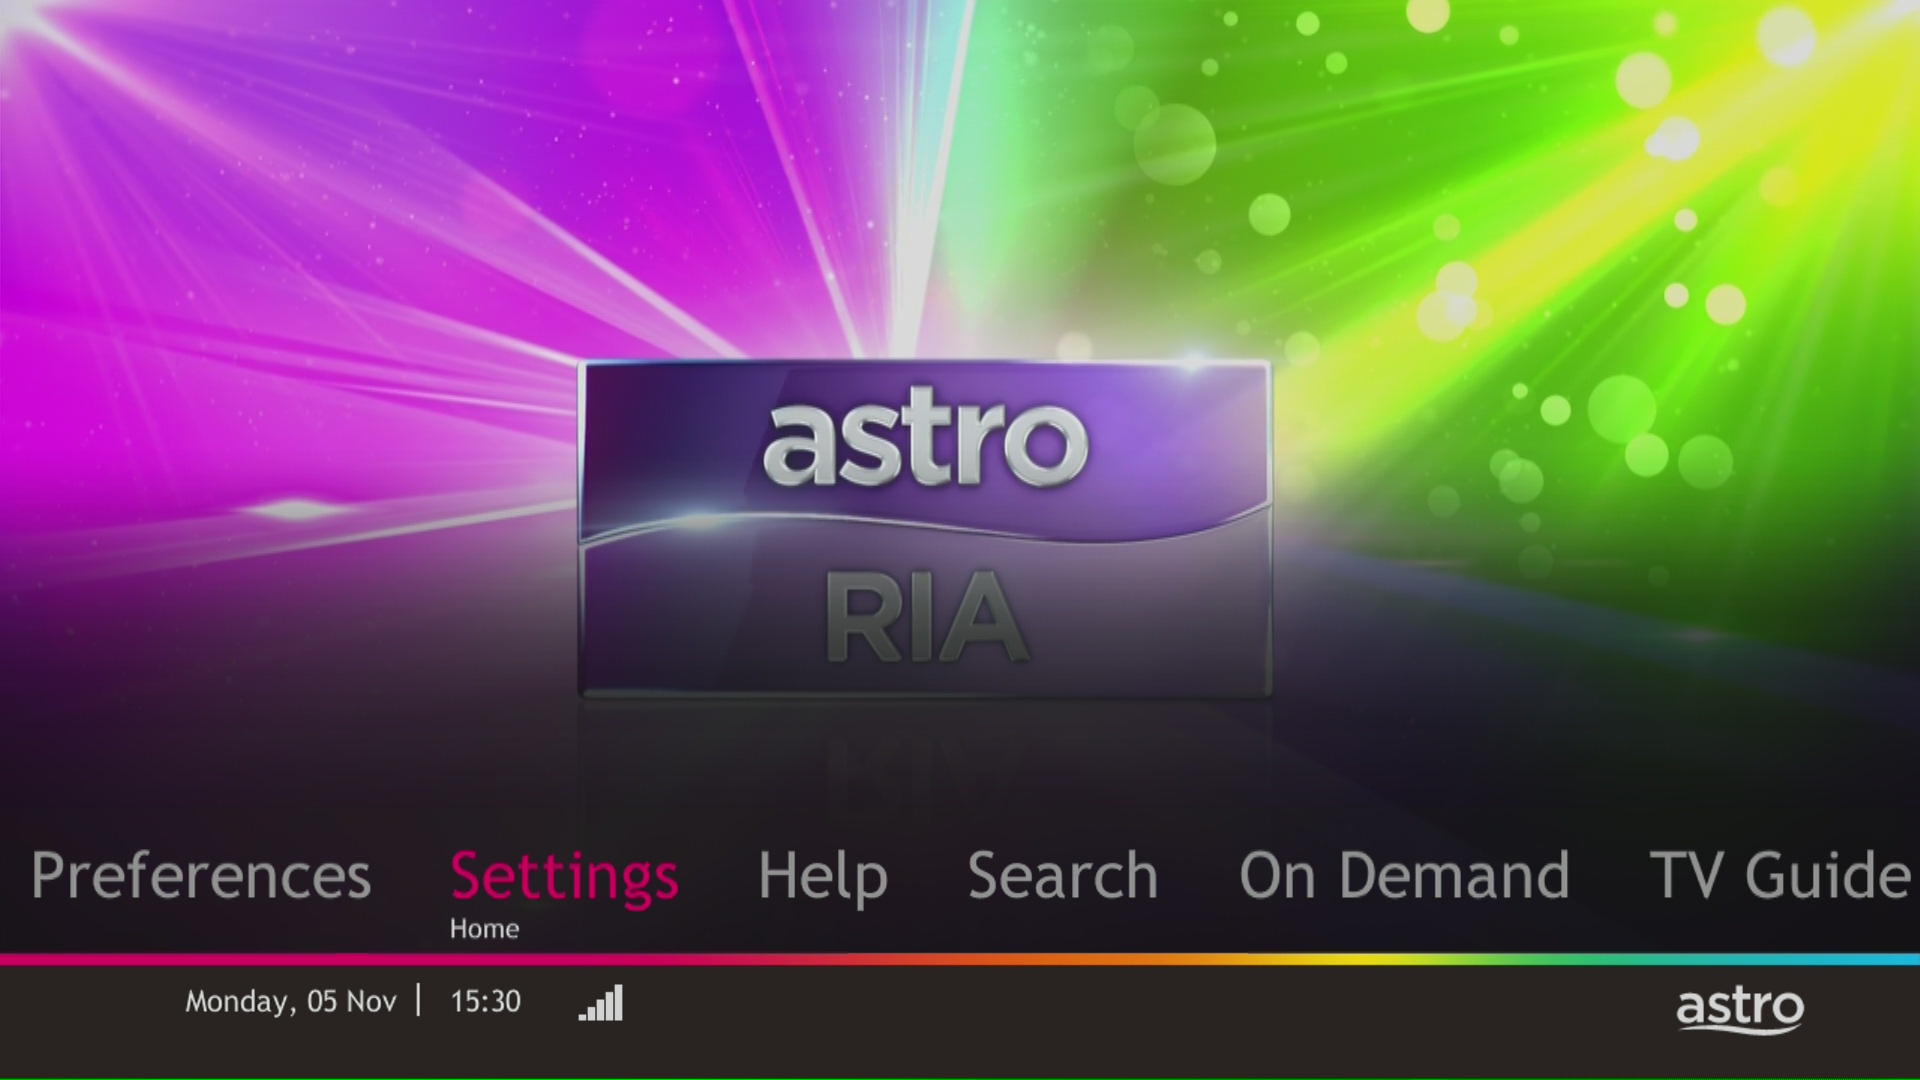
Navigate to Settings and press "OK".
STEP 3
Navigate to Display and press "OK".

STEP 4
Navigate to Resolution and press "OK".

STEP 5
Navigate to your preferred selection and press “OK”.

STEP 6
Select Yes, continue and press "OK" to confirm on the changes.
Otherwise, select No, go back to cancel.

- With numerous OTT entrants, consumers are suffering from subscription fatigue. In fact, they are looking for a one stop shop platform where OTT services are integrated in one place.
- Astro offers flexibility and convenience with new packs where customers can get the convenience of accessing a variety of content via Ultra Box as the single remote-control solution.
- In addition, there will be cost savings for Astro customers to purchase both Netflix and Astro together. Even better deals available if customers also subscribe to broadband for a better-connected experience.
BYOND / PVR / Ultra Box
To dismantle ONLY - FOC
To reinstall ONLY – RM65
To dismantle and reinstall - RM65
Broadband / IPTV
Relocation within 6 months of contract start will be charged a RM500.00 relocation fee, and the contract will be renewed to a new 24-month contract.
Relocation after 6 months of contract start will have their contract renewed to a new 24-month contract.
Note For IPTV Customers:
1. Upon relocation request, all exiting IPTV customers will be converted to our Astro & Broadband service. Customers can choose to have standard Astro service with satellite dish, or unicast Plug & Play without satellite dish.
2. If customers choose to have satellite dish, an additional RM150.00 will be charged for satellite installation. If customers choose to have unicast Plug & Play service, no satellite dish is required, hence no extra charge will be incurred.
*Please note that additional charges may apply if the reinstallation process requires extra cables/fixings.
For more info on the product including offers and setup, visit product.astro.com.my/multiroom
The Malaysia Communication and Multimedia Commission (MCMC)has issued a directive to all telecommunication companies (telcos) to block the sending and receiving of SMS with URL links. The move is aimed at preventing users from becoming victims of online scams. This exercise is applicable for all person-to-person SMS with URL links sent to or received from local and international mobile numbers, which has already taken effect as of 2 May 2023.
Please be informed that your service will be suspended if there is no payment after 31 days from your bill cycle date. After 62 days of non-payment, your service will be terminated, and an early cancellation fee will be applied if you are still within the 24-month contract.
For multi-frequency customers, RM10.00 is charged per physical bill generated.
Mac OS X
1. Click the Go tab in the top menu bar and select Utilities from the drop-down menu.
2. Type "network utility" in the search bar in the top right-hand corner of the Utilities window and then hit the "Enter" key on your keyboard.

3. Click the Network Utility icon to open the Network Utility window.
4. For Ping Test, select the Ping tab and then type the address you'd like to ping in the text box. Click Ping and wait for the ping results.

5. For Traceroute Test, select the Traceroute tab and then type the address you like to traceroute in the text box. Click Trace and wait for the traceroute results.

Windows 10
1. Click the Search icon (magnifying glass) in the bottom left-hand corner and type "cmd" into the search bar.

2. Select the Command Prompt app - it will be at the top of the list of search results as the best match.

3. A black box with a flashing cursor will open; this is the Command Prompt.
For Ping Test, type "ping" and then hit the Space bar on your keyboard. Type in the address you like to ping and then hit the Enter key on your keyboard. Wait for the ping results.

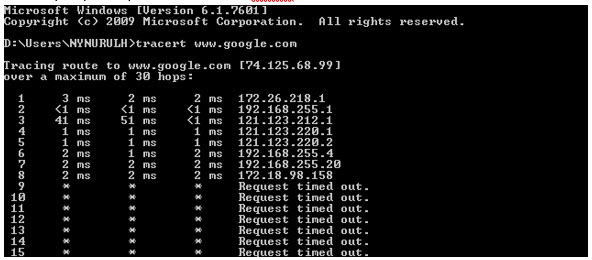
For Traceroute Test, type "tracert" and then hit the Space bar on your keyboard. Type in the address you like to trace and then hit the Enter key on your keyboard. Wait for the tracert results.

Windows 7 & Vista
1. Open the Start menu by clicking the Windows icon at the bottom left-hand corner of the screen.
2. Type "cmd" in the search bar at the bottom of the menu.
3. Click cmd found in the search results for Programs.

4. A black box with a flashing cursor will open; this is the Command Prompt.
For Ping Test, type "ping" and then hit the Space bar on your keyboard. Type in the address you like to ping and then hit the Enter key on your keyboard. Wait for the ping results.

For Traceroute Test, type "tracert" and then hit the Space bar on your keyboard. Type in the address you like to trace and then hit the Enter key on your keyboard. Wait for the traceroute results.

Windows 8
1. Move the mouse to the right-hand corner of the screen to make the vertical menu bar (charm bar) appear. Click Search.
2. Type "cmd" in the search bar and hit the Enter key on your keyboard.

3. Click cmd that found in the search results for Programs.
4. A black box with a flashing cursor will open; this is the Command Prompt.
For Ping Test, type "ping" and then hit the Space bar on your keyboard. Type in the address you like to ping and then hit the Enter key on your keyboard. Wait for the ping results.

For Traceroute Test, type "tracert" and then hit the Space bar on your keyboard. Type in the address you'd like to trace and then hit the Enter key on your keyboard. Wait for the traceroute results.
Windows XP
1. Click the Start button in the bottom left-hand corner of the screen.
2. Click the Run option in the right-hand column.

3. Type "cmd" in the text box and then hit the Enter key on your keyboard.
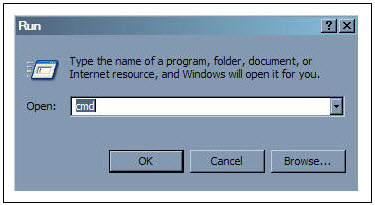
4. A black box with a flashing cursor will open; this is the Command Prompt.
For Ping Test, type "ping" and then hit the Space bar on your keyboard. Type in the address you'd like to ping and then hit the Enter key on your keyboard. Wait for the ping results.

For Traceroute Test, type "tracert" and then hit the Space bar on your keyboard. Type in the address you'd like to trace and then hit the Enter key on your keyboard. Wait for the tracert results.
STEP 1
On your remote, press the HOME button and the home menu will be displayed on top of your screen.
STEP 2
Navigate to Settings.
STEP 3
Navigate to Menu Language and press "OK".

STEP 4
Navigate to your preferred language selection and press “OK”.

Astro is continuously improving our user interface and introducing new features to our platforms to ensure that your Astro experience is more seamless, efficient and user-friendly.
For details on our latest interface, Picture-in-Picture mode and auto-start interactive mode on Astro GO, please click here.
In addition, we have also recently introduced a new look to the Title Information Page, the ability to disable the Profile Selection Screen and adjustable auto-standby timing. For more information, please click here.
Disney+ Hotstar is available on Chromecast (Gen 2 onwards, firmware 1.43 & above) and with the latest version of the Disney+ Hotstar app on iPhone, iPad and Android mobile.
Follow these instructions to cast your film/series:
- Make sure your mobile device and your Chromecast are on the same WiFi network
- Log into your Disney+ Hotstar app
- Select a film/series that you want to cast
- Press "Play'
- Once the film/series has started, tap on the casting icon
- Select the screen you wish to cast to
- The film/series should then be cast onto your screen
Astro is continuously improving our user interface and introducing new features to our platforms to ensure that your Astro experience is more seamless, efficient and user-friendly.
For details on our latest interface, Picture-in-Picture mode and auto-start interactive mode on Astro GO, please click here. For enhancements to the Title Information Page, the ability to disable the Profile Selection Screen and adjustable auto-standby timing, please click here.
In addition, we have also recently introduced an infinite scrolling feature at the title information page and the ability to select the video quality directly from the video player. For more information, please click here.
We are not able to transfer your existing Disney+ Hotstar access. To enjoy our bundle rates with one of our packages, simply sign up or renew your subscription to any of our new Packs for even better value and savings. Please visit astro.com.my to find out more.
Visit our page to find out about our new packs.
STEP 1
Identify your remote control:

a) Remote control with Astro logo at the bottom of the remote, proceed to STEP 2.
b) Remote control with Astro logo at the top of the remote, proceed to STEP 4
STEP 2 (Astro Logo at the bottom of the Remote)
On your remote, press the “set tv” button and set tv instructions will be displayed on top of your screen:

STEP 3
Follow the steps appear on the TV screen to sync your Astro remote and complete the setup.

STEP 4 (Astro Logo atthe top of the Remote)
Press and hold “tv input” key on bottom left of the remote for 3 seconds until the LED blinks twice.

STEP 5
Enter the 2-digit TV Code of your TV Brand and the LED will blink twice:

STEP 6
Try out the TV controls (TV Standby or adjust Volume) to check if they are working correctly.

STEP 7
Press ok and wait for the LED to blink twice to save the settings.
After order submission, the Plug & Play Box and Astro SIM card will be couriered separately to your service address. The delivery dates with the tracking numbers will be communicated via SMS.
The Plug & Play Box and Astro SIM card should arrive within 3-working days after your order submission. You may self-install your box by following the guide here.
We encourage you to upgrade your Astro experience by switching to our new packs to enjoy more choices, value and flexibility. Starting 9 November 2021, you would need to be subscribed to the new packages to make any changes to your subscription.
Please ensure you:
a. Have your original identification card “MyKad” (Front & Back) with you (Malaysian).
b. Have your original Passport & Visa with you (Non-Malaysian).
c. Are in a brightly lit environment
You can make changes to your Netflix plans that are included in your Bundle through My Astro app
You can change your non Astro-bundled a-la carte Netflix plan at any time by signing into Netflix.com and visiting the Account page, then selecting Change Plan to view and select available plans.
Unfortunately, you cannot link your direct Disney+ Hotstar subscription to your Astro account. Please ensure that the mobile number used for your direct subscription to Disney+ Hotstar is different from the mobile number used to activate Disney+ Hotstar entitlement via your Astro subscription. If you do not have an alternative mobile number to nominate, kindly contact Disney+ Hotstar's customer service directly at disneyplus.my@hotstar.com for details on how to cancel your direct subscription.
No, you will not be charged 8% Service Tax for paper billing option.
You can add a new Netflix account to your bill through CH 741 or clicking the Netflix button on the remote control. Please enter the email address you would like to use for Netflix subscription and ensure the Billing partner is Astro.
If you would like to transfer your existing Netflix Account to be charged under Astro bill, please follow the steps below:
- Cancel your existing subscription with Netflix
- Once the remaining duration of your existing subscription has ended, you may proceed to subscribe for Netflix via Astro bill
- To subscribe, go to CH 741 and enter the email address used for your previous subscription with Netflix
- Once successfully completed, all existing settings and watching history on your Netflix account will be brought over
Your purchased PPV daily pass will still be accessible to you for the purchased duration ie. 3, 5, 7 or 30 days respectively. However, you will no longer be able to purchase PPV daily passes from 8 Oct onward.
This convenient option allows you to complete your registration without the need to provide hard copy documents physically to the sales agent. The identity verification process helps to secure your Account and protect it from unauthorised usage.
You may visit any of Astro's digital platform that you would like to log into. Then, create a new Astro ID using your existing email address or mobile number. After creating your new Astro ID, please use it to log into our digital platforms moving forward.
Your cloud recording space will revert to 200 hours by default. If your current recordings exceed 200 hours, the system will delete the exceeded hours once you have stopped the Astro GO+ subscription starting with the oldest recordings first.
The new packs will be available for existing and new Astro customers starting 9 November 2021.
No, the Ulti Box does not support 4K UHD content. If you would like to watch Astro's 4K UHD content, please sign up for an Ultra box at Astro Ultra Box and Ulti Box | Astro.
Rebates/refunds are not provided. Early termination of the 3-months pass add on is subject to an early termination fee prorated to RM54.90 for the remaining months.

STEP 1
Switch on the power for your box and make sure that the adapter's power light is on.

STEP 2
Put the box on standby mode.

STEP 3
Press and hold the Home button on the box.

STEP 4
Wait until "boot" appear on the front panel and released.

STEP 5
New Installation Settings page will appear.
Click here for the guides to complete the setup.


STEP 1
Switch off the power of your box and ensure the adapter�s power light is off.

STEP 2
Switch on the power of your box and ensure the adapter�s power light is on.
STEP 3
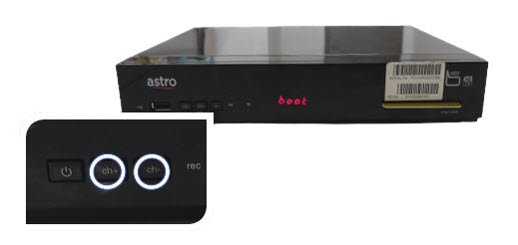
Press and hold the Ch+ and Ch- keys on the box simultaneously when the "boot" message appears on the front panel.
STEP 4
Wait until the "Clr" message appears on the front panel, then release the Ch+ and Ch- keys.

STEP 5
New Installation Settings page will appear.
Click here for the guides to complete the setup.

STEP 1
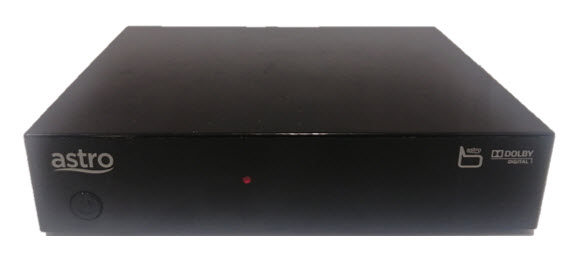
Ensure your box is on standby mode. (Red light on box's front panel).
STEP 2
Press and hold the Standby button. Wait until the LED at front panel change from red to green for 3 times, then release the button.
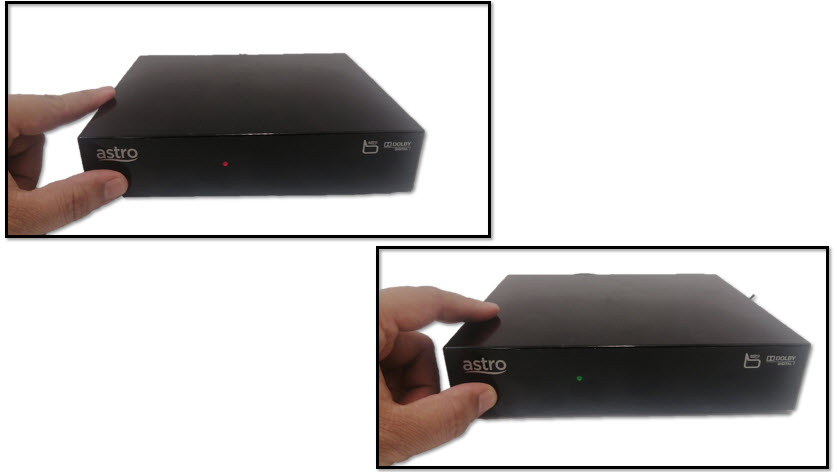
STEP 3
New Installation Settings page will appear.
Click here for the guides to complete the setup.

STEP 1
Switch off the power of your box and ensure that the adapter�s power light is off.
STEP 2
Switch on the power of your box and ensure that the adapter's power light is on.
STEP 3
Keep pressing the 'Power' button until the Startup Option screen appears.
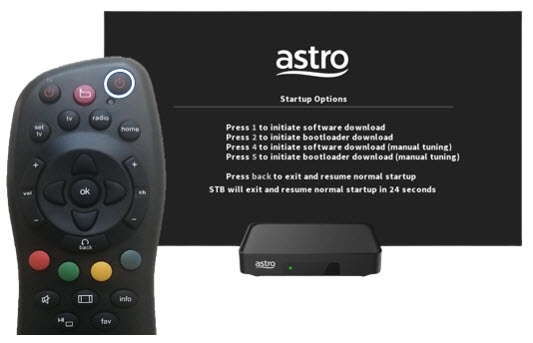
STEP 4
Press "369" on the remote control to trigger refresh box setting menu.
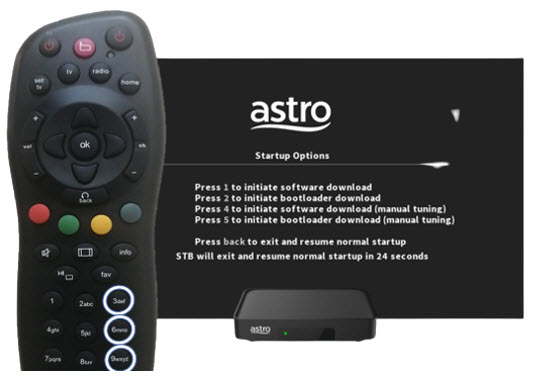
STEP 5
Press "OK" to proceed. The box will be refreshed to the original setting.

STEP 6
New Installation Settings page will appear.
Click here for the guides to complete the setup.
Of course not! It is a value added service introduced for your convenience. You will only be billed for any package take ups or service upgrades, which will be reflected in your next Astro invoice.
1. Ensure power cable is connected tightly.
2. Try to use another power socket / power source to eliminate faulty power sockets/power sources which could cause the issue.

3. If the issue persists, submit your feedback form for further assistance.
Please refer below for the installation and activation fees for Astro customers on the new pack.

STEP 1
Switch off the power for your box and make sure that the adapter's power light is off.

STEP 2A
Unplug the HDMI cable from your box and plug it back in securely. Do select the correct TV input.

STEP 2B
If you are connecting using RCA cable, please unplug the RCA cable from your box and plug it back in securely.

STEP 3
Switch on the power for your box and make sure that the adapter's power light is on.
Please wait for 5 minutes.

STEP 4
Turn on your box. You should no longer be experiencing this problem. If issue remain, replace to another HDMI cable.

If no improvement seen, please submit the issue in our Feedback Form and attach a picture of your smart card number for assistance.
For customers with the Ultra or Ulti Box, please ensure to provide your latest contact details to our Astro agent during the call to terminate your account, this includes your mobile number and house address. If you still need further help, please contact us at 03-9543 3838.
For customers with the Ultra or Ulti Box, you will be charged a fee of RM100 (not inclusive of Govt. tax) upon confirmation of lost Astro Box and Smart Card/SIM Card.
For lost Smart Card/SIM card only, you may be charged RM50 to obtain a replacement.
You may verify if your speed plan has been successfully upgraded during the installation process with your Astro installer before sign-off. If you would like to confirm the status of your speed upgrade after installation, you may contact Astro’s Contact Centre at 03-9543 1543 and an Astro agent will be available to assist you immediately.
1. Clearly indicate full name of Astro customer, contact number and Astro subscription account number when making each payment (e.g. on bank-in slips)
2. For Direct Debit, please contact your bank for standing instructions. Provide the full name of Astro customer and Astro account number. The Direct Debit service may not be available with all banks. Please check with your bank for confirmation of Direct Debit service.
3. Please inform us of any changes in billing address/information by contacting us via one of these platforms.
IMPORTANT NOTICE: To avoid any problems in payment processing, please pay only at authorised Astro payment channels
I am sorry you can't. While we understand the value customers see in choosing their preferred service/pack individually, the packaging of channels/services in the new packs are necessary for us to offer content/services at an affordable price to our customers.
You will be notified 30 days before the expiry on the renewal of subscription and can opt out from auto renewal at least (2) days before the auto-renewal date.
If you want to opt out of your auto-renewal for Disney+ Hotstar, please contact our Customer Contact Centre at 03 9543 3838 and speak to one of our customer service executives to change your package according to what suits you best at least two (2) days before the next auto-renewal date. Alternatively, please WhatsApp us at 03 9543 3838 and type "DH Help
Redemption should be done by the account holder. However, if the account holder is unavailable, immediate family members can make the redemption provided that the account holder has given them the permission to redeem using his account credentials.
