

Nationwide Installation
Applying for
| Maxis UniFi Astro Njoi |
Frequently Asked Questions
Find your answers here.
We provide one stop service to apply Astro and Broadband for you.
You can avoid driving and queuing at the sales counter. We are the dealer that can help you to handle your application from the beginning to the end.
We do not charge you when you apply from us. There is no credit card information required to apply here. Charges are the same as you apply from the sales counter.
First, you can apply online, we will get back to you immediately during business hour. WhatsApp/Email/Fax us your Photocopy of IC (for malaysian) / Passport (for foreigners). When we receive all the information, we will proceed with your application immediately.
Once we receive your application with complete information, we will process your application immediately during business hour. The contractor from the service provider will then contact you for installation appointment once your application is approved.
Enjoy greater savings and hassle-free bill payment in one single bill for both Astro and Broadband. You get to enjoy Astro and Broadband at discounted price every month over the contract period of 24 months.
Astro offers multiple TV packs including Entertainment, Sports, Movies and Kids options. You can choose a pack that matches your viewing preferences and add optional streaming apps where available.
Yes, you may subscribe to Astro TV packs without bundling broadband. However, bundling Astro TV with Fibre Broadband may provide better monthly savings and convenience with a single bill.
For small households with light streaming and browsing, 100Mbps is usually sufficient. Larger families, gamers or heavy streamers may benefit from 500Mbps or 1Gbps plans for smoother performance across multiple devices.
Most Astro TV and Fibre broadband plans come with a 24-month contract. Early termination charges may apply if cancellation is made before the contract ends.
Yes, you may upgrade your TV pack or broadband speed at any time, subject to eligibility and coverage. A new contract period may apply depending on the upgrade.
Your monthly bill will be issued directly by Astro. You may receive it via email or access it through your Astro account. Bundled customers will receive a single combined bill for TV and broadband services.
Payment methods may include online banking, auto debit, credit card or other approved payment channels provided by Astro. Our team can guide you during the registration process.
If you experience any service interruption, you may contact Astro customer support for technical assistance. In many cases, issues can be resolved remotely or a technician will be arranged if necessary.
Yes, relocation is subject to service availability at your new address. Relocation charges and contract adjustments may apply depending on your plan.
No, you do not need a credit card to submit your application. Payment setup will be arranged directly with Astro after your service is approved.
Selected Astro TV packs allow optional add-ons such as streaming services depending on current promotions and availability. Additional monthly charges may apply.
Yes, a WiFi router is typically provided during fibre installation. The router model may vary depending on the selected broadband speed plan.
Yes, we will check the service coverage at your address before proceeding with your application to ensure broadband is available at your location.
For Malaysians, please provide a copy of your MyKad. For foreigners, provide a copy of your passport when submitting your broadband application.
After your application is approved, the service provider typically contacts you within 2 to 7 working days to arrange the broadband installation appointment.
Most Astro Broadband plans come with a 24-month contract starting from your installation date. If you relocate, a new 24-month contract may apply at your new address.
Yes, you can relocate your broadband service, subject to service availability at the new address. Your contract may reset for another 24 months from the new installation date.
Yes, you may request to relocate broadband devices within your home. Non-standard installation charges may apply and are payable to the installer directly after assessment.
Yes, you can switch to Astro Broadband. To avoid service interruption, it is recommended to activate the new service before terminating your current broadband contract.
Standard installations may be free during promotions, but non-standard installations (e.g., device relocation or complex wiring) may incur extra charges payable directly to the installer.
Yes, a charge of up to RM20.00 may be imposed upon reconnection.
Please refer to the table below:

Note:
- The table above is an approximation of the cancellation fee. The final fees will be calculated at the end of your subscription/upon downgrade.
- Downgrade of Pack for Residential customers will be on basis of package ranking, whereas downgrade of pack for Astro & Broadband customer will be on basis of total monthly payment.
- Package ranking in descending order:
- Platinum Pack (highest rank)
- Premium Pack 1/2/3 (same rank across 3 options)
- Entertainment / Sports / Movies Plus Pack
- Entertainment / Sports / Movies Pack (same rank across 3 options)
- Primary Pack (lowest rank)
Please find some examples (for Residential customers) as below:
Termination
Customer signed up for Entertainment Plus Pack (24-month contract) with Ultra Box. Customer decided to terminate the subscription 8 months into the contract. As the customer still has 16 months remaining, the maximum applicable fee will be RM41.67 x 16months = RM666.67
Pack downgrade
Customer signed up for Movies Pack (24-month contract) with Ultra Box. 18 months in, customer decides to downgrade to Primary Pack (24-month contract). As the customer still has 6 months remaining, the maximum applicable fee will be RM20.83 x 6months = RM125
Dropping off Netflix or Disney+ Hotstar within first 12 months
Customer signed up for Entertainment Plus (24-month contract) with Ultra Box and 12-month commitment on Netflix App. 6 months in, customer decides to upgrade to Premium Pack 1 (24-month contract) which does not include Netflix App. As the customer still has 6 months remaining in the first 12 months of commitment for Netflix App, the maximum applicable fee will be RM41.67 x 6 months = RM250. Upon upgrading to Premium Pack 1, a new 12-month commitment for Disney+ Hotstar App begins alongside the 24-month contract on the package.
For customers who wish to have their physical tax invoices reprinted, there will be a flat fee of RM10.00 levied as part of the process which has been implemented since year 2015.
Yes, you can. If you are an existing Astro customer with the Disney+ Hotstar add-on option, your Disney+ Hotstar add-on option will be converted without any early termination charge upon your successful re-contract to eligible bundle packages.
There are 2 methods of setting maturity ratings restriction on Netflix:
Method 1 – Create a Kids Profile in Netflix App on Ultra/Ulti Box
- On the Netflix home menu, select “Switch Profile”
- Select Add Profile.
- Name the profile.
- Select Kids. Kids profiles have a logo 'Kids' on the profile icon so they are easy to identify.
- Select Continue. The new profile will show on the list of profiles on your account.
Method 2 – Manually set Viewing Restrictions for each profile
- Go to https://www.netflix.com/profiles/manage
- Select a Profile.
- Under Maturity Settings, select Edit.
- Enter your Netflix password.
- You may select the desired Maturity Rating settings or add a particular title restrictions for the profile.
- Select Save.
For more information kindly visit:
- https://help.netflix.com/en/node/114275
- https://help.netflix.com/en/node/114276
If you have forgotten your username or password, you may follow the steps below:
Step 1. Go to netflix.com
Step 2: Click on Sign In
Step 3: Click on "Need Help
Astro does not provide installment plan facilities. You are advised to pay your charges before the due date, as per your monthly bill statement.
No, customers are only allowed to choose ONE billing option (either Paper Bill or E-bill or SMS bill). However, customers who opted for Paper Bill will still be able to check their bills through Astro Self-Service Portal, IVR, Channel 200 and WhatsApp.
STEP 1
On your remote, press the HOME button and the home menu will be displayed on top of your screen.

STEP 2
Navigate to Settings.

STEP 3
Navigate to STB Diagnostics and press "OK".

STEP 4
Select General Diagnostics and press "OK".

STEP 5
Details information of General Diagnostics screen will be displayed.

STEP 6
Press down arrow on your remote to get more information.

Purchase function on Astro GO is only available for Android devices, Huawei devices and on the Astro GO website. For Apple device users, please head to astrogo.astro.com.my to make your purchase.
Purchase instruction:
Head to the Store section

Click on RENT

Enter Your PIN (Default PIN 0000)

Confirm to Purchase

Purchased Success. Enjoy!

You purchased content title will be available under "Rental" in My Library. All purchases on Astro GO will be added to your monthly bill and accessible on both Astro GO and your Astro decoder. Cancellation of purchase is not possible upon confirmation.
*Purchase of content is only available on Android & Huawei devices and on the Astro GO website*
If your existing Netflix account is linked with your Astro subscription, your Netflix account will resume on the previous method of payment. If you linked a new Netflix account with your Astro subscription, cancelling Astro service will also cancel your Netflix account.
Successful payment via JomPAY will be posted real time.
As a rule of thumb, this issue might happen when the devices are not equipped with minimum requirement above that supports the subscribed internet speeds:
- WiFi technology
- Network Interface Card (NIC)
As mentioned above however, it is important to note that despite meeting the device minimum requirements, it is not a guarantee that devices connected over WiFi will be able to achieve maximum subscribed internet speeds due to the following:
- Bad WiFi signal quality and coverage across the area due to:
- Distance from the RGW/Mesh AP with connected device
- Obstruction within the house (walls, metallic surfaces)
- Interference with other household appliances
- Congested bandwidth
- If there are too many devices connected to the WiFi network, then the bandwidth might be overloaded with traffic hence, slowing down the speed
- Devices are connected using WiFi instead of wired using LAN.
- It is important to note that wired connection offers better reliability and speed over WiFi.
- WiFi is more prone to interference compared to a wired connection which causes lower speeds and dropped signal.
- Router Positioning: Most people underestimate the importance of picking a good spot for a Wi-Fi router. Even a small shift in positioning could end up being the difference between day and night:
- High vs. Low: Put the router as high up as possible to extend the broadcasting range of the radio waves. This also helps clear the router of possible interferences.
- Concrete & Metals: Make sure your router isn’t blocked by any other objects, especially devices that are electronic. Also, avoid placing your router in your basement as this area is usually enclosed by a lot of concrete, which can be almost impossible for Wi-Fi signals to penetrate.
- Distance to Router: The further away from your router you get, the weaker the Wi-Fi signal. Therefore, the best option is to place your router as close to your devices as possible, but this is only practical if you have one main area where you tend to use your devices. Otherwise, you should place your router near the center of your home. After all, Wi-Fi broadcasts in 360 degrees, so it doesn’t make sense to put it at one end of the house.
- Usage
- More likely, however, is that the people on your network such as friends, roommates, or family members are participating in bandwidth-heavy activities like gaming and streaming Ultrabox/Netflix.
- Fortunately, if this is the case, you can prioritize your own network traffic by enabling Quality of Service in your router settings.
- If the problem persists, please run a Ping Test/Traceroute Test and attach the picture or screenshot of both test results in the Feedback Form below, in order for us to provide further assistances. Please make sure to attach the required screenshot(s) in ONE file (i.e. Microsoft Word document, PDF, Image file) before submitting the form.
Note:
Astro and its service providers will not offer any guarantees for compatibility of the customer's equipment (e.g., Personal Computer, Notebook, printers) nor provide on site troubleshooting for WiFi service issues related to the customer's equipment.
Astro Rewards is your free loyalty programme - a way for us to say thank you for being with us.
We're always adding new and exciting gifts, deals, and experiences for you - all ready and waiting in the My Astro app for you, right at your fingertips. Here's the best part, the longer you're with us, the better your rewards!

You may proceed with the following troubleshooting steps and it shouldn’t take you much longer than 15 minutes.
1. Please standby a computer/laptop to access to the internet and connection must be via LAN cable (connect the LAN cable to the Black port at D-Link Router and direct to the computer/laptop).
2. You may open any web browser such as Google Chrome, Internet Explorer, Mozilla Firefox and etc.
3. On the address bar, please go to http://dlinkrouter.local./ and below page will appear. (These are the defaults and if you have done a configuration on your router previously, the password may be different).
Username: admin
Password: (Leave the field blank)
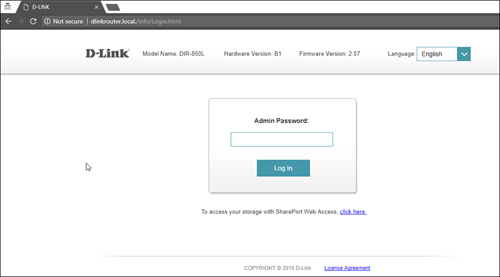
4. Once you have successfully login, the router's web-based setup page will appear. Please follow below steps for the configuration.

5. From the top menu, click Settings and then choose Wireless.

6. Below screen will appear to configure the wireless setting. Since this is a dual band router, you will have 2 Wi-Fi Names (SSID) i.e. 2.4GHz and 5GHz.
You may connect to any of the SSID, preferably with a stronger signal available.
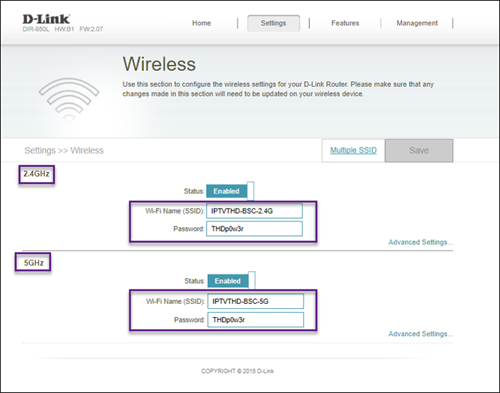
7. You may change the Wi-Fi Name (SSID) and the Password to follow your preferences, and then click "Save" for the changes to take place.
Please reconnect to the new wireless name with the new password once completed.
Please close and re-launc hthe Astro Fibre app, and you will be able to log in.
- Credit or Debit Cards
- Visa
- Mastercard
- Maybank2U - Pay using your Maybank2U account
- FPX - Pay using any local bank account via FPX
- E-Wallet - Touch "n Go
Most Astro customers are eligible to use the app, web, Ultra and Ulti boxes. You will only need to login with your Astro ID. Do note that your Astro ID must be linked to your Astro account to use the service. Click "Create now!' on the login page and you will be guided to create an Astro ID if you do not have one.
Your bill statement will include details of your monthly subscription charges; e.g. charges for your chosen Astro packages and Broadband service. It will also show the time period of which your first bill will cover, as well as indicate how much the total charges are and when the payment due date is.
Please ensure that your Astro subscription comes with access to Disney+ Hotstar. You may visit astro.com.my/disney to learn more about the Packs that come with Disney+ Hotstar or to check if your Disney+ Hotstar access is activated.
Upon confirmation that your subscription comes with access to Disney+ Hotstar, if you still see an error screen on your TV with your Ultra or Ulti Box when logging in to Disney+ Hotstar, please call our Customer Contact Centre at 03 9543 3838 and an Astro agent will be available to assist you immediately.
1. Unifi netis brand
The following shows an Interface based on Unifi router

- Launch Web Browser and enter the default's gateway's IP address (192.168.1.1) in the address bar.

- Enter Username and Password.
- Username = tmadmin
- Password = Adm@xxxx (xxxx refers to last four digits of MAC address)

- Choose WLAN -> wlan0 (2.4GHz) Basic Setting. Note down on SSID.

- Choose WLAN -> wlan1 (5GHz). Compare SSID with previous SSID.

- If SSID for wlan0 (2.4GHz) and wlan1 (5GHz) are the same. Change wlan1 (5GHz) SSID by adding number 5(i.e. ifuni_5G) to differentiate from 2.4 GHz. Click Apply Changes.
Note: Connection to Wi-Fi may be temporarily loss while the changes is updated.
We would need you to run few tests in order for us to understand your issue and to assist you in fixing the problem.
You may proceed with the troubleshooting steps below which should not require any longer than 15 minutes.
- Please run each of the tests according to your your Laptop/PC Software.
- Compile the pictures / screenshots of your test results in one file (i.e Microsof Word document, PDF file) and attach them in the Support Ticket below in order for us to assist you further:
- List of websites effected.
- Run the Speed Test via LAN (cable) and Wi-Fi connection - Please click here for Speed Test guideline.
- Run the Traceroute Test - Please click here for Traceroute Test guideline.
- Run the Ping Test - Please click here for Ping Test guideline.
- Once you/ve gathered all the results, kindly send them all through the Feedback Form below.
Quick Info
A Speedtest is a service that provides free analysis of Internet access parameters, such as connection data rate.
A Ping Test shows how long it takes for packets to reach host.
A Traceroute Test traces the route of packets to destination host from our server.
Step 1: Open your My Astro app
Step 2: Select "Astro Rewards"
Step 3: Scroll through your rewards to see what you're entitled to
Step 4: Select the rewards that take your fancy and follow the instructions stated on how to redeem them (redemption instructions may vary based on reward)
Advance payment is only applicable to Astro TV pack purchases. If you subscribe to an Astro Fibre+TV bundle, only one month of your TV subscription fee (excluding tax) is required to be paid upon sign-up. The full tax amount and the first-month subscription fee for Astro Fibre will be paid on your first month's bill.
This Disney+ Hotstar software update will be rolled out progressively to all Ulti Box customers starting 23 August 2022. Please be assured that you will be able to access the Disney+ Hotstar app on your Ulti Box soon.
If you need further assistance, please call our Customer Contact Centre or WhatsApp "DH Help
Connect your Ultra Box/Ulti Box today and get the full value for your subscription. We believe we can provide you the best entertainment experience in Malaysia, and it all starts with connecting your box to the internet.
Want to enjoy these features for free?
- Continue watching Astro even when it’s raining.
- Binge-watch and catch-up to 110,000 videos on-demand from Malaysia, Hollywood, Korea, China, Bollywood and more anytime.
- Create multiple profiles in your house to enjoy a personalized Astro experience, with shows recommended to you based on your interest. There is a Kids-friendly version for your little ones as well.
- Rewind, pause and fast-forward shows and matches so that you will never miss another moment.
STEP 1
On your remote, press the HOME button and the home menu will be displayed on top of your screen.

STEP 2
Navigate to Settings.

STEP 3
Scroll to Network Settings and press "OK". Select New Wi-Fi Connection and press "OK".


STEP 4
Select your Wi-Fi network and press "OK". Please enter the password to connect to your network.


STEP 5
You have successfully connected when this screen appears.

There are no extra charges as it is a value-added service introduced provided for your convenience.
The balance will be credited into your account, which will be reflected when you receive your next bill. The balance credit will be used to offset your bill balance.
STEP 1

Try to change channels on your Astro remote.
INDICATOR: LED blinking 3 times / NO LED blink
SOLUTION: Replace new battery
Proceed to Step 2.
INDICATOR: LED blinking 1 time
Confirm it's not your Astro remote faulty, let's proceed to Step 3.
STEP 2
If issue remain after the battery replacement, this might be due to a faulty Astro remote.
Try changing the channel manually directly from the box front panel (If any).
If it's working, you might need to replace your Astro remote.
You may walk-in to our nearest Customer Service Center for the replacement.

STEP 3
You need to refresh the box setting by initiate manually from box front panel.
Refer to Refresh Box setting Guide steps here.
STEP 1
Press "HOME" button on your remote control.

STEP 2
Navigate to Settings and press "OK".

STEP 3
Navigate to STB Diagnostics and press "OK".

STEP 4
Take a look at the Smart Card Status.

1. Power reset (on & off) your Modem and Router.
2. Ensure standard physical connection (No 3rd party devices connected to decoder and modem).
3. Please connect your computer or laptop to your Astro Fibre router using LAN cable. Your LAN cable must be connected from the yellow port of Astro Fibre router (Any available port).
4. Once connected, open any web browser such as Google Chrome, Internet Explorer, Mozilla Firefox and etc.
5. On the address bar, type https://testmyline.astro.com.my/ and below page will appear.

6.Click "GO", and the test will begin.

The test is completed once both download and upload speeds are displayed.
Sample of the Speedtest result is shown below.

**Please ensure the snapshot includes a time stamp and network used either LAN cable or wireless (as per picture above)
7. Kindly screenshot or take a picture of the result, name it as "LAN Speedtest" for test using LAN cable (wired connection).
8. Repeat the test once again using WiFi connection (Please unplug your LAN cable and connect via wireless connection using your SSID).
9. Screenshot or take a picture of the result, name it as "WiFi Speedtest".
If you did not receive the recovery email or verification code, please make sure that:
- You are inserting the correct email or mobile number you used to register for your Astro ID.
- Check your junk mailbox or spam folder.
To find out which email or phone number you have used to register your Astro ID, you may submit a feedback form. Kindly select feedback type "I have an enquiry/issue with Apps" choose "Astro GO"

We will get in touch with you within 48 hours to solve your enquirie
Depending on your service, it is mandatory to return some devices as per our T&Cs, whilst other devices should be disposed of and recycled at collection centres registered under the Department of Environment. To find out what you should do with your devices after service termination, please click here.
Starting 16 February 2024, you may be asked to perform Astro ID verification when you log in to their Astro account on digital platforms such as www.astro.com.my, Astro GO, My Astro etc. This 2-step process encompasses verifying your email address or phone number and re-entering of your existing password.
For Residential Astro Pay TV customers: Yes, you are allowed to change your package to the one that best suits your entertainment needs. You may make the following pack changes:
- Pack upgrades
- Movement within Entertainment, Movies or Sports (e.g., switching from Sports to Entertainment)
- Movement within Premium pack (to a different combination of content)
For these changes, you will remain on same contract duration, or you can choose to change to longer commitment. If you downgrade your packs, you will be charged a cancellation fee for pack, and you can then choose a new contract for the new pack. Kindly note additional contract details for Disney+ Hotstar and Netflix.
(Please refer to the section "Changes to your Astro Contract" for more details)
Rebates/refunds are not provided. Early termination of the 3-months pass add on is subject to an early termination fee prorated to RM54.90 for the remaining months.
Mac OS X
1. Click the Go tab in the top menu bar and select Utilities from the drop-down menu.
2. Type "network utility" in the search bar in the top right-hand corner of the Utilities window and then hit the "Enter" key on your keyboard.

3. Click the Network Utility icon to open the Network Utility window.
4. For Ping Test, select the Ping tab and then type the address you'd like to ping in the text box. Click Ping and wait for the ping results.

5. For Traceroute Test, select the Traceroute tab and then type the address you like to traceroute in the text box. Click Trace and wait for the traceroute results.

Windows 10
1. Click the Search icon (magnifying glass) in the bottom left-hand corner and type "cmd" into the search bar.

2. Select the Command Prompt app - it will be at the top of the list of search results as the best match.

3. A black box with a flashing cursor will open; this is the Command Prompt.
For Ping Test, type "ping" and then hit the Space bar on your keyboard. Type in the address you like to ping and then hit the Enter key on your keyboard. Wait for the ping results.

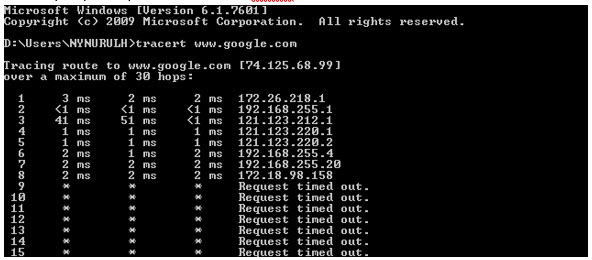
For Traceroute Test, type "tracert" and then hit the Space bar on your keyboard. Type in the address you like to trace and then hit the Enter key on your keyboard. Wait for the tracert results.

Windows 7 & Vista
1. Open the Start menu by clicking the Windows icon at the bottom left-hand corner of the screen.
2. Type "cmd" in the search bar at the bottom of the menu.
3. Click cmd found in the search results for Programs.

4. A black box with a flashing cursor will open; this is the Command Prompt.
For Ping Test, type "ping" and then hit the Space bar on your keyboard. Type in the address you like to ping and then hit the Enter key on your keyboard. Wait for the ping results.

For Traceroute Test, type "tracert" and then hit the Space bar on your keyboard. Type in the address you like to trace and then hit the Enter key on your keyboard. Wait for the traceroute results.

Windows 8
1. Move the mouse to the right-hand corner of the screen to make the vertical menu bar (charm bar) appear. Click Search.
2. Type "cmd" in the search bar and hit the Enter key on your keyboard.

3. Click cmd that found in the search results for Programs.
4. A black box with a flashing cursor will open; this is the Command Prompt.
For Ping Test, type "ping" and then hit the Space bar on your keyboard. Type in the address you like to ping and then hit the Enter key on your keyboard. Wait for the ping results.

For Traceroute Test, type "tracert" and then hit the Space bar on your keyboard. Type in the address you'd like to trace and then hit the Enter key on your keyboard. Wait for the traceroute results.
Windows XP
1. Click the Start button in the bottom left-hand corner of the screen.
2. Click the Run option in the right-hand column.

3. Type "cmd" in the text box and then hit the Enter key on your keyboard.
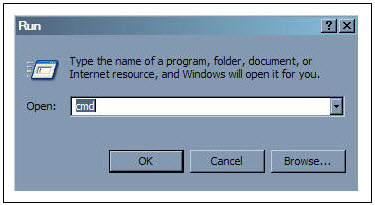
4. A black box with a flashing cursor will open; this is the Command Prompt.
For Ping Test, type "ping" and then hit the Space bar on your keyboard. Type in the address you'd like to ping and then hit the Enter key on your keyboard. Wait for the ping results.

For Traceroute Test, type "tracert" and then hit the Space bar on your keyboard. Type in the address you'd like to trace and then hit the Enter key on your keyboard. Wait for the tracert results.
"Payment Due Date" refers to the payment deadline for your Astro bills each month.
Your cloud recording space will revert to 200 hours by default. If your current recordings exceed 200 hours, the system will delete the exceeded hours once you have stopped the Astro GO+ subscription starting with the oldest recordings first.
Astro ID is the account you use to sign in and manage all your Astro services online. You can use your Astro ID for the following Astro apps and portals:
- My Astro
- Astro GO
- HBO GO
- Disney+ Hotstar
- iQIYI
- TVBAnywhere+
- beIN Sports Connect
- SYOK App
- AWANI App
- Astro Website
- Ideaktiv portals
You can create an Astro ID using your mobile number or email address here. To secure your Astro ID, please proceed to next step and link the ID to your Astro account number (10 digits) or smart card number (12 digits).
Please ensure to put your box on standby mode to refresh the signal.
a. Using IVR
1. Dial 03-95433838 and select you preferred language.
2. Select Account Related.
3. Select Technical Assistance.
4. Select Refresh Smartcard.
b. Using MyAstro web
STEP 1
Go to https://myastro.astro.com.my/ in your web browser.
STEP 2
Key-in your Email / Mobile number and password. Then, press LOG IN.
STEP 3
Click on TV pack.
STEP 4
Choose Main Room for the Primary Box; else choose Multiroom (If any).
STEP 5
Click on "Refresh" to refresh signal on your box.
For Main Box
For Multiroom
STEP 6
After tap the Refresh, below notification will be displayed as below.
For Main Box
For Multiroom
c. Using MyAstro App
STEP 1
Open myAstro App and click "Login".
STEP 2
Key-in your Email / Mobile number and password. Then, press "LOG IN".
STEP 3
Go to "Account".
STEP 4
Scroll down to "TV pack" and click on it.
STEP 5
Choose Main Room for the Main Box; else choose Multiroom (If any).
STEP 6
Tap on "Refresh" to refresh signal on your box.
For Main Box
For Multiroom
STEP 7
After tap the Refresh, below notification will be displayed as below.
For Main Room
For Multiroom
You can add on Astro Fibre, our own internet service to your existing TV Pack for even more value and savings. Please click here to learn more about Astro Fibre.
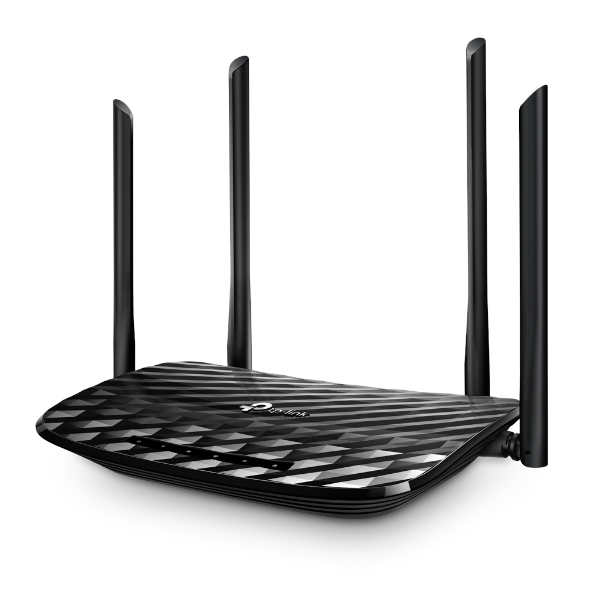
- Please standby computer/laptop to access to the internet and connection must be via (cable) [Connect the LAN (cable) to the yellow port in Maxis Router and direct to computer/laptop].
- You may open any web browser such as Google Chrome, Internet Explorer, Mozilla Firefox and etc.
- On the address bar, please go to http://192.168.0.1 or www.tplinkwifi.net and below page will appear.

The default login of the router is available on the sticker at the back of the router. If you have done a configuration on your router previously, the password may be different
4. Once you have successfully login, the router's web-based setup page will appear. Please follow below steps for the configuration.

5. From the top menu, choose Basic and then click Wireless tab on the left menu to access to below screen.

6. Since this is a dual band router, you will have 2 Wireless Network Names (SSID) i.e. 2.4GHz and 5GHz. You may connect to any of the SSID, preferably with a stronger signal available.
7. You may change the Wireless Network Name (SSID) and the Password to follow your preferences, then click "Save" for the changes to take place.
Please reconnect to the new wireless name with the new password once completed.
For any NJOI-related information, please visit the NJOI Help & Support page at https://purchase.njoi.com.my/en-support

You may proceed with the following troubleshooting steps and it shouldn't take you much longer than 15 minutes.
1. Please standby a computer/laptop to access to the internet and connection must be via LAN cable (connect the LAN cable to the Black port at D-Link Router and direct to the computer/laptop).
2. You may open any web browser such as Google Chrome, Internet Explorer, Mozilla Firefox and etc.
3. On the address bar, please go to http://dlinkrouter.local./ and below page will appear. (These are the defaults and if you have done a configuration on your router previously, the password may be different)
Username: admin
Password: (Leave the field blank)

4. Once you have successfully login, the router's web-based setup page will appear. Please follow below steps for the configuration.

5. From the top menu, click Settings and then choose Wireless.

6. Below screen will appear to configure the wireless setting. Since this is a dual band router, you will have 2 Wi-Fi Names (SSID); i.e. 2.4GHz and 5GHz.
i. For 2.4GHz setting, click Advanced Settings to display more available options.

ii. To change the channel, click the drop-down arrow for Wi-Fi Channel, then select your desired channel.
Choose between 1 to 13 (Suggested channels : 1,6,11). Click Save for the changes to take place.
The router will auto reboot and connection will re-establish after few minutes.

iii. Next, for 5GHz setting, click Advanced Settings to display more available options to make changes on the wireless channel for 5GHz.

iv. Click the drop-down arrow for Wi-Fi Channel, then select your desired channel from the selection.

v. Click Save for the changes to take place. The router will auto reboot and connection will re-establish after few minutes.
Yes, starting 9 November 2021, these new packs will be Astro's default offering.

Disabling band steering means that there will be two frequency bands available for the users - 2.4GHz and 5GHz.
Note: Band Steering is called Dual-band Combination in the router web interface.
- Please connect your computer or laptop to your Astro Fibre router using LAN cable. Your LAN cable must be connected from the yellow port of Astro Fibre router (Any available port).
- Once connected, open any web browser such as Google Chrome, Internet Explorer, Mozilla Firefox and etc.
- On the address bar, type http://192.168.100.254 and below page will appear.

Login using your username and password if you have changed the router login setting. Otherwise, your default router login is as per below.
Username: user
Password: user
4. Once you have successfully logged in, the router's web-based setup page will appear.

5. At the top of the page, click Wi-Fi to configure the WiFi parameters.

6. Click on Dual-band Combination button to disable the Band Steering.

7. Set the Wi-Fi name and Wi-Fi Password for both 2.4GHz and 5GHz bands based on your preference. Then click "Apply" for the changes to take place.

8. Kindly ensure to reconnect your WiFi according your new WiFi name and password.
No there will not be any penalty.
For the Multiroom subscription on a box setup, if your subscription is within the 24-month contractual period. Then a pro-rated penalty of RM600 will be applied for any Astro box except for Ultra Box, which the penalty will be RM1,000.
To reconnect your Astro account, please check your Account status, Bill Summary and pay on Astro Quick Pay. Your disconnected services will resume within 1 hour after you have paid your "Total Overdue Charges"
No, the eKYC verification process must be done by the individual themselves, using their MyKad and selfie in real-time.
