
A free satellite TV service from Astro. Watch lifetime entertainment, news, learning & information and more.
Pictures for illustration only.
Enjoy free access to 15+ TV channels & 10+ radio channels.
* Subject to Astro terms & conditions.


Step-1 |
Step-2 |
Step-3 |
Choose a plan & sign-up online. |
Sit back & wait for installation. |
Enjoy your new Astro / Broadband! |
A free satellite TV service from Astro. Watch lifetime entertainment, news, learning & information and more.
Pictures for illustration only.
New decoder only without satellite dish & cabling. You must have Astro/Njoi satellite dish and cable installed and working properly.
Including installation.
New decoder complete with satellite dish & cabling.
Including installation.
Applying for
| Njoi Astro UniFi Maxis |
Find your answers here.
We provide one stop service to apply Astro and Broadband for you.
You can avoid driving and queuing at the sales counter. We are the dealer that can help you to handle your application from the beginning to the end.
We do not charge you when you apply from us. There is no credit card information required to apply here. Charges are the same as you apply from the sales counter.
First, you can apply online, we will get back to you immediately during business hour. WhatsApp/Email/Fax us your Photocopy of IC (for malaysian) / Passport (for foreigners). When we receive all the information, we will proceed with your application immediately.
Once we receive your application with complete information, we will process your application immediately during business hour. The contractor from the service provider will then contact you for installation appointment once your application is approved.
Enjoy greater savings and hassle-free bill payment in one single bill for both Astro and Broadband. You get to enjoy Astro and Broadband at discounted price every month over the contract period of 24 months.
Astro offers multiple TV packs including Entertainment, Sports, Movies and Kids options. You can choose a pack that matches your viewing preferences and add optional streaming apps where available.
Yes, you may subscribe to Astro TV packs without bundling broadband. However, bundling Astro TV with Fibre Broadband may provide better monthly savings and convenience with a single bill.
For small households with light streaming and browsing, 100Mbps is usually sufficient. Larger families, gamers or heavy streamers may benefit from 500Mbps or 1Gbps plans for smoother performance across multiple devices.
Most Astro TV and Fibre broadband plans come with a 24-month contract. Early termination charges may apply if cancellation is made before the contract ends.
Yes, you may upgrade your TV pack or broadband speed at any time, subject to eligibility and coverage. A new contract period may apply depending on the upgrade.
Your monthly bill will be issued directly by Astro. You may receive it via email or access it through your Astro account. Bundled customers will receive a single combined bill for TV and broadband services.
Payment methods may include online banking, auto debit, credit card or other approved payment channels provided by Astro. Our team can guide you during the registration process.
If you experience any service interruption, you may contact Astro customer support for technical assistance. In many cases, issues can be resolved remotely or a technician will be arranged if necessary.
Yes, relocation is subject to service availability at your new address. Relocation charges and contract adjustments may apply depending on your plan.
No, you do not need a credit card to submit your application. Payment setup will be arranged directly with Astro after your service is approved.
Selected Astro TV packs allow optional add-ons such as streaming services depending on current promotions and availability. Additional monthly charges may apply.
Yes, a WiFi router is typically provided during fibre installation. The router model may vary depending on the selected broadband speed plan.
Yes, we will check the service coverage at your address before proceeding with your application to ensure broadband is available at your location.
For Malaysians, please provide a copy of your MyKad. For foreigners, provide a copy of your passport when submitting your broadband application.
After your application is approved, the service provider typically contacts you within 2 to 7 working days to arrange the broadband installation appointment.
Most Astro Broadband plans come with a 24-month contract starting from your installation date. If you relocate, a new 24-month contract may apply at your new address.
Yes, you can relocate your broadband service, subject to service availability at the new address. Your contract may reset for another 24 months from the new installation date.
Yes, you may request to relocate broadband devices within your home. Non-standard installation charges may apply and are payable to the installer directly after assessment.
Yes, you can switch to Astro Broadband. To avoid service interruption, it is recommended to activate the new service before terminating your current broadband contract.
Standard installations may be free during promotions, but non-standard installations (e.g., device relocation or complex wiring) may incur extra charges payable directly to the installer.
STEP 1
On your remote, press the HOME button and the home menu will be displayed on top of your screen.

STEP 2
Navigate to Settings.

STEP 3
Navigate to STB Diagnostics and press "OK".

STEP 4
Select Network Diagnostics and press "OK".

STEP 5
Details information of Network Diagnostics screen will be displayed.

No, your rewards cannot be transferred to another person or exchanged for cash.
1. Ensure power cable is connected tightly.
2. Try to use another power socket / power source to eliminate faulty power sockets/power sources which could cause the issue.

3. If the issue persists, submit your feedback form for further assistance.
By keying in the 10-digit account number, Astro will be able to provide better self-service options, as it allows Astro to customise automation options based on the needs of each customer's account.
STEP 1
On your remote, press the HOME button and the home menu will be displayed on top of your screen.
STEP 2
Navigate to Settings.
STEP 3
Navigate to STB Diagnostics and press "OK".
STEP 4
Select General Diagnostics and press "OK".

STEP 5
Details information of General Diagnostics screen will be displayed.

STEP 6
Press down arrow on your remote to get more information.

Payment for Astro services will not increase. However, the Service Tax applicable will be increased from 6% to 8% and this will result in an increase in the total amount payable.
You can recover your Netflix login here or at astro.com.my/Netflix
Step 1: Head to astro.com.my/Netflix
Step 2: At the FAQ section look for "How to recover my Netflix login email and password
1. Ensure Modem/Router are connected tightly to the power socket.

2. Try to use another power socket / power source to eliminate faulty power sockets/power sources which could cause the issue.

3. If issue persists, submit your Feedback Form for further assistance.
My Astro app and web is currently available in English and Bahasa Malaysia only.
Please ensure that your Astro subscription comes with access to Disney+ Hotstar. You may visit astro.com.my/disney to learn more about the Packs that come with Disney+ Hotstar or to check if your Disney+ Hotstar access is activated.
Upon confirmation that your subscription comes with access to Disney+ Hotstar, if you still see an error screen on your TV with your Ultra or Ulti Box when logging in to Disney+ Hotstar, please call our Customer Contact Centre at 03 9543 3838 and an Astro agent will be available to assist you immediately.
Astro Rewards is open to all *Active Astro PayTV customers and their immediate family members
* "Active Astro customer" refers to subscriber of the Astro Service and whose account is current and active with no outstanding payments due and owing to Astro and who has not breached the Astro subscription agreement nor given any instructions to terminate and /or suspend his/her subscription to the Astro Service as at the date of winner notification. Winners must remain active Astro customers until the date of collection of prizes.
Please follow the steps below to verify your Astro ID:

At this point in time, the Disney+ Hotstar app on the Ultra or Ulti Box does not support Dolby audio. We are working to enable this in a future update.
To continue enjoying your PVR decoder and service, you must maintain a minimum monthly subscription fee of RM60 (not inclusive of the recording fee and Govt. Tax).
Astro & Broadband comes with 24-month contract commitment.
Astro ID and / or account deletion is permanent. Upon deletion, it will be unlinked from your TV subscription account and you will be logged out from all the associated Astro apps and / or services connected including the partner apps that you have logged in using the same Astro ID. If you have any queries regarding Astro ID or would like to request for Astro ID account deletion, click on submit your request here, fill in the required details and our Astro representative will get back to you within 3 business days for security verification purposes.
Please visit any of Astro’s digital platform that you would like to log into, such as Astro’s official website (www.astro.com.my). Then, create a new Astro ID using your email address or mobile number by clicking “No Astro ID? Create Now!”. After creating your new Astro ID, please use it to log into our digital platforms moving forward.
If you have an active Astro subscription, you may also link it to your Astro ID. Please click here for the guide.
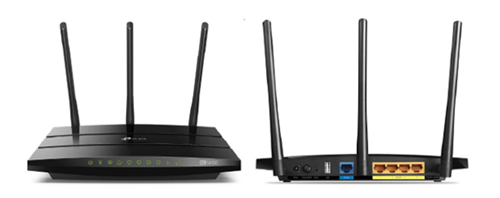
You may proceed with the following troubleshooting steps and it shouldn’t take you much longer than 15 minutes.
1. Please standby a computer/laptop to access to the internet and connection must be via LAN cable (connect the LAN cable to the Black port at D-Link Router and direct to the computer/laptop).
2. You may open any web browser such as Google Chrome, Internet Explorer, Mozilla Firefox and etc.
3. On the address bar, please go to tplinkwifi.net and to access to below login page. Type the Username and Password, then click "Login".

The default login of the router is available on the sticker at the back of the router. If you have done a configuration on your router previously, the password may be different)
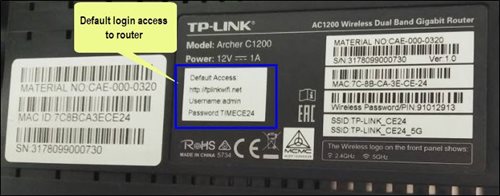
For example, below is the login details of the above router:
Username: admin
Password: TIMECE24
4. Once you have successfully login, the router's web-based setup page will appear. Please follow below steps for the configuration.
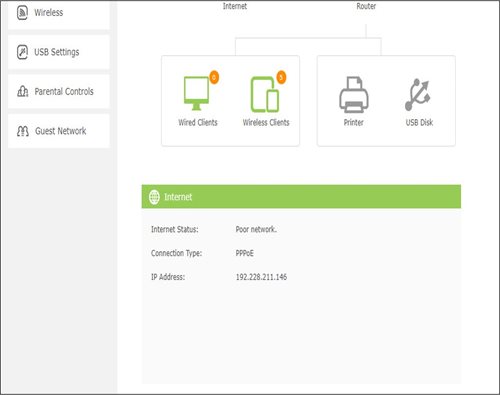
5. From the top menu, choose Basic and then click Wireless tab on the left menu to access to below screen.

6. Since this is a dual band router, you will have 2 Wireless Network Names (SSID) i.e. 2.4GHz and 5GHz. You may connect to any of the SSID, preferably with a stronger signal available.
7. You may change the Wireless Network Name (SSID) and the Password to follow your preferences, then click "Save" for the changes to take place.
Please reconnect to the new wireless name with the new password once completed.
The new packs will be available for existing and new Astro customers starting 9 November 2021.
STEP 1
On your remote, press the HOME button and the home menu will be displayed on top of your screen.
STEP 2
Navigate to Settings.
STEP 3
Navigate to Network Settings and press "OK".

STEP 4
Navigate to Network Diagnostics and press "OK".

STEP 5
Network Diagnostics screen will be displayed accordingly.

Although anyone can create an Astro ID, only the Astro account owner is allowed to link their account to the Astro ID. Otherwise, you will need permission from the account's owner in order to complete the linking.
Please note that charges will be on a monthly basis (RM18.30/month) and this subscription is subject to a 3-months contract.
If you are facing technical issues, please contact us at wecare@astro.com.my or call/WhatsApp us at 03-9543 3838.
You may reach out to Astro's customer service at 03-95433838 if you think there's an error regarding your redemption or rewards.
Yes, customers whose accounts are suspended but resumed within 24 months from their offer period start date will still be able to enjoy the internet speed upgrade upon service resumption. However, the speed upgrade offer period will not be extended despite the suspension period.
Unfortunately, customers whose accounts are suspended but resumed after 24 months from their offer period start date will not be able to receive the free speed upgrade.

3. Click the Network Utility icon to open the Network Utility window.
4. For Ping Test, select the Ping tab and then type the address you'd like to ping in the text box. Click Ping and wait for the ping results.

5. For Traceroute Test, select the Traceroute tab and then type the address you like to traceroute in the text box. Click Trace and wait for the traceroute results.

1. Click the Search icon (magnifying glass) in the bottom left-hand corner and type "cmd" into the search bar.

2. Select the Command Prompt app - it will be at the top of the list of search results as the best match.

3. A black box with a flashing cursor will open; this is the Command Prompt.
For Ping Test, type "ping" and then hit the Space bar on your keyboard. Type in the address you like to ping and then hit the Enter key on your keyboard. Wait for the ping results.

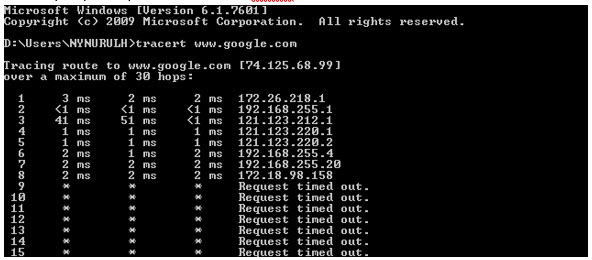
For Traceroute Test, type "tracert" and then hit the Space bar on your keyboard. Type in the address you like to trace and then hit the Enter key on your keyboard. Wait for the tracert results.

1. Open the Start menu by clicking the Windows icon at the bottom left-hand corner of the screen.
2. Type "cmd" in the search bar at the bottom of the menu.
3. Click cmd found in the search results for Programs.

4. A black box with a flashing cursor will open; this is the Command Prompt.
For Ping Test, type "ping" and then hit the Space bar on your keyboard. Type in the address you like to ping and then hit the Enter key on your keyboard. Wait for the ping results.

For Traceroute Test, type "tracert" and then hit the Space bar on your keyboard. Type in the address you like to trace and then hit the Enter key on your keyboard. Wait for the traceroute results.

1. Move the mouse to the right-hand corner of the screen to make the vertical menu bar (charm bar) appear. Click Search.
2. Type "cmd" in the search bar and hit the Enter key on your keyboard.

3. Click cmd that found in the search results for Programs.
4. A black box with a flashing cursor will open; this is the Command Prompt.
For Ping Test, type "ping" and then hit the Space bar on your keyboard. Type in the address you like to ping and then hit the Enter key on your keyboard. Wait for the ping results.

For Traceroute Test, type "tracert" and then hit the Space bar on your keyboard. Type in the address you'd like to trace and then hit the Enter key on your keyboard. Wait for the traceroute results.
1. Click the Start button in the bottom left-hand corner of the screen.
2. Click the Run option in the right-hand column.

3. Type "cmd" in the text box and then hit the Enter key on your keyboard.
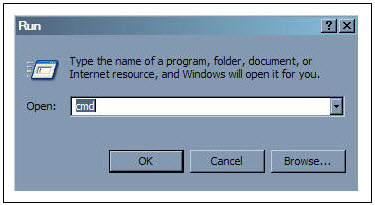
4. A black box with a flashing cursor will open; this is the Command Prompt.
For Ping Test, type "ping" and then hit the Space bar on your keyboard. Type in the address you'd like to ping and then hit the Enter key on your keyboard. Wait for the ping results.

For Traceroute Test, type "tracert" and then hit the Space bar on your keyboard. Type in the address you'd like to trace and then hit the Enter key on your keyboard. Wait for the tracert results.
Regular (DTH) customers can watch Astro without an Internet connection. If you have selected Plug & Play setup option, a minimum speed of 10Mbps/device is required to enjoy a good HD viewing experience on Ultra/Ulti¯Box and 30Mbps/device for 4K UHD viewing on Ultra Box. However, if you have selected the Regular (DTH) option, the internet speeds above are recommended to enjoy a good viewing experience for On Demand and Astro Cloud services.

STEP 1
Switch on the power for your box and make sure that the adapter's power light is on.

STEP 2
Put the box on standby mode.

STEP 3
Press and hold the Home button on the box.

STEP 4
Wait until "boot" appear on the front panel and released.

STEP 5
New Installation Settings page will appear.
Click here for the guides to complete the setup.


STEP 1
Switch off the power of your box and ensure the adapter�s power light is off.

STEP 2
Switch on the power of your box and ensure the adapter�s power light is on.
STEP 3
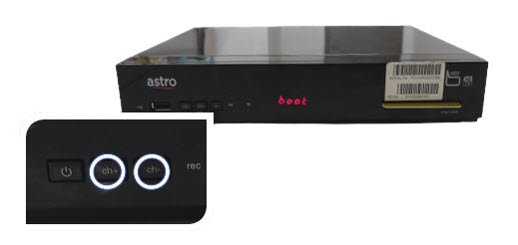
Press and hold the Ch+ and Ch- keys on the box simultaneously when the "boot" message appears on the front panel.
STEP 4
Wait until the "Clr" message appears on the front panel, then release the Ch+ and Ch- keys.

STEP 5
New Installation Settings page will appear.
Click here for the guides to complete the setup.

STEP 1
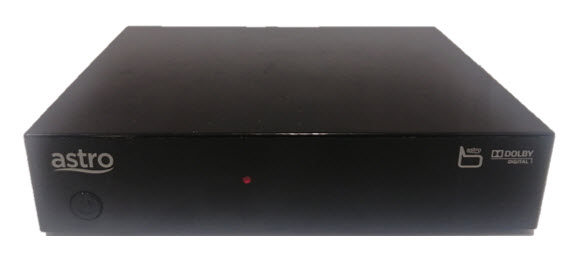
Ensure your box is on standby mode. (Red light on box's front panel).
STEP 2
Press and hold the Standby button. Wait until the LED at front panel change from red to green for 3 times, then release the button.
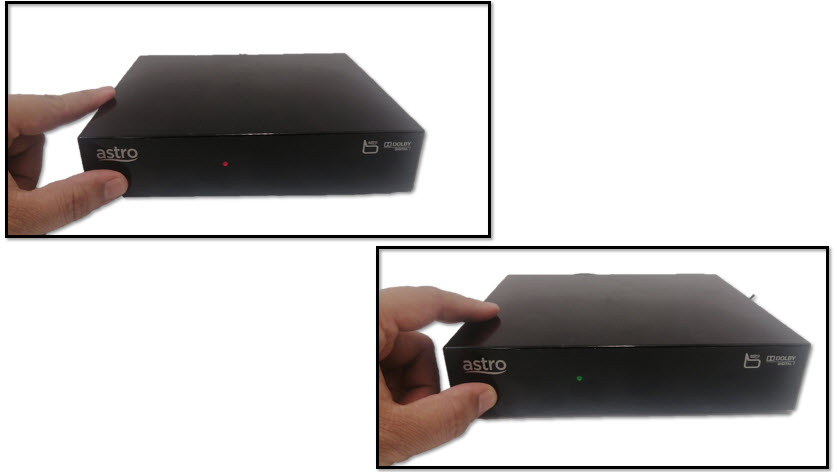
STEP 3
New Installation Settings page will appear.
Click here for the guides to complete the setup.

STEP 1
Switch off the power of your box and ensure that the adapter�s power light is off.
STEP 2
Switch on the power of your box and ensure that the adapter's power light is on.
STEP 3
Keep pressing the 'Power' button until the Startup Option screen appears.
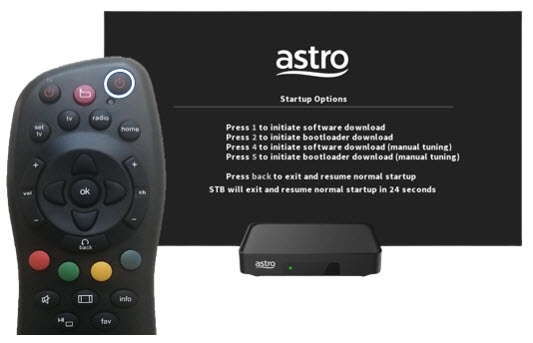
STEP 4
Press "369" on the remote control to trigger refresh box setting menu.
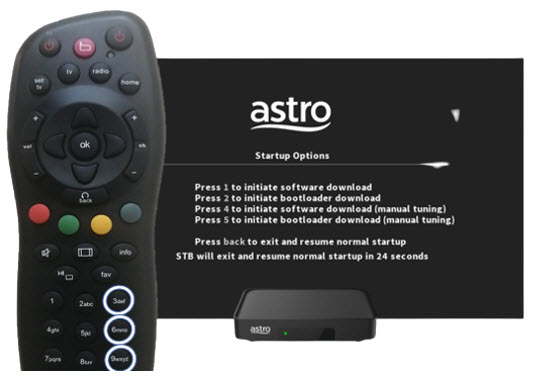
STEP 5
Press "OK" to proceed. The box will be refreshed to the original setting.

STEP 6
New Installation Settings page will appear.
Click here for the guides to complete the setup.
You will be notified 30 days before the expiry on the renewal of subscription and can opt out from auto renewal at least (2) days before the auto-renewal date.
If you want to opt out of your auto-renewal for Disney+ Hotstar, please contact our Customer Contact Centre at 03 9543 3838 and speak to one of our customer service executives to change your package according to what suits you best at least two (2) days before the next auto-renewal date. Alternatively, please WhatsApp us at 03 9543 3838 and type "DH Help
Yes, you can. Go to the Account tab and scroll to "Subscription' section. Select "TV pack', select "Main room' or "Multiroom' and then click the "Refresh' button.
1. Ultra Box magenta light / Ulti Box purple light - Your box is turned "On".
Press the Home button to launch Video On Demand and stream anytime or press channel number on your remote.

2. Ultra Box / Ulti Box orange light - Your box is on "Standby" mode.
Your box is ready to be turned "On" or leave it in this mode to receive new software updates.

3. Ultra Box / Ulti Box blinking orange light - Your box is booting up.
Please wait a few minutes for the box to start.
4. Ultra Box / Ulti box blinking blue light - Your box is downloading a software update.
Please wait a few minutes for the download to complete.

We noticed that you've recently requested for a change in your Astro account.
As this change will affect your overall monthly subscription, the expiry date for your Disney+ Hotstar (3-months Pass) subscription has been deferred to xxx (date) to consolidate the final monthly subscription pricing.
You can be assured that your data are safe with us. Astro implemented sufficient security measures to protect customer data and fully comply to Personal Data Protection Act
Astro ID is the account you use to sign in and manage all your Astro services online. You can use your Astro ID for the following Astro apps and portals:
You can create an Astro ID using your mobile number or email address here. To secure your Astro ID, please proceed to next step and link the ID to your Astro account number (10 digits) or smart card number (12 digits).
Starting 28 April 2022, Astro customers can access Disney+ Hotstar via Ultra Box, mobile app and website. We are working towards making Disney+ Hotstar available via the Ulti Box. Stay tuned for updates.
â€
You may visit any of Astro's digital platform that you would like to log into. Then, create a new Astro ID using your existing email address or mobile number. After creating your new Astro ID, please use it to log into our digital platforms moving forward.
There is no contract for this subscription.
Please note that only one Disney+ Hotstar access is bundled to each TV Pack subscription which allows two concurrent streams on Disney+ Hotstar.
You can track your ticket status by contacting us via WhatsApp or call us at 03-9543 3838.
Please rest assured that streamingapps labelled with "coming soon"
will be available on Astro in the near future.Please visit product.astro.com.my/appsfor more information on the streaming apps available on Astro or follow oursocial media to get notified on latest launches.
Facebook: @Astro
Instagram: @astromalaysia
Twitter: @astroonline
Kindly take note that streaming appslabelled with “coming soon” will be made available on Astro once they areready. Astro reserves the right to delay or cancel streaming app launches, ifnecessary.
Astro subscribers will have the freedom to subscribe to Netflix via Astro, or they may also choose to continue subscribing via Netflix directly on their own.
Starting 23 August 2022, Astro customers will progressively be able to access Disney+ Hotstar via the Ulti Box, in addition to the Ultra Box, mobile app and website.
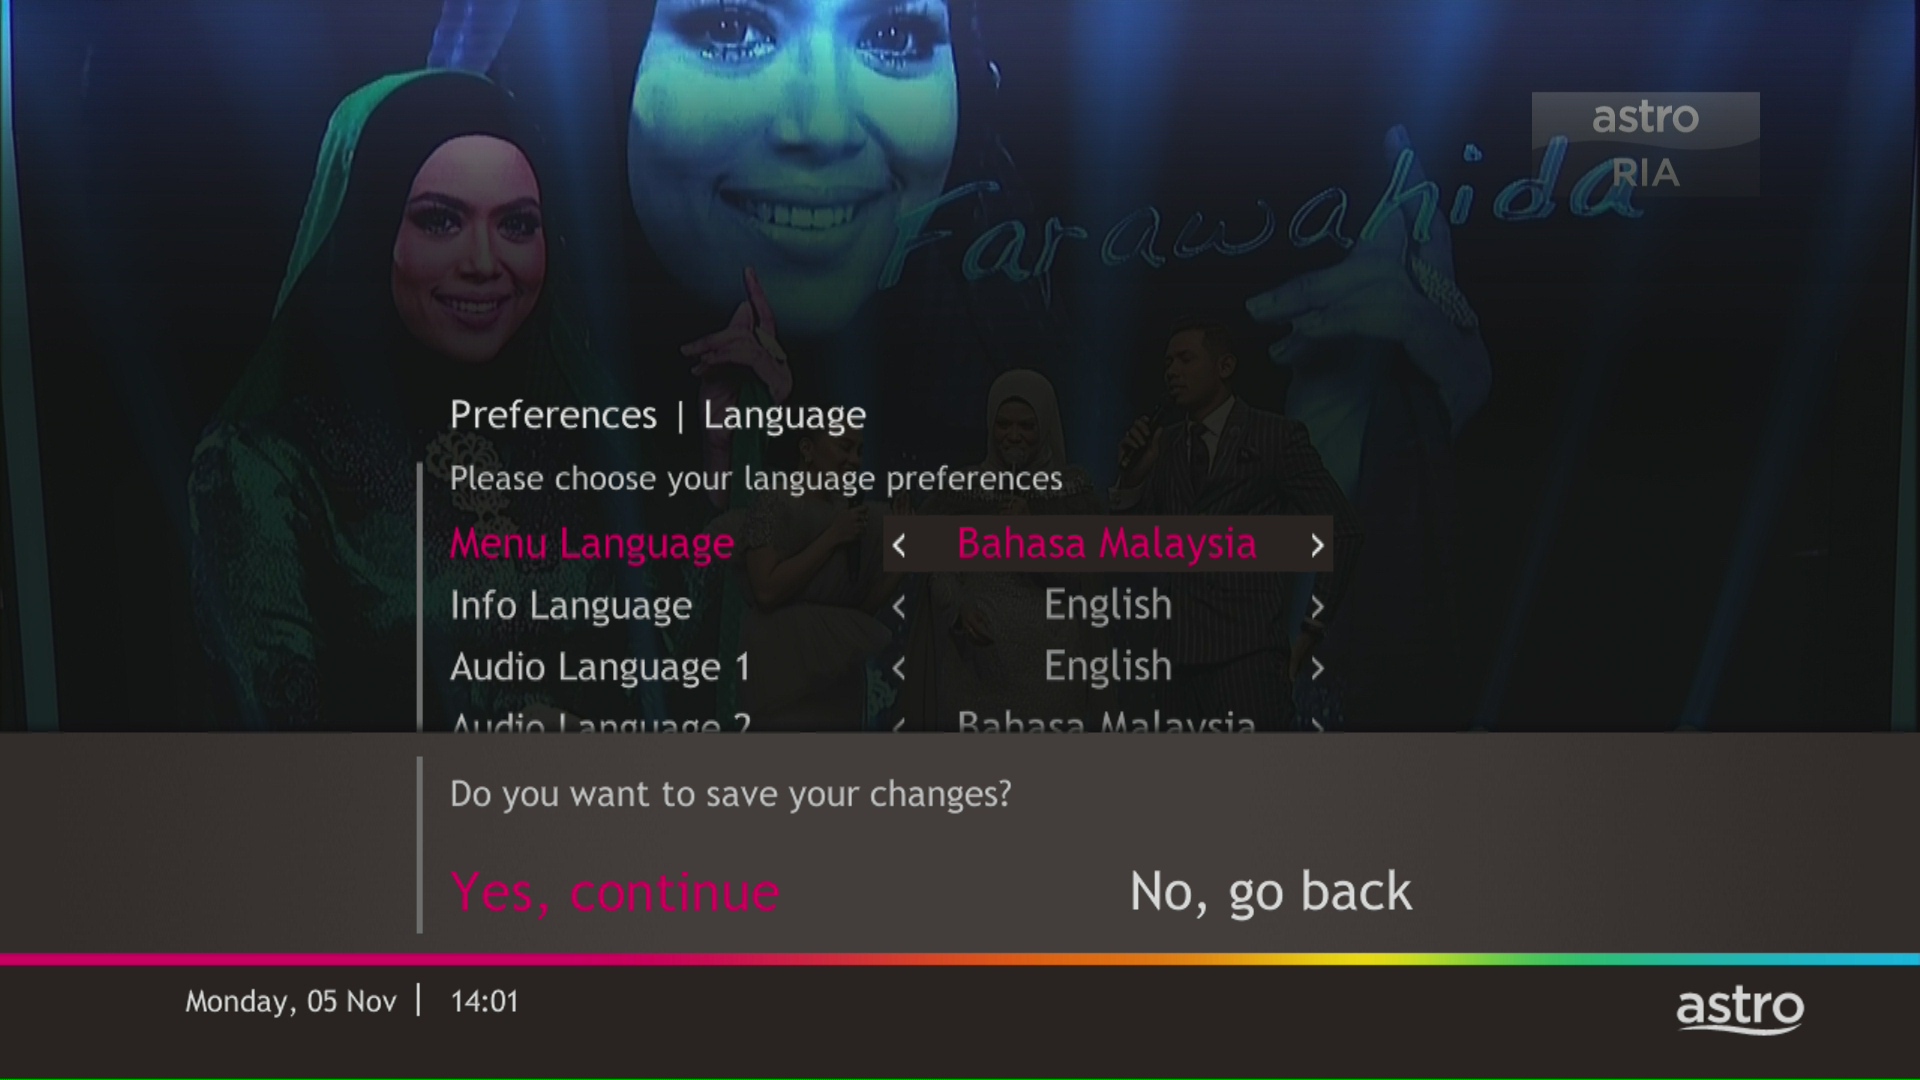
STEP 1
Press "HOME" button on your remote control.

STEP 2
Navigate to Preferences and press "OK".

STEP 3
Navigate to Language and press "OK".

STEP 4
Choose your language preferences and press "OK".
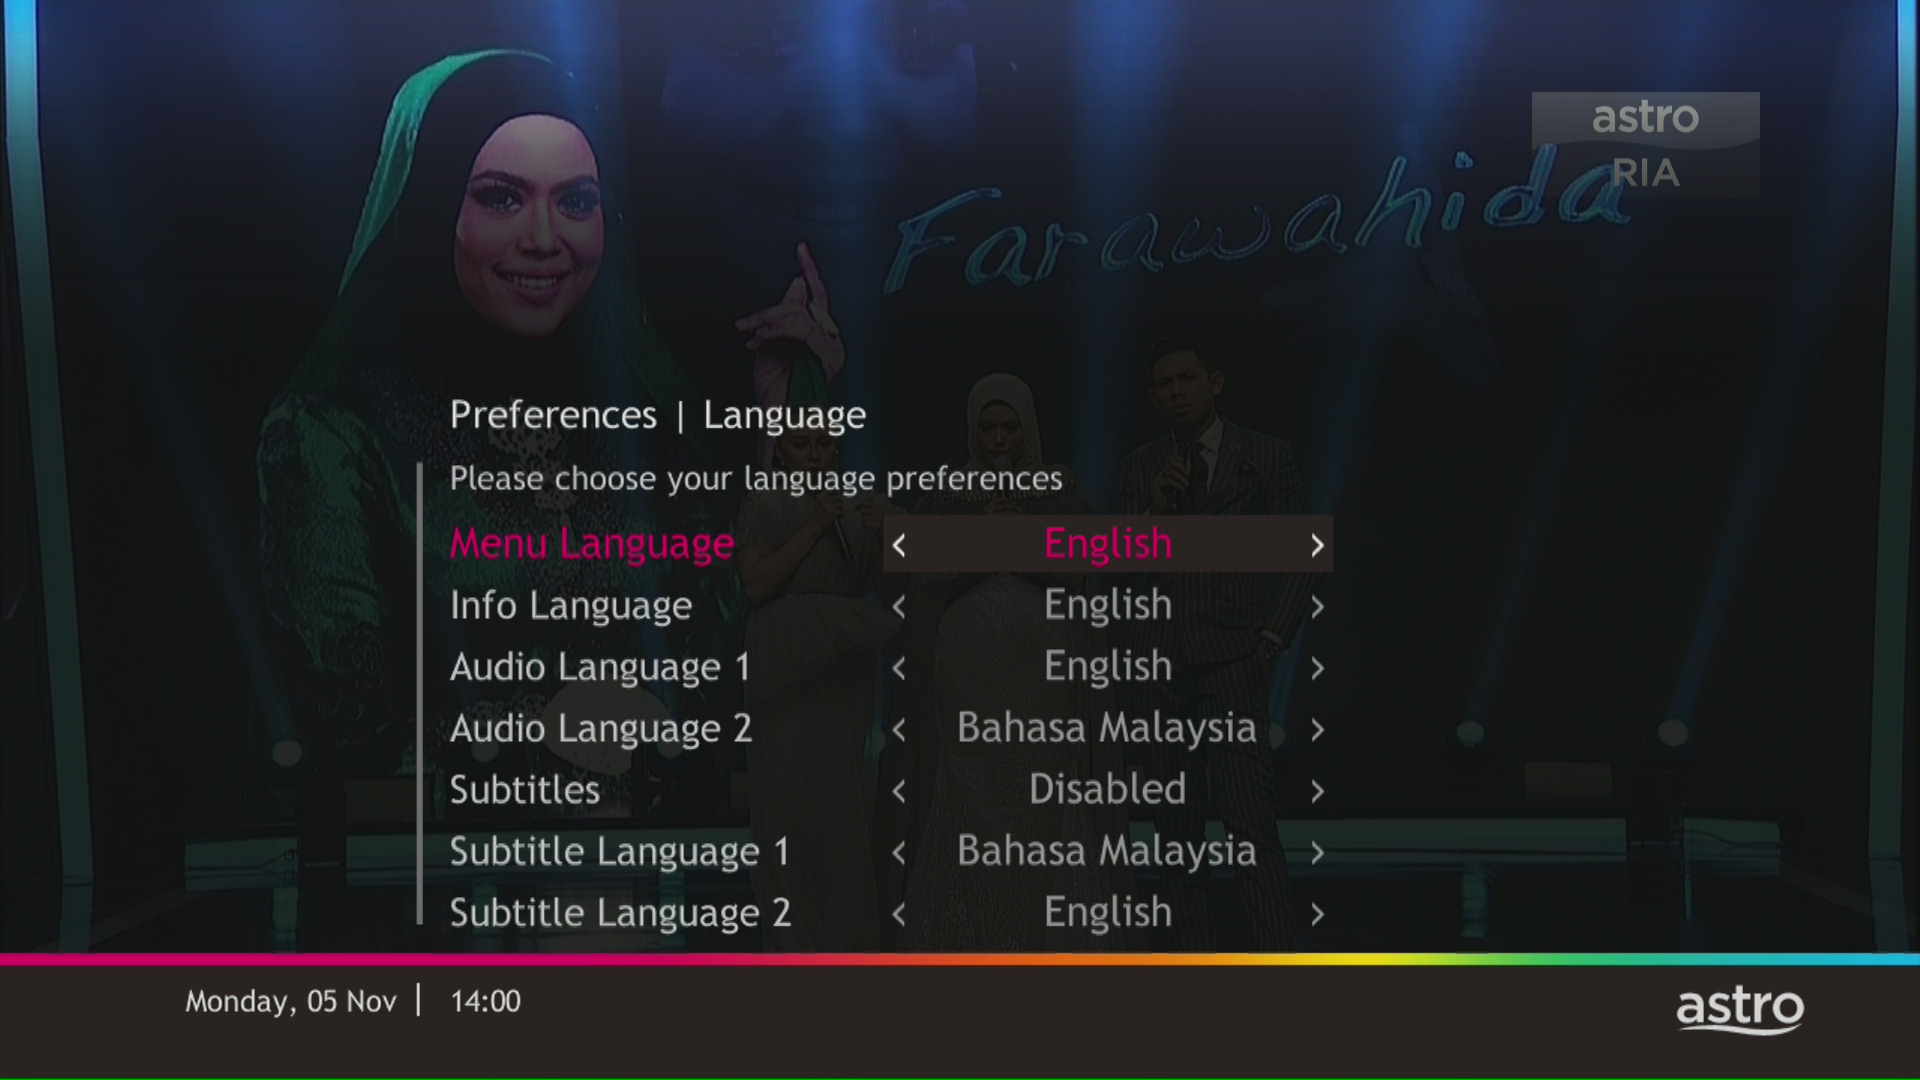
STEP 5
Select Yes, continue and press "OK" to confirm on the changes.
Otherwise, select No, go back to cancel.


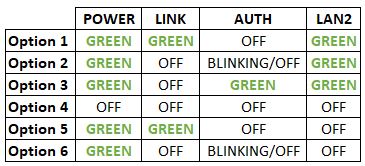

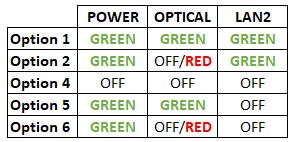


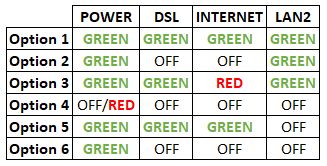
Option 1
1. Please turn off all devices (Modem and Router). By restarting your modem, you can isolate the possibility of overloaded processes in the modem, which would impact its performance.
2. Ensure the fiber cable from your wall socket and modem is securely connected.


Notes: You might be connected to LAN 1 if backbone is Maxis
Router connection

3. Please make sure the LAN cable is connected properly from router (Port 1-4 - Yellow port) to PC/Laptop.
4. If the issue persists, submit your feedback form and attach your modem light indicator picture/video for further assistance.
Option 2/ Option 3/ Option 5/ Option 6
1. Please turn off all devices (Modem and Router). By restarting your modem, you can isolate the possibility of overloaded processes in the modem, which would impact its performance.
2. Ensure the fiber cable from your wall socket and modem is securely connected.

3. Ensure both cables on the Modem (LAN Port 2) and Router (WAN Port - Red port) are properly connected.


Notes: You might be connected to LAN 1 if backbone is Maxis
Router connection

4. Please make sure the LAN cable is connected properly from router (Port 1-4 - Yellow port) to PC/Laptop.
5. Please make sure both cables on Router (Any Yellow port) and Astro Decoder (Network Port behind decoder) are properly inserted.


6. Switch on modem and router and please wait for 2 minutes to stabilise the devices after reboot.
7. If the issue persists, submit your feedback form and attach your modem light indicator picture/video for further assistance.
Option 4
1. Ensure Modem/Router are connected tightly to the power socket.

2. Try to use another power socket / power source to eliminate faulty power sockets/power sources which could cause the issue.
3. If the issue persists, submit your feedback form for further assistance.


Option 1
Modem connection

Router connection


3. Please make sure the LAN cable is connected properly from router (Port 1-4 - LAN port) to PC/Laptop.
4. If you have change the password in Selfcare Time portal recently, please change the router configuration follows the new password made in Selfcare, but if you didn't make any changes, please go to Step 5.
5. If the issue persists, submit your feedback form and attach your modem light indicator picture/video for further assistance.
Option 2 / Option 3
1. Please turn off all devices (Modem and Router). By restarting your modem, you can isolate the possibility of overloaded processes in the modem, which would impact its performance.
2. Gently remove fiber optic cable and blow / wipe the tip of the fibre cable. This is to clean up the cable in order to avoid any interferences.
3. Re-insert the fiber cable to the optical port behind the modem.
4. Ensure both cables on Modem (LAN Port 1) and Router (Internet Port) are properly connected.
Modem Connection

Router Connection


5. Make Sure both cables on Modem (LAN Port 4 /LAN Port 3 for second decoder) and Astro Decoder (Network Port) are properly inserted.

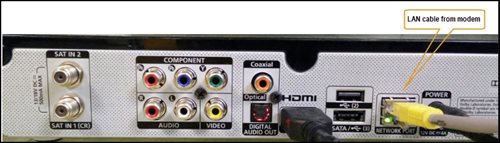
6. Switch on modem and router and please wait for 2 minutes to stabilise the devices after reboot.
5. If the issue persists, submit your feedback form and attach your modem light indicator picture/video for further assistance.
Option 4
1. Ensure Modem/Router are connected tightly to the power socket.
2. Try to use another power socket / power source to eliminate faulty power sockets/ power sources which could cause the issue.
3. If the issue persists, submit your feedback form for further assistance.
Option 5
1. Please ensure LAN cable is directly connected to modem port LAN 1.
2. Please use different LAN port if LAN 1 port is still off / not working.
3. If the issue persists, submit your feedback form for further assistance.
We would recommend the following browsers for a smooth verification process:
• Google Chrome
• Microsoft Edge
• Mozilla Firefox
• Safari
Yes, you will enjoy an Ulti box when subscribing to Primary/Entertainment/ Movie Pack OR an Ultra box when subscribing to Sports/Sports+/Movies+/Premium 1/Premium 2/Premium 3/Platinum Pack.
You will get FREE installation for both Ultra/Ulti box upon signing up with Astro & Broadband.
This issue occurs because your TV does not support the higher resolution.
STEP 1
Switch off the power for your box and make sure that the adapter's power light is off.

STEP 2
Switch on the power for your box and make sure that the adapter's power light is on.

STEP 3
Press the standby button repeatedly after switch on the power.
The Startup Options screen will appear on your TV.

STEP 4
Press "987" to access the Advanced Startup Options menu.
Then, press "1" to initiate a reset setting.

STEP 5
Press "OK" to confirm restore to factory setting.

STEP 6
After the factory setting is restored, TV will turn blank.
Please wait until the box completes initiate setup.

STEP 7
Press "1" to initiate Linux download on the software.

STEP 8
Once completed, the following screen will appear on your TV.
Refer to Installation Setup guide here to complete the setup.

Once you have received the eKYC link via SMS/email/astro.com.my, you can proceed to follow the instructions on the screen. You can check out the step-by-step image below for more info.
For MyKad/MyPR/MyTentera :

For Passport :