
A free satellite TV service from Astro. Watch lifetime entertainment, news, learning & information and more.
Pictures for illustration only.
Enjoy free access to 15+ TV channels & 10+ radio channels.
* Subject to Astro terms & conditions.


Step-1 |
Step-2 |
Step-3 |
Choose a plan & sign-up online. |
Sit back & wait for installation. |
Enjoy your new Astro / Broadband! |
A free satellite TV service from Astro. Watch lifetime entertainment, news, learning & information and more.
Pictures for illustration only.
New decoder only without satellite dish & cabling. You must have Astro/Njoi satellite dish and cable installed and working properly.
Including installation.
New decoder complete with satellite dish & cabling.
Including installation.
Applying for
| Njoi Astro UniFi Maxis |
Find your answers here.
We provide one stop service to apply Astro and Broadband for you.
You can avoid driving and queuing at the sales counter. We are the dealer that can help you to handle your application from the beginning to the end.
We do not charge you when you apply from us. There is no credit card information required to apply here. Charges are the same as you apply from the sales counter.
First, you can apply online, we will get back to you immediately during business hour. WhatsApp/Email/Fax us your Photocopy of IC (for malaysian) / Passport (for foreigners). When we receive all the information, we will proceed with your application immediately.
Once we receive your application with complete information, we will process your application immediately during business hour. The contractor from the service provider will then contact you for installation appointment once your application is approved.
Enjoy greater savings and hassle-free bill payment in one single bill for both Astro and Broadband. You get to enjoy Astro and Broadband at discounted price every month over the contract period of 24 months.
Astro offers multiple TV packs including Entertainment, Sports, Movies and Kids options. You can choose a pack that matches your viewing preferences and add optional streaming apps where available.
Yes, you may subscribe to Astro TV packs without bundling broadband. However, bundling Astro TV with Fibre Broadband may provide better monthly savings and convenience with a single bill.
For small households with light streaming and browsing, 100Mbps is usually sufficient. Larger families, gamers or heavy streamers may benefit from 500Mbps or 1Gbps plans for smoother performance across multiple devices.
Most Astro TV and Fibre broadband plans come with a 24-month contract. Early termination charges may apply if cancellation is made before the contract ends.
Yes, you may upgrade your TV pack or broadband speed at any time, subject to eligibility and coverage. A new contract period may apply depending on the upgrade.
Your monthly bill will be issued directly by Astro. You may receive it via email or access it through your Astro account. Bundled customers will receive a single combined bill for TV and broadband services.
Payment methods may include online banking, auto debit, credit card or other approved payment channels provided by Astro. Our team can guide you during the registration process.
If you experience any service interruption, you may contact Astro customer support for technical assistance. In many cases, issues can be resolved remotely or a technician will be arranged if necessary.
Yes, relocation is subject to service availability at your new address. Relocation charges and contract adjustments may apply depending on your plan.
No, you do not need a credit card to submit your application. Payment setup will be arranged directly with Astro after your service is approved.
Selected Astro TV packs allow optional add-ons such as streaming services depending on current promotions and availability. Additional monthly charges may apply.
Yes, a WiFi router is typically provided during fibre installation. The router model may vary depending on the selected broadband speed plan.
Yes, we will check the service coverage at your address before proceeding with your application to ensure broadband is available at your location.
For Malaysians, please provide a copy of your MyKad. For foreigners, provide a copy of your passport when submitting your broadband application.
After your application is approved, the service provider typically contacts you within 2 to 7 working days to arrange the broadband installation appointment.
Most Astro Broadband plans come with a 24-month contract starting from your installation date. If you relocate, a new 24-month contract may apply at your new address.
Yes, you can relocate your broadband service, subject to service availability at the new address. Your contract may reset for another 24 months from the new installation date.
Yes, you may request to relocate broadband devices within your home. Non-standard installation charges may apply and are payable to the installer directly after assessment.
Yes, you can switch to Astro Broadband. To avoid service interruption, it is recommended to activate the new service before terminating your current broadband contract.
Standard installations may be free during promotions, but non-standard installations (e.g., device relocation or complex wiring) may incur extra charges payable directly to the installer.
Your bill will be waived upon request.
STEP 1
On your remote, press the Home button and the Home Page will be displayed your screen. 
STEP 2
Navigate to SETTINGS.
STEP 3
Navigate to Profile Selection on Startup and press “OK”.
STEP 4
Navigate to your preferred selection and press “OK”.
STEP 5
Navigate to Save and press “OK”.

1. Please use a LAN ethernet cable and connect your computer/laptop to the back of the Maxis Router.
2. You may open any web browser such as Google Chrome, Internet Explorer, Mozilla Firefox, etc.
3. On the address bar, please go to http://192.168.1.254 and the page below will appear.

The default login of the router as below. If you have done a configuration on your router and changed your password previously, please use the password you have previously set.
Username: administrator
Password: Router S/N (Available on the sticker at the back of the router)
4. Once you have successfully login, the router's web-based setup page will appear.

5. From the left menu, select WIRELESS to access the screen below.

6. You may change the Network Name (SSID) and the Password to follow your preferences, then scroll to bottom and click "Apply" for the changes to take place.

7. A warning box will popup, click "OK" for the changes to take place and reconnect to the new wireless name with the new password once completed.

8. Please wait until the connection reestablish.

Please refer to these FAQs for more information, or click here to learn more and sign up for the Ultra Box. Alternatively, you may call 03-7481 8000 to get in touch with an Astro representative.
The balance will be credited into your account, which will be reflected when you receive your next bill. The balance credit will be used to offset your bill balance.
For Astro Fibre subscription, should you choose to discontinue/terminate the Astro Fibre service before the expiry of the contract (24 months), you will be subjected to an early cancellation fee of RM100 x Remaining months of the contract period for your Broadband services.
All Astro Fibre devices provisioned (Fibre modem, WiFi router and Mesh) will need to be returned upon termination. Our team will schedule the collection of equipment after your Broadband services have been terminated.
If equipment is damaged, lost or cannot be retrieved, penalty fees will be applied (excluding Service Tax) accordingly.
WiFi router and fibre modem will be replaced upon checking and verification by Astro's Contact Centre /installer. It will be replaced without additional charge regardless contract tenure.
Yes, a charge of up to RM20.00 may be imposed upon reconnection.
STEP 1
Check on the adapter's power light.
If the adapter's power light is ON, please refer to Blank Screen troubleshooting steps here.
Otherwise, if the adapter's power light is OFF, switch off the power for your box.

STEP 2
Ensure power cable is connected tightly.
Plug in power cable to different power socket and switch on the plug.
You should no longer be experiencing this problem.
If issue remains, proceed to STEP 3.

STEP 3
Try a different power socket to connect the equipment.
Turn on the power socket and check the adapter's power light.

If there is no light on your power adaptor's, please submit the issue on our Feedback Form and attach a picture of your smart card number for assistance.
Please indicate in the form if any lightning strike/thunderstorm/power trip occurred.
After order submission, the Plug & Play Box and Astro SIM card will be couriered separately to your service address. The delivery dates with the tracking numbers will be communicated via SMS.
The Plug & Play Box and Astro SIM card should arrive within 3-working days after your order submission. You may self-install your box by following the guide here.
Yes, you may upgrade to the Ultra Box if you are currently on the Entertainment or Movie Pack. If you are on the 500Mbps or 800Mbps plan, the upgrade will be free. However, a one-time fee of RM100 (excluding Govt. Tax) will apply if you are on the 50Mbps or 100Mbps plan. Please call or WhatsApp our Customer Contact Centre at 03-9543 3838 if you would like to make this upgrade. Please refer to the table below for the complete guide for Ultra Box upgrade:

STEP 1
Switch off the power for your box and make sure that the adapter's power light is off.

STEP 2
Locate the Smartcard at the front or right side and gently pull it out make sure that the adapter's power light is off.

STEP 3
Wipe the Smartcard's gold chip clean using a dry soft cloth.

STEP 4
Make sure the gold chip is facing upwards and reinsert it all the way in.

STEP 5
Switch on the power for your box and make sure that the adapter's power light is on. Please wait for 5 minutes.

STEP 6
Turn on your box. You should no longer be experiencing this problem.
If issue persist, please submit the issue in our Feedback Form and attach a picture of your General tab of the STB Diagnostics for assistance.

Please contact your issuing bank for further information. Astro does not directly handle standing instructions. Please utilise our auto-debit facility if you would like hassle-free payments.
If you have forgotten your username or password, you may follow the steps below:
Step 1. Go to netflix.com
Step 2: Click on Sign In
Step 3: Click on "Need Help
· Bill
· Log into your Astro Self-Service (location)
No, you will not be automatically switched to the new pricing. To perform a manual switch, please contact us at 03-9543 3838.
Astro is an official distributor of Disney+ Hotstar, the dedicated streaming home for global, and Malaysian hits. Astro customers can now subscribe to Disney+ Hotstar through the new, bigger and more diverse Packs, i.e.: Movies, Premium 1, Premium 3 or Platinum Pack. The streaming service brings together blockbuster movies from Hollywood to Hallyu and award-winning content from Disney, Marvel, Star Wars, Pixar, National Geographic, FX, 20th Centuary Studios and more including exclusive premieres from leading Malaysian studios. Take your family entertainment to the next level with Disney+ Originals like I am Groot, Prey, Baymax, Obi-Wan Kenobi, She-Hulk, IN THE SOOP: Friendcation and more - with the convenience of one monthly bill for all your entertainment needs.
Movies Pack, Premium 1, Premium 3 and Platinum customers as well as customers on the Starter Plus Pack, Value Plus Pack, and Disney+ Hotstar (3-months Pass) can enjoy Disney+ Hotstar on Astro.
Customers can subscribe to Disney+ Hotstar via astro.com.my/Disney, as well as via authorised retailers and dealers.
The Astro Fibre app is a newly introduced mobile application exclusively for Astro Fibre customers to allow them to schedule when each user can access the internet, share network access to guests in a secure manner, easy device management, amongst many other features for a better WiFi experience. For more information about this app, please visit here.
Currently, there are no rebates provided when you sign-up for the Ultra/Ulti Plug & Play Box.
STEP 1
Switch OFF the power of your Ultra / Ulti box and make sure that the adapter's power light is off.

STEP 2
Switch ON the power of your Ultra / Ulti box and make sure that the adapter's power light is on.

STEP 3
On your remote control, press the Home or Standby button repeatedly until the Startup Options appear on TV.
STEP 4
Press "987" to proceed.
Advanced Startup Options will be displayed.
STEP 5
Press "1" to initiate a reset setting.
STEP 6
Press "OK" to continue.
STEP 7
After the factory setting is restored, TV will turn blank.
Please wait until the box completes initiate setup.
STEP 8
Once completed, the following screen will appear on your TV.
Refer to Installation Setup guide to complete the setup.
Click here to follow New Installation Settings guide for Satellite
Click here to follow New Installation Settings guide for Plug and Play
Astro's Plug & Play Box is our latest box where users can enjoy the latest Astro box simply by connecting it to the TV and internet. There is no longer a need to schedule or pay for an installation. By connecting your Plug & Play Box to home broadband, you will be able to-do the following:
Other features include pause on TV and continue watching on the Astro GO app, enhanced search capabilities and more.
Yes, until 31 August 2022, customers can subscribe to the Movies Pack for only *RM59.99/month or the Platinum Pack for only *RM99.99/month for 6 months as well as the Premium 1 or Premium 3 Pack for only *RM99.99/month for 6 months until 30 October 2022 and be entitled to access Disney+ Hotstar as part of their Astro subscription. To find out more about our latest promotions, please visit promotions.astro.com.my.
The default PIN is 0000. You may change your PIN to a secure one by doing this at Settings, under your Preferences, select PIN Management, enter your old PIN or default PIN and proceed to create a new PIN.


| Step 1: Visit https://id.astro.com.my/ and click on “Forgot Astro ID?” | Step 2: Enter your Account/Smartcard Number. If you do not know where to find it, click on “Where to find your Account/ Smartcard Number” |
No, you are still able to access HBO Go on your current Movies pack.
If the bill has been paid, there will not be any additional service tax charge. However, if the bill has been issued by Astro but has not been paid, then the 8% Service Tax will be reflected in the next bill with adjustments on the new tax rate for services rendered from 1st March onwards.
Example:
Bills issued on 15th February will be charged the 6% SST. Customers will see proration for 8% from 1st – 14th March in the next bill issued on 15th March 2024. If you have fully paid your February bill before 1st March, the Service Tax will remains at 6%. You will be able to see the adjustment reflected in your next bill.

STEP 1
Please wait while your Astro box initializes.
STEP 2
Select your preferred language.
STEP 3
Navigate to Next and press "OK".
STEP 4
Select Auto as the Video Resolution.
STEP 5
Navigate to Next and press "OK".
STEP 6
Navigate to Confirm and press "OK" to confirm your selection if you are able to read the texts on screen properly.
Otherwise, navigate to Cancel to revert to the previous settings.
STEP 7
Select IPTV Plug & Play (self-install) as the box operating mode.
STEP 8
Navigate to Next and press "OK".
STEP 9
Select your preferred connection.
For connection via Wi-Fi, proceed to STEP 10.
For connection via LAN Cable, proceed to STEP 16 once you are connected.
STEP 10
Please wait while your Astro box searches for available Wi-Fi networks.
STEP 11
Navigate to your preferred Wi-Fi network and press "OK".
STEP 12
Please enter the password to connect to the Wi-Fi network.
STEP 13
Navigate to Done to continue.
STEP 14
Please wait while your Astro box connects to the internet.
STEP 15
Navigate to Yes to allow your Astro box to connect to this network automatically.
Otherwise, navigate to No.
Proceed to STEP 17 for the next step.
STEP 16
Navigate to Next and press "OK".
STEP 17
Your box's connection status will be displayed.
Navigate to Finish to complete the setup.
STEP 1
Try to change channels on your Astro remote. Check the LED light.
If the LED is blinking 3 times or if it is not blinking, replace the batteries and proceed to STEP 2.
Otherwise, if the LED is blinking 1 time, your remote is working fine, let's proceed to STEP 3.
STEP 2
Check if you can change channels using your Astro remote control. You should no longer be experiencing this problem if is a battery issue.
If issue remain after batteries replacement, proceed to STEP 3.
STEP 3
You need to refresh the box setting manually from the box front panel.
Refer to Refresh Box setting (Clear NVRAM) - Ultra / Ulti Box.
If issue persist, please submit the issue on our Feedback Form.
Please note that your request to opt out has been processed, and payment for Disney+ Hotstar is not required. Your bill adjustment will be reflected in your next bill.
The main changes are the revamped look and feel of the user interface on the Smart TV App, which include redesigns to the Astro interface that consists of title rows at the Home Page to feature popular franchises, new live programmes posters and changes to the menu bar for easier navigation.
For more info, please read our dedicated FAQ on this here.
In addition, we have also recently introduced a new look to the Title Information Page and the ability to disable the Profile Selection Screen. For more information, please click here.

1. Please connect your computer or laptop to your Astro Fibre router using WiFi or LAN cable. Your LAN cable must be connected from the yellow port of Astro Fibre router (Any available port).
2. Once connected, open any web browser such as Google Chrome, Internet Explorer, Mozilla Firefox and etc.
3. On the address bar, type http://192.168.100.254 and below page will appear.

Login using your username and password if you have changed the router login setting. Otherwise, your default router login is as per below.
Username: user
Password: user
4. Once you have successfully logged in, the router's web-based setup page will appear.

5. At the top of the page, click WLAN to configure the WiFi parameters.

6. You may change the Primary SSID (WiFI Name) and the WPA Passphrase (WiFi Password) to follow your preferences for 2.4G Wi-Fi Settings, then click "Save & Apply" for the changes to take place.

7. You may make the same changes for 5G Settings by change the Primary SSID (WiFI Name) and the WPA Passphrase (WiFi Password) to follow your preferences, then click "Save & Apply" for the changes to take place.


You may proceed with the following troubleshooting steps and it shouldn't take you much longer than 15 min
1. Please standby a computer/laptop to access to the internet and connection must be via LAN cable (connect the LAN cable to the Yellow port at Tplink Router and direct to the computer/laptop).
2. You may open any web browser such as Google Chrome, Internet Explorer, Mozilla Firefox and etc.
3. On the address bar, please go to tplinkwifi.net and to access to below login page. Type the Username and Password, then click "Login".

The default login of the router is available on the sticker at the back of the router. If you have done a configuration on your router previously, the password may be different.

For example, below is the login details of the above router:
Username: admin
Password: TIMECE24
4. Once you have successfully login, the router's web-based setup page will appear. Please follow below steps for the configuration.
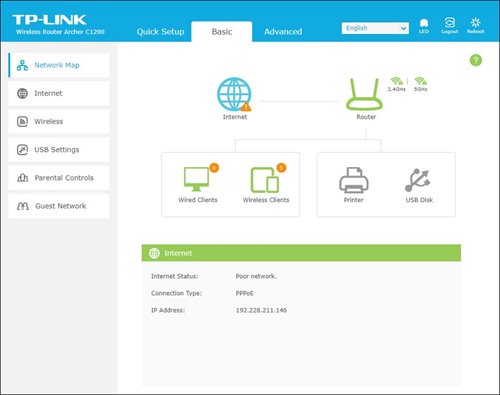
5. From the top menu, choose Advanced and click the Wireless tab on the left menu. Then, select Wireless Settings from the sub menu. Below screen will appear for 2.4GHz selection.

i. Please ensure to tick Enable Wireless Radio function.
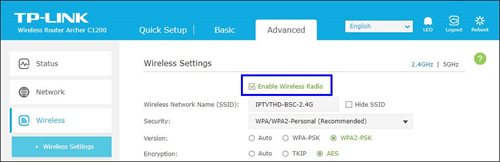
ii. To change the channel, click the drop-down arrow for Channel, then select your desired channel.
Choose between 1 to 13 (Suggested channels : 1,6,11). Then, click "Save" for the changes to take place.

iii. Click Save for the changes to take place. The router will auto reboot and connection will re-establish after few minutes.

iv. Next, select 5GHz to make changes on the wireless channel for 5GHz.
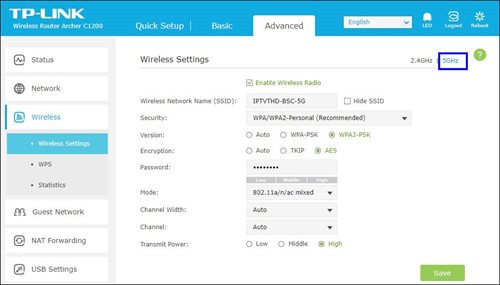
v. Click the drop-down arrow for Channel, then select your desired channel from the selection.

vi. Click Save for the changes to take place. The router will auto reboot and connection will re-establish after few minutes.

Visit https://product.astro.com.my/box or check out our user guide for a quick and easy way to get started!
Intermittent internet connection using LAN cable
Looks like there is something wrong with your service connection.
Please run a Ping Test, Traceroute Test and attach the picture or screenshot of both test results in the Feedback Form below, in order for us to provide further assistances.
Please make sure to attach the required screenshot(s) in ONE file (i.e. Microsoft Word document, PDF, Image file) before submitting the form.
Quick Info
A Ping Test shows how long it takes for packets to reach host.
A Traceroute Test traces the route of packets to destination host from our server.
Intermittent internet connection using Wi-Fi
1. Router Positioning
Most people underestimate the importance of picking a good spot for a Wi-Fi router. Even a small shift in positioning could end up being the difference between day and night.
i) High vs. Low
Put the router as high up as possible to extend the broadcasting range of the radio waves. This also helps clear the router of possible interferences.
ii) Concrete & Metals
Make sure your router isn't blocked by any other objects, especially devices that are electronic. Also, avoid placing your router in your basement as this area is usually enclosed by a lot of concrete, which can be almost impossible for Wi-Fi signals to penetrate.
iii) Distance to Router
The further away from your router you get, the weaker the Wi-Fi signal. Therefore, the best option is to place your router as close to your devices as possible, but this is only practical if you have one main area where you tend to use your devices.
Otherwise, you should place your router near the center of your home. After all, Wi-Fi broadcasts in 360 degrees, so it doesn't make sense to put it at one end of the house.
2. Wireless Interference & Noise
You've probably never noticed but there are wireless signals all around you wherever you go and they're passing through you all the time. From where? Electronic devices, Wi-Fi routers, satellites, cell towers, and more.
Although Wi-Fi is supposed to be on a different frequency than most of these devices, the amount of radio noise can still cause interference. Some common causes of interference include:
i) Microwaves
ii) Bluetooth Devices
iii) Cordless Phone
3. Surrounding Wi-Fi signals
A truth of the modern world is that every household has their own Wi-Fi network, which can cause issues with channel overlap. This can be somewhat problematic in a townhouse, but is especially problematic in housing complexes and apartments where there can be many routers within close proximity.
Which is why it's important that you pick a good channel in your router settings. Modern routers can choose channels for you automatically, but sometimes it's better to investigate and find the best channel yourself.
4. Usage
More likely, however, is that the people on your network such as friends, roommates, or family members are participating in bandwidth-heavy activities like gaming and streaming Ultrabox/Netflix.
Fortunately, if this is the case, you can prioritize your own network traffic by enabling Quality of Service in your router settings.
If the problem persists, please run a Ping Test, Traceroute Test and attach the picture or screenshot of both test results in the Feedback Form below, in order for us to provide further assistances.
Please make sure to attach the required screenshot(s) in ONE file (i.e. Microsoft Word document, PDF, Image file) before submitting the form.
Quick Info
A Speedtest is a service that provides free analysis of Internet access parameters, such as connection data rate.
A Ping Test shows how long it takes for packets to reach host.
A Traceroute Test traces the route of packets to destination host from our server.
STEP 1
Press "HOME" button on your remote control.

STEP 2
Navigate to Settings and press "OK".

STEP 3
Navigate to STB Diagnostics and press "OK".

STEP 4
Take a look at the Smart Card Status.

You do not need to request for a reconnection as our system will detect your payment and process it immediately, provided you paid via a real-time payment channel.
Click here for a full list of our payment channels.
Please refer to these FAQs for more information.
Mesh WiFi network refers to a unified wireless network that is formed by utilizing inter-connected WiFi nodes (Mesh devices) placed throughout the house.
Your cloud recording space will revert to 200 hours by default. If your current recordings exceed 200 hours, the system will delete the exceeded hours once you have stopped the Astro GO+ subscription starting with the oldest recordings first.
Please ensure to put your box on standby mode to refresh the signal.
a. Using IVR
1. Dial 03-95433838 and select you preferred language.
2. Select Account Related.
3. Select Technical Assistance.
4. Select Refresh Smartcard.
b. Using MyAstro web
STEP 1
Go to https://myastro.astro.com.my/ in your web browser.
STEP 2
Key-in your Email / Mobile number and password. Then, press LOG IN.
STEP 3
Click on TV pack.
STEP 4
Choose Main Room for the Primary Box; else choose Multiroom (If any).
STEP 5
Click on "Refresh" to refresh signal on your box.
For Main Box
For Multiroom
STEP 6
After tap the Refresh, below notification will be displayed as below.
For Main Box
For Multiroom
c. Using MyAstro App
STEP 1
Open myAstro App and click "Login".
STEP 2
Key-in your Email / Mobile number and password. Then, press "LOG IN".
STEP 3
Go to "Account".
STEP 4
Scroll down to "TV pack" and click on it.
STEP 5
Choose Main Room for the Main Box; else choose Multiroom (If any).
STEP 6
Tap on "Refresh" to refresh signal on your box.
For Main Box
For Multiroom
STEP 7
After tap the Refresh, below notification will be displayed as below.
For Main Room
For Multiroom
Astro customers can make payments via Auto-debit, WhatsApp,Astro Quick Pay and other authorised payment channels withoutsurcharge for the easiest and fastest way to pay their Astro bills.
Bill payments at selected petrolstations, convenience stores, retail/mobile shops, kiosks, and e-Wallets, may incur a surcharge of up to RM0.50 per transaction by the appointed collection agencies of RMS (Razer), ATX, MobilityOne and e-Pay.
The surcharge is imposed by third-party payment collection partners for services rendered.
You can refer to all our payment options below. Those marked with ‘*’ will be subject to a surcharge by appointed collection agencies.
A. HASSLE-FREE METHODS
Auto-Debit:
Click here for step-by-stepinstructions on how to activate auto-debit payment via My Astro Portal.
WhatsApp:
JomPAY:
Look for the JomPAY logo on your latest bill, log into your preferred online banking platform, and submit your payment details.
• Biller Code: 9639 (unique to Astro only)
• Ref-1: <10-digit Astro account number> (E.g. 08XXXXXXXX)
B. ASTRO SELF-SERVICE METHODS
Astro Quick Pay:
My Astro Portal:
Channel 200:
My Astro App:
C.BANKS
Maybank:
Visit maybank2u.com.my for more information.
Public Bank:
Visit pbebank.com for moreinformation.
Bank Simpanan Nasional:
Visit mybsn.com.my for more information.
Agrobank:
Visit agrobank.com.my for more information.
D. e-WALLETS
ATX*
Boost, GoPayz, KelantanPay, Zcity (GEM REWARD), SabahPay, Tapay, GoPay,MerchantTradeMoney, ToneGroup, Elinking, Mpay, Mcash, and other various smaller wallets.
e-Pay*
Touch n Go (TnG), Grab Pay, Shopee, BigPay, True Money
E. OTHER METHODS
Associated Retailers:
RMS (Razer/ MOL)*
7-Eleven, 99 Speedmart, Caring Pharmacy
ATX*
RedONE Shop, Mobile Money, Runcit Hero (telecommunication shops), Parcel Hub (courier shops), Kiosk, DHL
Mobility One*
Kedai D’mart, Happy Mart, Pasaraya Sakan, PusatKomuniti Desa (PKD), Aeon Big and various sundry shops
e-Pay*
Petrol stations (Petronas, Shell, BHP, Caltex, Petron), KK Mart, Mydin, MyNews, SenHeng, Hai-O, Giant, TF ValueMart, Billion, Big Pharmacy
Service Tax will not be imposed on any CSR projects accounts. Any tax payable will be borne by Astro.
Yes, the monthly subscription fee will be prorated into your Astro bill.
Yes, you will be able to access Disney+ Hotstar even if you remain on your existing Movies/Starter Plus/Value Plus Packs.
From 8 October 2021 onwards, Astro will be ceasing the daily passes (e.g. 3, 5, 7 & 30 days passes). Please subscribe to the relevant packs to continue enjoying your favourite content. Stay tuned for more exciting offers. Thank you.
No, Pay-Per-View is no longer available in CH200.
If you're trying to visit a website and it won't load, but others do, there could be a variety of causes. If the site itself is down, there's not much you can do but wait.
If you can load the site on other computers or devices (make sure you try different means of connecting to the internet), there may be an issue with your computer or network.
There are some quick fixes that will solve most problems, but you may have to get your hands a little dirty.
i. List of websites effected.
ii. Run the Speed Test via LAN (cable) and Wi-Fi connection - Please click here for Speed Test guideline.
iii. Run the Traceroute Test - Please click here for Traceroute Test guideline.
iv. Run the Ping Test - Please click here for Ping Test guideline.
Once you've gathered all the results, kindly send them all through the Feedback Form below.
Quick Info
A Speedtest is a service that provides free analysis of Internet access parameters, such as connection data rate.
A Ping Test shows how long it takes for packets to reach host.
A Traceroute Test traces the route of packets to destination host from our server.
STEP 1
On your remote, press the HOME button and the home menu will be displayed on top of your screen.

STEP 2
Navigate to Settings.

STEP 3
Navigate to S/PDIF Audio and press "OK".

STEP 4
Navigate to your preferred selection and press “OK”.