
A free satellite TV service from Astro. Watch lifetime entertainment, news, learning & information and more.
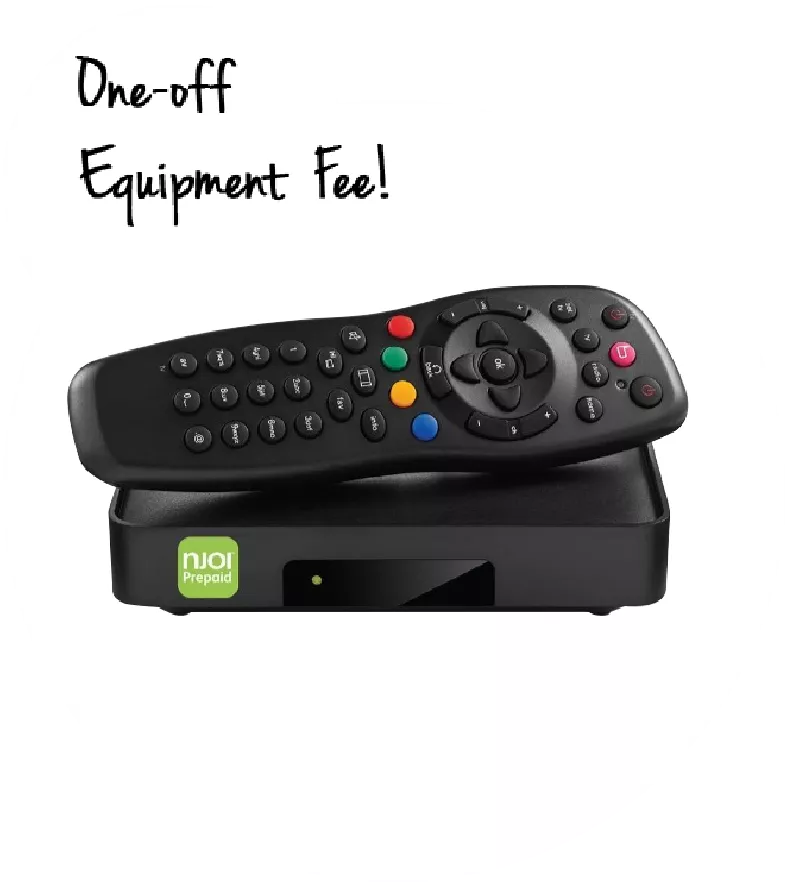
Pictures for illustration only.
Enjoy free access to 15+ TV channels & 10+ radio channels.
* Subject to Astro terms & conditions.


Step-1 |
Step-2 |
Step-3 |
Choose a plan & sign-up online. |
Sit back & wait for installation. |
Enjoy your new Astro / Broadband! |
A free satellite TV service from Astro. Watch lifetime entertainment, news, learning & information and more.
Pictures for illustration only.
New decoder only without satellite dish & cabling. You must have Astro/Njoi satellite dish and cable installed and working properly.
Including installation.
New decoder complete with satellite dish & cabling.
Including installation.
Applying for
| Njoi Astro UniFi Maxis |
Find your answers here.
We provide one stop service to apply Astro and Broadband for you.
You can avoid driving and queuing at the sales counter. We are the dealer that can help you to handle your application from the beginning to the end.
We do not charge you when you apply from us. There is no credit card information required to apply here. Charges are the same as you apply from the sales counter.
First, you can apply online, we will get back to you immediately during business hour. WhatsApp/Email/Fax us your Photocopy of IC (for malaysian) / Passport (for foreigners). When we receive all the information, we will proceed with your application immediately.
Once we receive your application with complete information, we will process your application immediately during business hour. The contractor from the service provider will then contact you for installation appointment once your application is approved.
Enjoy greater savings and hassle-free bill payment in one single bill for both Astro and Broadband. You get to enjoy Astro and Broadband at discounted price every month over the contract period of 24 months.
Astro offers multiple TV packs including Entertainment, Sports, Movies and Kids options. You can choose a pack that matches your viewing preferences and add optional streaming apps where available.
Yes, you may subscribe to Astro TV packs without bundling broadband. However, bundling Astro TV with Fibre Broadband may provide better monthly savings and convenience with a single bill.
For small households with light streaming and browsing, 100Mbps is usually sufficient. Larger families, gamers or heavy streamers may benefit from 500Mbps or 1Gbps plans for smoother performance across multiple devices.
Most Astro TV and Fibre broadband plans come with a 24-month contract. Early termination charges may apply if cancellation is made before the contract ends.
Yes, you may upgrade your TV pack or broadband speed at any time, subject to eligibility and coverage. A new contract period may apply depending on the upgrade.
Your monthly bill will be issued directly by Astro. You may receive it via email or access it through your Astro account. Bundled customers will receive a single combined bill for TV and broadband services.
Payment methods may include online banking, auto debit, credit card or other approved payment channels provided by Astro. Our team can guide you during the registration process.
If you experience any service interruption, you may contact Astro customer support for technical assistance. In many cases, issues can be resolved remotely or a technician will be arranged if necessary.
Yes, relocation is subject to service availability at your new address. Relocation charges and contract adjustments may apply depending on your plan.
No, you do not need a credit card to submit your application. Payment setup will be arranged directly with Astro after your service is approved.
Selected Astro TV packs allow optional add-ons such as streaming services depending on current promotions and availability. Additional monthly charges may apply.
Yes, a WiFi router is typically provided during fibre installation. The router model may vary depending on the selected broadband speed plan.
Yes, we will check the service coverage at your address before proceeding with your application to ensure broadband is available at your location.
For Malaysians, please provide a copy of your MyKad. For foreigners, provide a copy of your passport when submitting your broadband application.
After your application is approved, the service provider typically contacts you within 2 to 7 working days to arrange the broadband installation appointment.
Most Astro Broadband plans come with a 24-month contract starting from your installation date. If you relocate, a new 24-month contract may apply at your new address.
Yes, you can relocate your broadband service, subject to service availability at the new address. Your contract may reset for another 24 months from the new installation date.
Yes, you may request to relocate broadband devices within your home. Non-standard installation charges may apply and are payable to the installer directly after assessment.
Yes, you can switch to Astro Broadband. To avoid service interruption, it is recommended to activate the new service before terminating your current broadband contract.
Standard installations may be free during promotions, but non-standard installations (e.g., device relocation or complex wiring) may incur extra charges payable directly to the installer.
Your Astro Rewards tier is based on how long you've continuously been an Active Astro Pay TV customer:
The rewards you will receive depends on which tier you're in. Rewards are cumulative: If you're in Diamond tier, you will be able to enjoy all the benefits from Magenta, Silver, and Gold tiers.
If you cancel your Astro Pay TV services but resubscribe at a later date, your duration (year) with us will reset to zero and restart according to your new activation date. Your Astro Rewards tier will reset to Magenta.
After order submission, the Plug & Play Box and Astro SIM card will be couriered separately to your service address. The delivery dates with the tracking numbers will be communicated via SMS.
The Plug & Play Box and Astro SIM card should arrive within 3-working days after your order submission. You may self-install your box by following the guide here.
From Channels 480 (Astro First):
Purchase via Whatsapp
Purchase via SMS
*SMS service is available for Maxis, Celcom, Digi and U Mobile only.
From Beyond PVR On Demand interface:
From Ultra/Ulti On Demand interface:
From Astro Go app (purchases only applicable for Android devices):
*The default pin code is 0000 if you have not pre-set it.
Step 1:
Type ASTRO EBILL <Your 10-Digit Smart Card Number> <Your Email Address>
Example: ASTRO EBILL 0156123412 abcdabcd@gmail.com
Step 2:
Send SMS to 66688
Note: This request must be sent from account holder’s mobile/primary number
*Standard telco charges and Terms & Conditions apply
STEP 1
On your remote, press the HOME button and the home menu will be displayed on top of your screen.

STEP 2
Navigate to Settings.

STEP 3
Navigate to Network Settings and press "OK".

STEP 4
Navigate to Network Diagnostics and press "OK".

STEP 5
Network Diagnostics screen will be displayed accordingly.

If you would like more information or to provide feedback, kindly log in to our support page via support.astro.com.my. For more questions regarding Astro Pack, you may reach out to us via call at 03-7481 1000 (Monday to Friday, 9AM – 6PM exclude public holidays).
STEP 1
Please wait while your Astro box initializes.
STEP 2
Select your preferred language.
STEP 3
Navigate to Next and press "OK".
STEP 4
Select Auto as the Video Resolution.
STEP 5
Navigate to Next and press "OK".
STEP 6
Navigate to Confirm and press "OK" to confirm your selection if you are able to read the texts on screen properly.
Otherwise, navigate to Cancel to revert to the previous settings.
STEP 7
Select IPTV Plug & Play (self-install) as the box operating mode.
STEP 8
Navigate to Next and press "OK".
STEP 9
Select your preferred connection.
For connection via Wi-Fi, proceed to STEP 10.
For connection via LAN Cable, proceed to STEP 16 once you are connected.
STEP 10
Please wait while your Astro box searches for available Wi-Fi networks.
STEP 11
Navigate to your preferred Wi-Fi network and press "OK".
STEP 12
Please enter the password to connect to the Wi-Fi network.
STEP 13
Navigate to Done to continue.
STEP 14
Please wait while your Astro box connects to the internet.
STEP 15
Navigate to Yes to allow your Astro box to connect to this network automatically.
Otherwise, navigate to No.
Proceed to STEP 17 for the next step.
STEP 16
Navigate to Next and press "OK".
STEP 17
Your box's connection status will be displayed.
Navigate to Finish to complete the setup.
STEP 1
Try to change channels on your Astro remote. Check the LED light.
If the LED is blinking 3 times or if it is not blinking, replace the batteries and proceed to STEP 2.
Otherwise, if the LED is blinking 1 time, your remote is working fine, let's proceed to STEP 3.
STEP 2
Check if you can change channels using your Astro remote control. You should no longer be experiencing this problem if is a battery issue.
If issue remain after batteries replacement, proceed to STEP 3.
STEP 3
You need to refresh the box setting manually from the box front panel.
Refer to Refresh Box setting (Clear NVRAM) - Ultra / Ulti Box.
If issue persist, please submit the issue on our Feedback Form.
Yes, starting 9 November 2021, these new packs will be Astro's default offering.
Astro Fibre WiFi router is a dual-band edge Residential Gateway which supports two frequency bands 2.4GHz and 5GHz.
Here's what you can do with your unused satellite TV devices:
If you have an Ultra or Ulti Box, you may:
1. Return your device to us via Arranged Pick-up:
Step 1: Please call Astro's Contact Centre at 03-9543 3838 to schedule an arranged pick-up by one of our Astro agents.
Step 2: Just sit back and relax! Our courier partner, Citylink will come to your doorstep, dismantle the satellite dish for you and retrieve the devices.
2. Return your device to us via Dropoff:
Step 1: Please gather your device(s) and click here to find a Customer Service Centre (CSC) or Astro Authorised Retailer (AAR) near you.
Step 2: Don't worry, it's free! Simply walk in during opening hours and hand over the device(s) to one of our Astro agents.
Note: An installer's visit is required to dismantle your satellite dish. However, if you have a Box or other satellite TV devices at home that do not require dismantling, you may walk into any of our authorised dealers and hand them over to the agent.
If your Satellite TV device is NOT an Ultra or Ulti Box, you may:
1) Recycle your device:
For all Ultra or Ulti Boxes, please return them to Astro via drop-off at a CSC or AAR near you or schedule a pick-up appointment via 03-9543 3838.
For other older Boxes or Satellite TV devices, you are required to discard them only at registered collection centres for proper handling and management of e-waste in an environmentally sound manner. Click here to find a registered collection centre near you.
Note: Upon termination of your Astro service, all Ultra and Ulti Box customers are required to return their devices to Astro. Failure to do so within 14 days of termination may incur a fee of RM100 (not inclusive of Govt. Tax). For customers on all other boxes, please discard your box only at registered collection centres to ensure we all play our part in protecting the environment.
Arranged Pick-Ups
1) I missed the pickup appointment; what do I do now?
Our agent will make two attempts to retrieve the device(s) and dismantle your satellite dish within a period of 14 days, failing which the penalty of RM100 (not inclusive of Govt. tax) would be imposed.
2) Can I reschedule my pickup date?
Yes! Please call Astro's Contact Centre at 03-9543 3838 to reschedule your pickup date.
3) My old devices do not require dismantling; do I have to pack them before handing them over to the delivery agent?
Please pack your device(s) in their original box/packaging if possible. If this option is not available to you, just hand the device(s) over to the delivery agent without any packaging. You will not be charged any fees if the original packaging has been damaged/lost.
4) Do I have to print anything or fill in any forms before handing my device(s) over to the Astro agent?
No, you do not have to prepare any documents before handing your device(s) over to the Astro agent. All you have to do is get your device(s)ready before the Astro agent arrives to ensure a smooth handover process.
5) I have an old/unused satellite dish at my home and I am not an Astro customer; can I still schedule an installer visit to dismantle and return it?
Yes! Not to worry, you can still schedule an installer visit to dismantle the satellite dish from your home.
Drop-offs
1) Do I have to pack my device(s) before handing it over to the Astro agent?
Please pack your device(s) in their original box/packaging if possible. If this option is not available to you, just hand the device(s) over to the Astro agent without any packaging. You will not be charged any fees if the original packaging has been damaged/lost.
2) There are no Customer Service Centre (CSCs) or Astro Authorised Retailers (AARs) near me; what do I do now?
Please opt for courier pick-up if there are no CSCs or AARs near you. Call 03-9543 3838 now to schedule a pick-up appointment by one of our courier partners if you are holding an Ultra or Ulti Box For non-Ultra or Ulti boxes, you may recycle your box at a registered collection center. Click here to find a registered collection center near you.
3) Do I have to print anything or fill in any forms before handing my device(s) over to the Astro agent?
No, you do not have to prepare any documents before handing your device(s) over to the Astro agent. All you have to do is hand the device(s)over to the agent and you're done! You will also receive an acknowledgment slip after successful handover.
4) I found my Box and Smart card, however, the cable(s) that came with it is lost; will there be any penalty fees?
No, please return your old Plug & Play Boxes and Smartcard. There will be no penalty fees if the cable is damaged or lost.
Recycle via Registered Collection Centres
For all recycling-related questions, please click here.
Not to worry, we are only a phone call or a message away! Call or WhatsApp our Customer Contact Centre at 03-9543 3838 and an Astro agent will be available to assist you immediately.
This exercise currently only affects person-to-person SMS with URL links. However, the blocking of SMS sent by businesses via short codes such as 6XXXX, 3XXXX, 2XXXX and 1XXXX will be implemented at a later phase. In response to this government initiative, Astro customers will no longer receive SMS bills effective 1 August 2023. This change will be carried out in phases.
Please switch your preferred Bill Delivery Method using our self-service portals via My Astro Web or My Astro app. Please click here to download the app on your mobile device or login to My Astro Web.
No there will not be any penalty.
For the Multiroom subscription on a box setup, if your subscription is within the 24-month contractual period. Then a pro-rated penalty of RM600 will be applied for any Astro box except for Ultra Box, which the penalty will be RM1,000.
We encourage customers to ensure their TV compatibility with the Astro Multiroom (Smart TV) app first before making any purchase here.
If you are still experiencing any issues, please contact us at wecare@astro.com.my or call or WhatsApp us at 03-9543 3838 and our agents will be happy to assist you.
Yes, as long as it is compatible with Open Mesh standards and Astro Fibre equipment. However, Astro will not be responsible for managing or configuring the device. For the optimum WiFi experience, please pair your Astro Fibre with Astro's Mesh WiFi.
We are always updating the Multiroom (Smart TV) app to ensure our customers get to enjoy the best entertainment experience. We will keep you posted if you are able to enjoy more 4K UHD channels in the future!
For Astro Ultra Box or Ulti Boxes, you will be able to see an itemised charge called "Box Fee” in your Astro bill.
Yes, switching package is allowed. However, switching package from Non-Deal to Deal bundle will refresh a new 24-month contract.
Step 1: You request for a move.
Step 2: One of our agents will contact you within 24 hours to set an appointment if you’re using Self Service - Astro Self-Service Portal.
Step 3: You will receive a reminder of your appointment an hour before your scheduled time.
Step 4: The technician will dismantle your satellite dish.
If there is no satellite dish, customers should dismantle the modem, router, and decoder by themselves.
Step 5: You will need to transport your device(s) to your new home.
Step 6: The technician will reinstall your satellite dish, (including modems and routers for broadband customers) at your new home based on the schedule appointment.
Note For IPTV Customers:
1. Upon relocation request, all exiting IPTV customers will be converted to our Astro & Broadband service. Customers can choose to have standard Astro service with satellite dish, or unicast Plug & Play without satellite dish.
2. If customers choose to have satellite dish, an additional RM150.00 will be charged for satellite installation. If customers choose to have unicast Plug & Play service, no satellite dish is required, hence no extra charge will be incurred.
1. Power reset (on & off) your TV, Astro Decoder, Modem and Router.
2. Ensure standard physical connection (No 3rd party devices connected to decoder and modem).
3. Please ensure at all-time your router is 0.5 meter away from your Astro Decoder to avoid signal interferences.
4. Please standby computer/laptop to access to the internet and connection must be via LAN (cable) [connect the LAN (cable) at any LAN port at router and direct to computer/laptop].
5. You may open any web browser such as Google Chrome, Internet Explorer, Mozilla Firefox and etc.
6. On the address bar, please go to http://www.speedtest.net/ and below page will appear.

7. Click "Change Server" to edit the settings preferred by Internet Service Provider (ISP).
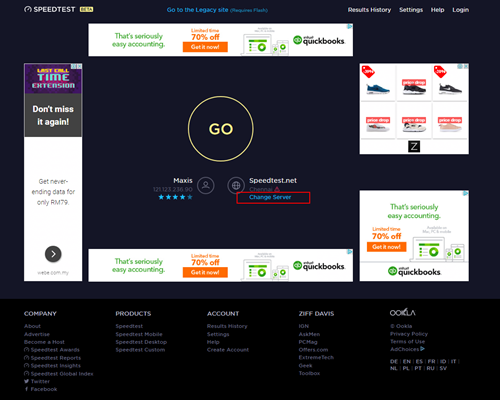
8. Edit the server settings by search and select the required server required by ISP.
For Maxis provider - Select Subang Jaya - Maxis server.
For TIME provider - Select Shah Alam - TIME dotcom Bhd server.
For Allo provider - Select Cyberjaya - Global Forway Sdn Bhd server.

9.Click "GO", and the test will begin.

The test is completed once both download and upload speeds are displayed.
Sample of the Speedtest result is shown below.

**Please ensure the snapshot includes a time stamp and network used either LAN cable or wireless (as per picture above)
10. Kindly screenshot or take a picture of the result, name it as "LAN Speedtest".
11. Repeat the test once again using Wi-Fi connection (Please unplug your LAN cable and connect via wireless connection using your SSID).
12. Screenshot or take a picture of the result, name it as "WiFi Speedtest".
STEP 1
On your remote, press the HOME button and the home menu will be displayed on top of your screen.

STEP 2
Navigate to Settings.

STEP 3
Navigate to Satellite Settings and press "OK".

STEP 4
Select Diagnostics and press "OK".

STEP 5
Signal reading on Tuner 1 will be displayed. Navigate to right arrow for next step.

STEP 6
Signal reading on Tuner 2 will be displayed. Navigate to "Done" and press "OK" to complete the diagnostics.

This issue occurs because your TV does not support the higher resolution.
STEP 1
Switch off the power for your box and make sure that the adapter's power light is off.

STEP 2
Switch on the power for your box and make sure that the adapter's power light is on.

STEP 3
Press the standby button repeatedly after switch on the power.
The Startup Options screen will appear on your TV.

STEP 4
Press "987" to access the Advanced Startup Options menu.
Then, press "1" to initiate a reset setting.

STEP 5
Press "OK" to confirm restore to factory setting.

STEP 6
After the factory setting is restored, TV will turn blank.
Please wait until the box completes initiate setup.

STEP 7
Press "1" to initiate Linux download on the software.

STEP 8
Once completed, the following screen will appear on your TV.
Refer to Installation Setup guide here to complete the setup.

You may access it by pressing "200' on your Astro remote control whilst watching TV.
Astro Fibre Bundle is a subscription service of broadband together with your desired Astro TV package, while Astro Fibre is a service that allows you to subscribe to Astro Fibre broadband only.

1. Please connect your computer or laptop to your Astro Fibre router using LAN cable. Your LAN cable must be connected from the yellow port of Astro Fibre router (Any available port).
2.Once connected, open any web browser such as Google Chrome, Internet Explorer, Mozilla Firefox and etc.
3. On the address bar, type http://192.168.100.254 and below page will appear.

Login using your username and password if you have changed the router login setting. Otherwise, your default router login is as per below.
Username: user
Password: user
4. Once you have successfully logged in, the router's web-based setup page will appear.

5. At the top of the page, click Wi-Fi to configure the WiFi parameters.

6. You may change the Wi-Fi Name and the Wi-Fi Password as per your preferences, then click "Apply".

7. Your Wi-Fi Name and password has been changed. Kindly ensure to reconnect your WiFi according your new WiFi name and password.
Thank you for your interest in returning your Astro Box & Smart card/SIM card. By returning these items, you are playing your part in preserving our environment as we will refurbish the box and return it to circulation or recycle it.
All Astro box and smartcard/SIM cards are also property of Astro and as per our current T&Cs, customers are required to return them upon termination of Astro services.
Kindly note that affected customers will be adequately informed 30 days prior to the implementation via SMS which are sent out in phases (Starting 1 July), with scheduled announcements across WhatsApp, My Astro app, and Astro website.
Service will be resumed after you make payment within 45 days. The monthly subscription fee to be prorated accordingly and a reconnection fee of up to RM20 (exclusive of SST) will be applied upon service resumption.
If payment is made within 45 days from your bill cycle date, Astro & Broadband services will be resumed within 3 hours of payment received. Your following month's bill will be prorated accordingly.
Find out more about the reconnection fee here.
4K UHD offers 4 times the resolution of HDTV (4K UHD has 3840x2160 resolution with 8 million pixels compared to HD which has 1920x1080 with 2 million pixels), sharper detail, smoother lines and a richer colour palette, as well as a vibrant colour TV experience.
Customers on Ultra Box with Sports Pack can tune in to the Astro SuperSport UHD Channel (CH 805 and CH 806) for an exciting selection of Sports content such as the Premier League and the Spanish Primera Liga.
Customers on Ultra Box with Movies Pack and News & Documentaries add-on can stream some of the latest movies and documentaries respectively in UHD by pressing the “Home” button on your remote and exploring your choices at no additional cost.
In addition, customers can rent additional movies on top of their subscription and stream the latest and hottest 4K UHD Blockbuster movies, drama series and local movies, blockbuster movies in Ultra HD via Astro First Channel 480, and Astro Best Channel 481 and VOD titles in “Store”.
Please note that a standard rent rate applies for all these titles, to learn more about the pricing, head over to the FAQ section at www.astro.com.my/ultra
Refund process required 5 working days by Astro and additional 3 - 7 working days required subject to the respective processing banks.
Any packages with Entertainment Plus, Movies Plus & Sports Plus will include Netflix. The default Netflix offering is Netflix Standard (2 screens and HD viewing) as part of your Entertainment Plus, Movies Plus and Sports Plus subscription. You can upgrade up to Netflix Premium (4 screens and 4K UHD viewing) at a price of RM 10 (inclusive of govt. tax).
Note: For the above subscriptions, you may use the email address used for your existing subscription with Netflix to activate and the future billing for Netflix will be transferred to your Astro bundle charges. For users that are billed for Netflix through Apple before joining the Astro bundle, remember to cancel your Apple billing arrangement after activating the Astro bundle else you may be double charged for your Netflix account.
If you do not have a bundle which includes Netflix, you may also add a new Netflix subscription to your Astro Bill for billing convenience.
STEP 1
On your remote, press the HOME button and the home menu will be displayed on top of your screen.
STEP 2
Navigate to Settings.
STEP 3
Navigate to STB Diagnostics and press "OK".

STEP 4
Select Household Diagnostics and press "OK".

STEP 5
Details information of Household Diagnostics screen will be displayed.

You would have to create a new Astro ID with your email address or mobile number and link your Astro subscription. Please follow the steps in the link here
The amount you're charged depends on:
You will be notified 30 days before the expiry on the renewal of subscription and can opt-out from auto renewal at least (2) days before the auto-renewal date.
If you want to opt-out of your auto-renewal for Disney+ Hotstar, please contact our Customer Contact Centre at 03 9543 3838 and speak to one of our customer service executives to change your package according to what suits you best at least two (2) days before the next auto-renewal date. Alternatively, please WhatsApp us at 03 9543 3838 and type DH Help for further assistance.
STEP 1
On your remote, press the HOME button and the home menu will be displayed on top of your screen.

STEP 2
Navigate to Settings.

STEP 3
Navigate to TV Settings and press “OK”.

STEP 4
Navigate to your preferred selection and press “OK”.

STEP 5
Navigate to Save and press "OK" to confirm your selection.

STEP 1
Switch OFF the power of your Ultra / Ulti box and make sure that the adapter's power light is off.

STEP 2
Switch ON the power of your Ultra / Ulti box and make sure that the adapter's power light is on.

STEP 3
On your remote control, press the standby button repeatedly until the Startup Options appear on TV.

STEP 4
Press "1".

STEP 5
Press "1".

STEP 6
The Software Update progress screen will appears.
The update will take 10 - 15 minutes to complete.
Please be patience.

Mesh WiFi technology greatly improves the WiFi network coverage within your home and virtually eliminates all WiFi “dead spots”. However, like all technologies there are limitations that you should be aware of.
The pairing of Mesh unit to the WiFi router is automatically handled between the WiFi router and the Mesh unit after it calculates its current position in relation to the WiFi router and surrounding Mesh unit (if available) already connected to the WiFi router.
If you are self-installing the mesh at your house, it is advisable for you to always pair the Mesh unit(s) with the WiFi router only regardless of how many Mesh unit available at your house.
Please note that if you have a Mesh connected to another Mesh, the expected performance of the WiFi speed will not perform as optimally as when compared to a Mesh connected directly to the WiFi router. Adding more points (also referred as Number of hops) in between your device to the WiFi router which will cause a reduction in bandwidth and add latency.
Your account may be under suspension. To resolve this issue, proceed to submit report via WhatsApp or Feedback Form.
For customers with the Ultra or Ulti Box, please ensure to provide your latest contact details to our Astro agent during the call to terminate your account, this includes your mobile number and house address. If you still need further help, please contact us at 03-9543 3838.

1. Please connect your computer or laptop to your Astro Fibre router using WiFi or LAN cable. Your LAN cable must be connected from the yellow port of Astro Fibre router (Any available port).
2. Once connected, open any web browser such as Google Chrome, Internet Explorer, Mozilla Firefox and etc.
3. On the address bar, type http://192.168.100.254 and below page will appear.

Login using your username and password if you have changed the router login setting. Otherwise, your default router login is as per below.
Username: user
Password: user
4. Once you have successfully logged in, the router's web-based setup page will appear.

5. At the top of the page, click WLAN to configure the WiFi parameters.

6. You may change the Primary SSID (WiFI Name) and the WPA Passphrase (WiFi Password) to follow your preferences for 2.4G Wi-Fi Settings, then click "Save & Apply" for the changes to take place.

7. You may make the same changes for 5G Settings by change the Primary SSID (WiFI Name) and the WPA Passphrase (WiFi Password) to follow your preferences, then click "Save & Apply" for the changes to take place.

You will not be able to switch between channels, use the app as a remote control, view favorite channels and programmes, use programme showtime reminder, and remote record feature.
1. Ensure power cable is connected tightly.
2. Try to use another power socket / power source to eliminate faulty power sockets/power sources which could cause the issue.

3. If the issue persists, submit your feedback form for further assistance.

1. Please use a LAN ethernet cable and connect your computer/laptop to the back of the Maxis Router.
2. You may open any web browser such as Google Chrome, Internet Explorer, Mozilla Firefox, etc.
3. On the address bar, please go to http://192.168.1.254 and the page below will appear.

The default login of the router as below. If you have done a configuration on your router and changed your password previously, please use the password you have previously set.
Username: administrator
Password: Router S/N (Available on the sticker at the back of the router)
4. Once you have successfully login, the router's web-based setup page will appear.

5. From the left menu, select WIRELESS to access the screen below.

6. You may change the Network Name (SSID) and the Password to follow your preferences, then scroll to bottom and click "Apply" for the changes to take place.

7. A warning box will popup, click "OK" for the changes to take place and reconnect to the new wireless name with the new password once completed.

8. Please wait until the connection reestablish.

Connect your PVR to Wi-Fi and enjoy access to our library of Video On Demand. Replay old seasons, catch-up latest episodes of your favourite shows, anytime you want. To connect your PVR, follow the steps below depending on your box type:
(a) Wi-Fi Enabled PVR (DMT5)

· Press the “Home” button and select “Settings” > “Network” > “Wi-Fi”
· Allow the PVR to scan Wi-Fi networks available and subsequently choose your home Wi-Fi network > Enter your Wi-Fi password if required
· Once connected, the icon below will appear on the screen.

Tip: Use the alpha-numeric keyboard on your Astro Remote to key in your password
· Press the “Home” button and select “On Demand” to start watching videos on demand!
(b) Non-Wi-Fi Enabled PVR (HD PVR)

There are two ways to connect your HD PVR decoder to your home Wi-Fi
(i) Using the Ethernet (LAN) cable
· Plug in the LAN cable from your modem into the PVR network port
· Once connected, the icon below will appear on the screen
· Press the “Home” button and select “On Demand” to start watching videos on demand!
(ii) Using an Astro Wi-Fi dongle as per shown below

Step 1 - Plugin the Wi-Fi dongle into the front USB part of your PVR decoder.
Step 2 - A prompt will appear stating "Do you wish to connect to a wireless network?", select "Yes, continue."
Step 3 - Once connected, the Wi-Fi icon will appear on the screen. Now you are ready to download and enjoy Astro's on demand entertainment.
Step 4 - Press the “Home” button and select “On Demand” to start watching videos on demand!
*The Wi-Fi dongle is only applicable for the non-Wi-Fi enabled PVR (as per the picture).
You will receive SMS notifications upon successful sign-up with a delivery tracking number for the Plug & Play Box and the Astro SIM card.
When Band Steering is enabled, only one SSID network name with one password is available. Example:
i.SSID: SSID, Password: 12345678
Although anyone can create an Astro ID, only the Astro account owner is allowed to link their account to the Astro ID. Otherwise, you will need permission from the account's owner in order to complete the linking.
STEP 1
On your remote, press the HOME button and the home menu will be displayed on top of your screen.
STEP 2
Navigate to Settings.
STEP 3
Navigate to Standby Mode and press "OK".

STEP 4
Navigate to your preferred selection and press "OK".

STEP 5
Navigate to Save and press "OK" to confirm your selection.

Users can easily access all their streaming Apps such as Netflix, Disney+ Hotstar, Viu etc by clicking the “APPS” button on their remote control. After clicking this button, they will be brought to the Apps rail under the home page.