
A free satellite TV service from Astro. Watch lifetime entertainment, news, learning & information and more.
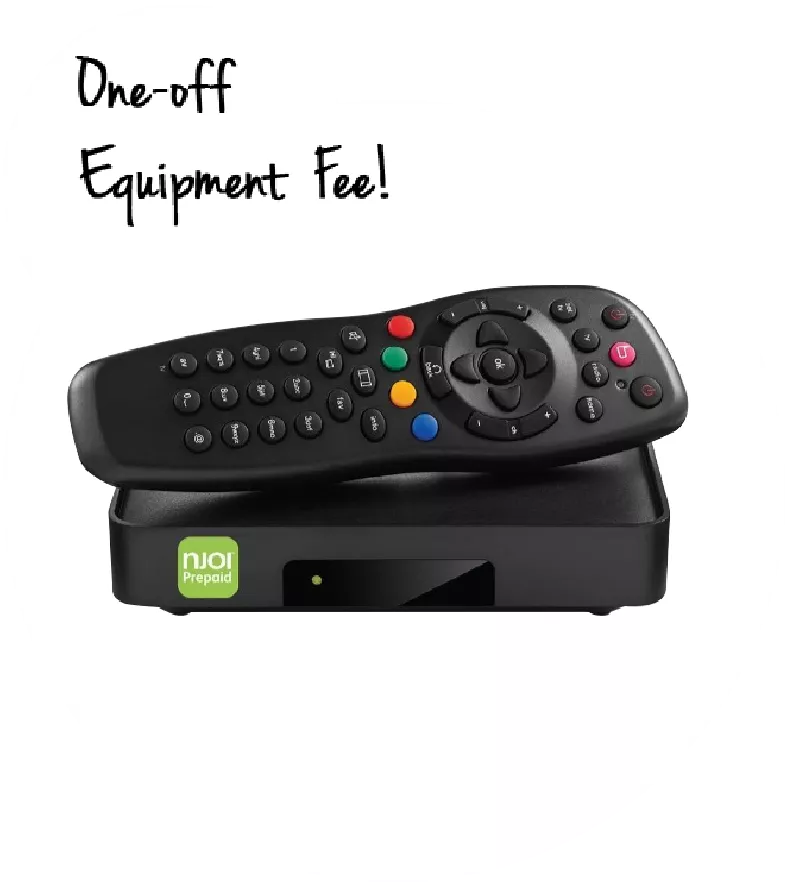
Pictures for illustration only.
Enjoy free access to 15+ TV channels & 10+ radio channels.
* Subject to Astro terms & conditions.


Step-1 |
Step-2 |
Step-3 |
Choose a plan & sign-up online. |
Sit back & wait for installation. |
Enjoy your new Astro / Broadband! |
A free satellite TV service from Astro. Watch lifetime entertainment, news, learning & information and more.
Pictures for illustration only.
New decoder only without satellite dish & cabling. You must have Astro/Njoi satellite dish and cable installed and working properly.
Including installation.
New decoder complete with satellite dish & cabling.
Including installation.
Applying for
| Njoi Astro UniFi Maxis |
Find your answers here.
We provide one stop service to apply Astro and Broadband for you.
You can avoid driving and queuing at the sales counter. We are the dealer that can help you to handle your application from the beginning to the end.
We do not charge you when you apply from us. There is no credit card information required to apply here. Charges are the same as you apply from the sales counter.
First, you can apply online, we will get back to you immediately during business hour. WhatsApp/Email/Fax us your Photocopy of IC (for malaysian) / Passport (for foreigners). When we receive all the information, we will proceed with your application immediately.
Once we receive your application with complete information, we will process your application immediately during business hour. The contractor from the service provider will then contact you for installation appointment once your application is approved.
Enjoy greater savings and hassle-free bill payment in one single bill for both Astro and Broadband. You get to enjoy Astro and Broadband at discounted price every month over the contract period of 24 months.
Astro offers multiple TV packs including Entertainment, Sports, Movies and Kids options. You can choose a pack that matches your viewing preferences and add optional streaming apps where available.
Yes, you may subscribe to Astro TV packs without bundling broadband. However, bundling Astro TV with Fibre Broadband may provide better monthly savings and convenience with a single bill.
For small households with light streaming and browsing, 100Mbps is usually sufficient. Larger families, gamers or heavy streamers may benefit from 500Mbps or 1Gbps plans for smoother performance across multiple devices.
Most Astro TV and Fibre broadband plans come with a 24-month contract. Early termination charges may apply if cancellation is made before the contract ends.
Yes, you may upgrade your TV pack or broadband speed at any time, subject to eligibility and coverage. A new contract period may apply depending on the upgrade.
Your monthly bill will be issued directly by Astro. You may receive it via email or access it through your Astro account. Bundled customers will receive a single combined bill for TV and broadband services.
Payment methods may include online banking, auto debit, credit card or other approved payment channels provided by Astro. Our team can guide you during the registration process.
If you experience any service interruption, you may contact Astro customer support for technical assistance. In many cases, issues can be resolved remotely or a technician will be arranged if necessary.
Yes, relocation is subject to service availability at your new address. Relocation charges and contract adjustments may apply depending on your plan.
No, you do not need a credit card to submit your application. Payment setup will be arranged directly with Astro after your service is approved.
Selected Astro TV packs allow optional add-ons such as streaming services depending on current promotions and availability. Additional monthly charges may apply.
Yes, a WiFi router is typically provided during fibre installation. The router model may vary depending on the selected broadband speed plan.
Yes, we will check the service coverage at your address before proceeding with your application to ensure broadband is available at your location.
For Malaysians, please provide a copy of your MyKad. For foreigners, provide a copy of your passport when submitting your broadband application.
After your application is approved, the service provider typically contacts you within 2 to 7 working days to arrange the broadband installation appointment.
Most Astro Broadband plans come with a 24-month contract starting from your installation date. If you relocate, a new 24-month contract may apply at your new address.
Yes, you can relocate your broadband service, subject to service availability at the new address. Your contract may reset for another 24 months from the new installation date.
Yes, you may request to relocate broadband devices within your home. Non-standard installation charges may apply and are payable to the installer directly after assessment.
Yes, you can switch to Astro Broadband. To avoid service interruption, it is recommended to activate the new service before terminating your current broadband contract.
Standard installations may be free during promotions, but non-standard installations (e.g., device relocation or complex wiring) may incur extra charges payable directly to the installer.
You can subscribe to new packs via

| Step 1: Visit https://id.astro.com.my/ and click on “Forgot Astro ID?” | Step 2: Enter your Account/Smartcard Number. If you do not know where to find it, click on “Where to find your Account/ Smartcard Number” |
Yes, you can restrict programmes based on the age rating by going to "Settings” > “Parental Controls & Profiles” on your Astro Box and Astro GO app. Alternatively, you may also create a Kids Profile that provides security with a 4-digit PIN to exit and accessibility to kids-friendly channels and On Demand content only.
STEP 1
On your remote, press the ... button and the Channel Guide page will be displayed on your screen.

STEP 2
Select the channel you would like to unlock and press "OK".

STEP 3
Select "Unlock Channel" and press "OK".

STEP 4
Enter the PIN to unblock the channel.

STEP 5
You are successfully unlocked the channel when this screen appears.

No, you are still able to access HBO Go on your current Movies pack.
Your existing contracts and corresponding rewards including but not limited to discounts/rebates will be removed with no penalty applied and replaced with the new contracts associated with the new packs. Exception applies to Disney+ Hotstar (3-Month Pack) and Multiroom campaigns in which remaining contract durations will be brought over if the subscription is continued or penalty will be applied upon discontinuation of said subscriptions.
In general, these two bands can be differentiated with these parameters: Coverage, Channel Interference and Speed.
2.4GHz gives better coverage but lower speeds, while 5GHz provides faster internet but covers a smaller area.

Please refer to the Welcome Card inside the Plug & Play Box package and scan the QR code. You may choose to watch either the self-installation video or the Augmented Reality (AR) Installation Video to activate your Plug & Play Box. You can also download the Installation Guide from the Astro Get Started Page.
Please install and activate your Plug & Play Box within 7 days of receiving your Plug & Play Box and Astro SIM card. If you are unable to activate your Plug & Play Box within 7 days, the Plug & Play Box will be automatically activated by Astro on the 8th day.
The billing and warranty of the Plug & Play Box shall begin on the same date of which the Plug & Play Box is activated.
In the event that you have ordered more than one (1) Plug & Play Box, please refer to the Astro SIM card letter (included with the Astro SIM card delivery) to match the right Astro SIM card to the respective Plug & Play Box. Each Astro SIM card has been paired with a specific Plug & Play Box, thus the correct matching of box and SIM card is required for it to work properly.
STEP 1
Identify your remote control:

a) Remote control with Astro logo at the bottom of the remote, proceed to STEP 2.
b) Remote control with Astro logo at the top of the remote, proceed to STEP 4
STEP 2 (Astro Logo at the bottom of the Remote)
On your remote, press the “set tv” button and set tv instructions will be displayed on top of your screen:

STEP 3
Follow the steps appear on the TV screen to sync your Astro remote and complete the setup.

STEP 4 (Astro Logo atthe top of the Remote)
Press and hold “tv input” key on bottom left of the remote for 3 seconds until the LED blinks twice.

STEP 5
Enter the 2-digit TV Code of your TV Brand and the LED will blink twice:

STEP 6
Try out the TV controls (TV Standby or adjust Volume) to check if they are working correctly.

STEP 7
Press ok and wait for the LED to blink twice to save the settings.
To reconnect your Astro account, please check your Account status, Bill Summary and pay on Astro Quick Pay. Your disconnected services will resume within 1 hour after you have paid your "Total Overdue Charges"
Please refer to these FAQs for more information.
If you would like to upgrade your pack to include Disney+ Hotstar Premium, please contact Astro Customer Contact Centre at 03 9543 3838. Alternatively, please WhatsApp Astro at 03 9543 3838 and type DH Help for further assistance.
The change in due date to 25 days after your billing date is to ensure that your transactions will be processed in a timely manner and subsequently ensure you will enjoy uninterrupted viewing. Please be assured that this change will not affect your monthly bill amount. Kindly check your latest monthly bill statement for more details about this revision.
If your existing Netflix account is linked with your Astro subscription, your Netflix account will resume on the previous method of payment. If you linked a new Netflix account with your Astro subscription, cancelling Astro service will also cancel your Netflix account.
Further details on pricing, billing and availability will be confirmed in coming months. Look out for more details and register your interest via https://astro.com.my/Netflix
STEP 1
On your remote, press the HOME button and the home menu will be displayed on top of your screen.

STEP 2
Navigate to Settings.

STEP 3
Navigate to Network Settings and press "OK".

STEP 4
Navigate to Network Diagnostics and press "OK".

STEP 5
Network Diagnostics screen will be displayed accordingly.

1. Ensure power cable is connected tightly.
2. Try to use another power socket / power source to eliminate faulty power sockets/ power sources which could cause the issue.

3. If the issue persists, submit your feedback form for further assistance.
No, the quality of your video depends on the speed and reliability of your internet.
All Astro customers with Disney+ Hotstar bundle/Add-on will be moved to the Disney+ Hotstar Premium Plan, with no changes to their current subscription pricing starting 24 April 2024. The new Disney+ Hotstar Premium Plan includes 3 concurrent streams, 10 maximum device logins, maximum video quality up to 4K Ultra HD (compatible devices required), and streaming on phone, tablet, laptop and TV.
If you have questions about your Disney+ Hotstar plan, please contact Astro Customer Contact Centre at 03 9543 3838. Alternatively, please WhatsApp Astro at 03 9543 3838 and type DH Help for further assistance.
We have discontinued offering the PVR box to our customers. You may opt to take up our latest 4K UHD supported Ultra Box instead. For more information, visit https://product.astro.com.my/box.
Alternatively, you may reach out to us at 03-7481 8000 for further enquiries or to sign up for the Ultra Box.
Upon submitting your application, you will receive the eKYC link via SMS/email/astro.com.my to complete the eKYC verification within 3 days.
Starting 27 September 2023, Astro customers may purchase Qalbox by Muslim Pro as an add-on for an exclusive price of only RM9.50/month inc. of SST (RRP: RM12.90/month). After successfully adding Qalbox to your subscription, all Ultra and Ulti Box customers can access the app on their Astro Box, the Muslim Pro mobile app, www.qalbox.com, as well as enjoy premium Muslim Pro features on the app. Please visit https://product.astro.com.my/apps/qalboxmuslimpro for more information.
1. What is Qalbox by Muslim Pro?
Qalbox by Muslim Pro is a Muslim-friendly entertainment streaming service that is accessible via the Muslim Pro app. It hosts an extensive library of content that celebrates Muslim identities and cultures worldwide and aims to create a global platform for Muslim creatives and filmmakers.
2. What is the difference between Muslim Pro and Qalbox?
Muslim Pro is the go-to Muslim lifestyle app, recognised by millions of Muslims globally ashaving the most accurate prayer time and athan/azan application for salah (prayer). Muslim Pro has a full suite of features that help Muslims practise their religion and deen more purposefully with features such as a Qibla finder, reading and listening to the Quran, a digital tasbih and more.Meanwhile, Qalbox is a streaming service by Muslim Pro to enjoy Muslim-friendly movies, TV series, animations and more. After purchasing Qalbox as an add-on, Astro customers can stream the app on their Ultra/Ulti Box, www.qalbox.com or via the Muslim Pro mobile app.
3. Why should I subscribe to Qalbox by Muslim Pro with Astro?
For an Astro-exclusive price of only RM9.50/month inc. SST (RRP: RM12.90/month), you can look forward to a wide range of content genres, including acquired and original scripted programmes, movies, documentaries, children's animations, as well as Quranic recitations and supplications (du'a). From classic movies on history, origins and civilizations of Muslims to titles that showcase modern Muslim life across the globe - viewers can immerse themselves in the experiences of other Muslims' varied journeys, struggles, and triumphs.
Additionally, you can also enjoy Premium Muslim Pro features on the mobile app which allow users to access all in-app features without any advertisements, download audio recitations of the Quran to listen offline, and add the Muslim Pro widget to their smartphone Home Page to view all prayer times, amongst many other features.
4. Where can I access Qalbox by Muslim Pro?
If you are subscribed to Qalbox by Muslim Pro, you can access your favourite Islamic content on your big screen TV via the Ultra/Ulti Box, www.qalbox.com or the Muslim Pro app.
5. What happened to my Qalbox by Muslim Pro Premium free trial?
Your free trial of Qalbox by Muslim Pro Premium subscription with Astro has ended on 26 September 2023. We hope you have enjoyed it! You may continue streaming the app by adding it to your bill for an exclusive price of only RM9.50/month inc. of SST (RRP: RM12.90/month).
6. How do I subscribe to Qalbox by Muslim Pro Premium as an Astro customer?
Astro customers may purchase Qalbox as an add-on via their Ultra or Ulti Box, My Astro app, www.astro.com.my, or by contacting our Customer Contact Centre at 03-9543 3838 (call/WhatsApp). Please follow the detailed steps below if you require guidance on how to purchase:
a) Ultra or Ulti Box
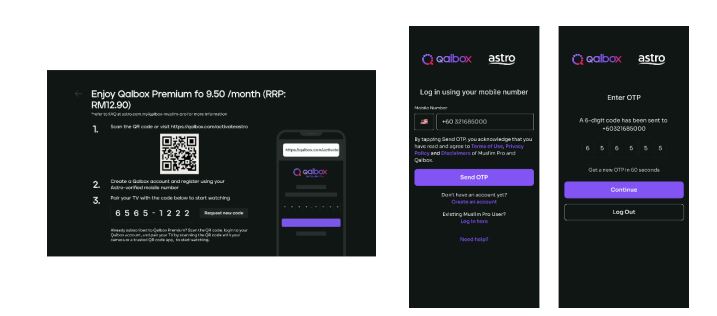
Step 1: Open œQalbox by Muslim Pro under the apps rail at your Home Page. Click on any show posters to proceed with the purchase.

Step 2: Provide your Astro verified mobile number and enter the OTP to proceed
*if you have activated your Qalbox Premium free trial, please ensure the same mobile number is used

Step 3: Scan the QR on screen to log in/create a new Qalbox account and pair it with your TV
b) My Astro app
Step 1: Open the My Astro app and select œAstro Store in the bottom menu. Then, select œApps > œQalbox by Muslim Pro > œGet it Now
Step 2: Log in with your Astro ID. Then, enter your Astro verified mobile number and perform the OTP verification to purchase

Step 3: Log in to the Qalbox mobile app using the same phone number as Step 2

Step 4: Once complete, launch Qalbox on your Ultra or Ulti Box and pair your account to your TV

c) Astro Website (www.astro.com.my)
Step 1: Visit www.astro.com.my and select œProduct & Services. Then, go to œApps > œQalbox by Muslim Pro > œGet it Now
Step 2: Log in with your Astro ID. Then, enter your Astro verified mobile number and perform the OTP verification to purchase
Step 3: Log in to the Qalbox mobile app using the same phone number as Step 2
Step 4: Once complete, launch Qalbox on your Ultra or Ulti Box and pair your account to your TV

7. I already have a Qalbox account from the free trial; how do I purchase the add-on with the same account?
Simply pick up where you left off by following the steps in Q6 and purchase the Qalbox by Muslim Pro add-on. Please ensure that the mobile number used to purchase the add-on is the same mobile number used when registering for the free trial.
8. I have my own Qalbox account outside of Astro; can I stream it on my Ultra/Ulti Box?
Yes, you can! Just follow these simple steps to stream your Qalbox account on your Ultra/Ulti Box:
Step 1: Open œQalbox by Muslim Pro under the Apps rail at your Box home page.
Step 2: Select œGo to Qalbox by Muslim Pro app then scan the QR code on screen to log in to your existing account.

Step 4: Finally, enter the pairing code displayed on your TV screen to pair your account to your Ultra/Ulti Box.
9. How do I enjoy Qalbox by Muslim Pro on the website and mobile app?
a) Qalbox Website: After subscribing through any of the methods under Q6, you will automatically be able to enjoy the app at www.qalbox.com.
b) Muslim Pro mobile app:
Step 1: Download the Muslim Pro app from the Apple App Store or Google Play Store
Step 2: Click œLog In at the bottom right corner. Then, select œContinue with Email/Phone
Step 3: Switch to the œPhone tab and enter your name and mobile number
Step 4: After clicking Continue, enter the OTP code sent to your device for verification purposes
Step 5: Enter your email address and create a password
Step 6: Now, enjoy Muslim-friendly shows on the app! Simply use the same email or phone number provided to log in in the future
10. How many devices can I use to stream Qalbox by Muslim Pro at the same time?
You can access your Qalbox by Muslim Pro account on up to five (5) devices at a time. To ensure a smoother streaming experience, please sign out from any unused devices.
11. Can I download content on Qalbox by Muslim Pro for offline viewing?
At the moment, offline downloading of content is not available.
12. Are there any subtitles or dubbing available for the content on Qalbox by Muslim Pro?
Presently, Qalbox offers subtitles in English, Bahasa Malaysia, Bahasa Indonesia, and French for selected content. Their commitment is to expand subtitle availability to encompass an even broader array of languages for all content. At this time, dubbing services are also available for selected content and they are actively exploring options to enhance accessibility and cater to the preferences of viewers.
13. Can I access Qalbox by Muslim Pro outside of Malaysia?
Yes, simply download the Muslim Pro app and log in using your registered mobile number for Qalbox. You may be required to provide your email address and password for additional security. Once done, you may access Qalbox immediately.
14. What is a Qalbox by Muslim Pro Premium subscription?
With the Qalbox by Muslim Pro Premium subscription, users can enjoy all the Muslim-friendly content on Qalbox and stream them on up to 5 devices at the same time. Additionally, users will also be able to enjoy Muslim Pro premium features on the mobile app which includes accessing all in-app features without any advertisements, download audio recitations of the Quran to listen offline, and add the Muslim Pro widget to their smartphone Home Page to view all prayer times, amongst many other features.
15. I don't have an Ultra/Ulti Box; can I still subscribe to Qalbox by Muslim Pro with Astro?
If you are not an Ultra or Ulti Box customer, you may still subscribe to Qalbox by Muslim Pro and enjoy:
a) Qalbox on the mobile app and website
b) Muslim Pro features via Muslim Pro app
16. Who may I contact if I encounter any problems with Qalbox by Muslim Pro?
Please reach out to the Qalbox team by emailing them at support@muslimpro.com if you have any enquiries or require assistance with the app.If you would like to contact Astro, you may reach out to our Customer Service Centre by:
1. Submitting a feedback form here: www.astro.com.my/contactus/form; or
2. Reaching to us via WhatsApp by typing œHi at 03-9543 3838 for assistance
17. Will my personal information be protected?
Yes, Astro is bounded by the PDPA. All information received will be used in accordance with our Privacy Notice
Step 1: Separate Your Wi-Fi Network Name
First, you need to set up your Wi-Fi to Dual-band in order to be less susceptible to interference, and allows you to choose between the 2.4GHz or 5GHz bands when connecting a device. A Wi-Fi frequency of 5GHz is best when you are near your router, and 2.4GHz is best for when you are far from your router.
Below are details for a standard login based on a standard router issued by ISP (Telekom Malaysia, Maxis, and Time dot Com)

Step 2: Factory reset your Ultra Box by following the steps below.
a. Press the Home button on your remote

b. Go to your settings page

c. Scroll down and select Reset/Restore

d. Select restore factory settings and proceed

e. Enter your PIN to access restore factory settings (default pin: 0000)

f. Choose restore and wait until the box reboots automatically. This may take around 2 minutes and you will see the Astro logo again when it's done.

Astro's Plug & Play Box is our latest box where users can enjoy the latest Astro box simply by connecting it to the TV and internet. There is no longer a need to schedule or pay for an installation. By connecting your Plug & Play Box to home broadband, you will be able to-do the following:
Other features include pause on TV and continue watching on the Astro GO app, enhanced search capabilities and more.
Connect your PVR to Wi-Fi and enjoy access to our library of Video On Demand. Replay old seasons, catch-up latest episodes of your favourite shows, anytime you want. To connect your PVR, follow the steps below depending on your box type:
(a) Wi-Fi Enabled PVR (DMT5)

· Press the “Home” button and select “Settings” > “Network” > “Wi-Fi”
· Allow the PVR to scan Wi-Fi networks available and subsequently choose your home Wi-Fi network > Enter your Wi-Fi password if required
· Once connected, the icon below will appear on the screen.

Tip: Use the alpha-numeric keyboard on your Astro Remote to key in your password
· Press the “Home” button and select “On Demand” to start watching videos on demand!
(b) Non-Wi-Fi Enabled PVR (HD PVR)

There are two ways to connect your HD PVR decoder to your home Wi-Fi
(i) Using the Ethernet (LAN) cable
· Plug in the LAN cable from your modem into the PVR network port
· Once connected, the icon below will appear on the screen
· Press the “Home” button and select “On Demand” to start watching videos on demand!
(ii) Using an Astro Wi-Fi dongle as per shown below

Step 1 - Plugin the Wi-Fi dongle into the front USB part of your PVR decoder.
Step 2 - A prompt will appear stating "Do you wish to connect to a wireless network?", select "Yes, continue."
Step 3 - Once connected, the Wi-Fi icon will appear on the screen. Now you are ready to download and enjoy Astro's on demand entertainment.
Step 4 - Press the “Home” button and select “On Demand” to start watching videos on demand!
*The Wi-Fi dongle is only applicable for the non-Wi-Fi enabled PVR (as per the picture).
Please check if you are streaming on a supported device. Astro GO is only applicable within the supported platforms; mobile devices (phones and tablets) and web browsers.
If you are still having issues, proceed to submit report via WhatsApp or Feedback Form.
STEP 1
On your remote, press the HOME button.

STEP 2
Navigate to SETTINGS icon and press "OK".

STEP 3
Navigate to Manage Satellite Frequency and press “OK”.

STEP 4
Choose Test Satellite Frequency and press “OK”.

STEP 5
Choose "Confirm" to continue Test Satellite Frequency and press “OK”.

STEP 6
Satellite Frequency Test progress screen will be displayed.

STEP 7
The test result will be displayed once completed.

STEP 1
On your remote, press the HOME button and the home menu will be displayed on top of your screen.

STEP 2
Navigate to Settings.

STEP 3
Navigate to Satellite Settings and press “OK”.

STEP 4
Navigate to LNB Setup and press “OK”.

STEP 5
Tuner Settings screen will be displayed accordingly.

STEP 6
Select LNB Type connected to your box.


STEP 7
Navigate to Next and press "OK" to confirm your selection.

STEP 8
Select this as the Entry Point and press "OK" to confirm your selection.

STEP 9
Navigate to Next and press "OK" to confirm your selection.

STEP 10
Signal reading results for Tuner 1 screen will be displayed accordingly.
Press right to navigate to Tuner 2.

STEP 11
Signal reading results screen for Tuner 2 will be displayed.
Then navigate to Finish and press "OK" to complete the setup.

By adding a Netflix account to your Astro bill, your Netflix account is already activated. No additional steps for activation are required.
For technical visit, the current fees will remain unchanged i.e.: 8% Service Tax absorbed by Astro. As for installation fees, current fees will remain unchanged i.e.: 6% Service Tax has already been included in installation fees, as 2% will be absorbed by Astro.
1) Download the Astro app from the app store available on your Smart TV.
2) Follow the steps below depending on your Smart TV brand.


Your cloud recording space will revert to 200 hours by default. If your current recordings exceed 200 hours, the system will delete the exceeded hours once you have stopped the Astro GO+ subscription starting with the oldest recordings first.
Yes, you can go to "Account' and scroll to "Subscription' and select TV pack. You may reach out to us via WhatsApp at 03-9543 3838 for more details.
To request for a move, you may choose to:
1. Self-serve by logging in to My Astro app and follow the steps below:
Step 1: From Account tab, choose Installation address under Subscription.
Step 2: Click "Relocate”.
Step 3: Verify your identity via OTP.
Step 3: Fill in the OTP that you receive and proceed by clicking "Verify"
Step 4: Confirm the Address, a support ticket will be created.
2. Submit your feedback via below link: https://support.astro.com.my/feedback-form
Step1: Choose Feedback Type
Step2: Fill in the form and click “Submit” support ticket.
Please ensure to put your box on standby mode to refresh the signal.
a. Using IVR
1. Dial 03-95433838 and select you preferred language.
2. Select Account Related.
3. Select Technical Assistance.
4. Select Refresh Smartcard.
b. Using MyAstro web
STEP 1
Go to https://myastro.astro.com.my/ in your web browser.
STEP 2
Key-in your Email / Mobile number and password. Then, press LOG IN.
STEP 3
Click on TV pack.
STEP 4
Choose Main Room for the Primary Box; else choose Multiroom (If any).
STEP 5
Click on "Refresh" to refresh signal on your box.
For Main Box
For Multiroom
STEP 6
After tap the Refresh, below notification will be displayed as below.
For Main Box
For Multiroom
c. Using MyAstro App
STEP 1
Open myAstro App and click "Login".
STEP 2
Key-in your Email / Mobile number and password. Then, press "LOG IN".
STEP 3
Go to "Account".
STEP 4
Scroll down to "TV pack" and click on it.
STEP 5
Choose Main Room for the Main Box; else choose Multiroom (If any).
STEP 6
Tap on "Refresh" to refresh signal on your box.
For Main Box
For Multiroom
STEP 7
After tap the Refresh, below notification will be displayed as below.
For Main Room
For Multiroom
In your first Astro bill, the first month's bill will be deducted accordingly excluding tax. You will still need to pay the full tax amount for your first month as per your first month's bill.
Note: Advance payment is only applicable to Astro TV pack purchases. If you subscribe to an Astro Fibre + TV bundle, only one month of your TV subscription fee (excluding tax) is required to be paid upon sign-up. The full tax amount and the first-month subscription fee for Astro Fibre will be paid on your first month's bill.
1. Tune to Astro channel 200 - select "Add-Ons"

2. Select the option for Monthly Subscription
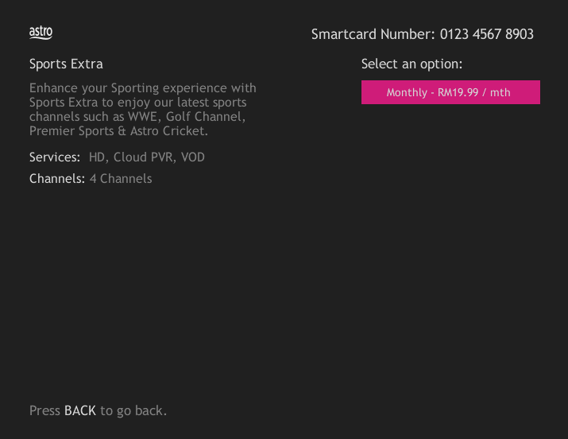
3. Send the WhatsApp code as per displayed on the TV screen

Service Tax will not be imposed on any CSR projects accounts. Any tax payable will be borne by Astro.
For any technical issues, you may visit Astro's Help & Support page or contact Astro via WhatsApp at 03-9543 3838 by typing PNP.
For customers whose sign-up speed is 50Mbps, 100Mbps or 500Mbps, you will get to enjoy your upgraded speed of 100Mbps/500Mbps/800Mbps for 24 months.
STEP 1
On your remote, press the HOME button and the home menu will be displayed on top of your screen.
STEP 2
Navigate to Settings.
STEP 3
Navigate to STB Diagnostics and press "OK".

STEP 4
Select Household Diagnostics and press "OK".

STEP 5
Details information of Household Diagnostics screen will be displayed.

All Astro customers who are actively using their username to log in will be notified via email or SMS two (2) weeks before this change takes place. Please refer to the guide below on how to check for your registered contact details:
| Step 1: Visit https://id.astro.com.my/ and log in using your username. | Step 2: Under your Profile, refer to the “Email” or “Mobile Number” fields to view your contact details. |
i.Initiate the app on your new Smart TV device, key in the unique code on the TV to your mobile
ii.You will see the list of devices on your mobile and choose the old device to be removed
iii.Your new Smart TV device will be added
STEP 1
On your remote, press the HOME button and the home menu will be displayed on top of your screen.

STEP 2
Navigate to SETTINGS.

STEP 3
Navigate to Audio Delay and press "OK".

STEP 4
Navigate to your preferred selection and press “OK”.

STEP 1
Switch off the power for your box and make sure that the adapter's power light is off.

STEP 2
Locate the Smartcard at the front or right side and gently pull it out make sure that the adapter's power light is off.

STEP 3
Wipe the Smartcard's gold chip clean using a dry soft cloth.

STEP 4
Make sure the gold chip is facing upwards and reinsert it all the way in.

STEP 5
Switch on the power for your box and make sure that the adapter's power light is on. Please wait for 5 minutes.

STEP 6
Turn on your box. You should no longer be experiencing this problem.
If issue persist, please submit the issue in our Feedback Form and attach a picture of your General tab of the STB Diagnostics for assistance.

The balance will be credited into your account, which will be reflected when you receive your next bill. The balance credit will be used to offset your bill balance.
The default PIN is 0000. You may change your PIN to a secure one by doing this at Settings, under your Preferences, select PIN Management, enter your old PIN or default PIN and proceed to create a new PIN.

STEP 1
On your remote, press the HOME button and the home menu will be displayed on top of your screen.

STEP 2
Navigate to Guide.

STEP 3
Select the channel you would like to add to favourite list and press "OK".

STEP 4
Select "Add to Favourites" and press "OK".

STEP 5
You are successfully added the channel to favourite list when this screen appears.

STEP 6
Your selected channel will have a heart tagging after added as favourite.
Please contact your issuing bank for further information. Astro does not directly handle standing instructions. Please utilise our auto-debit facility if you would like hassle-free payments.