
A free satellite TV service from Astro. Watch lifetime entertainment, news, learning & information and more.
Pictures for illustration only.
Enjoy free access to 15+ TV channels & 10+ radio channels.
* Subject to Astro terms & conditions.


Step-1 |
Step-2 |
Step-3 |
Choose a plan & sign-up online. |
Sit back & wait for installation. |
Enjoy your new Astro / Broadband! |
A free satellite TV service from Astro. Watch lifetime entertainment, news, learning & information and more.
Pictures for illustration only.
New decoder only without satellite dish & cabling. You must have Astro/Njoi satellite dish and cable installed and working properly.
Including installation.
New decoder complete with satellite dish & cabling.
Including installation.
Applying for
| Njoi Astro UniFi Maxis |
Find your answers here.
We provide one stop service to apply Astro and Broadband for you.
You can avoid driving and queuing at the sales counter. We are the dealer that can help you to handle your application from the beginning to the end.
We do not charge you when you apply from us. There is no credit card information required to apply here. Charges are the same as you apply from the sales counter.
First, you can apply online, we will get back to you immediately during business hour. WhatsApp/Email/Fax us your Photocopy of IC (for malaysian) / Passport (for foreigners). When we receive all the information, we will proceed with your application immediately.
Once we receive your application with complete information, we will process your application immediately during business hour. The contractor from the service provider will then contact you for installation appointment once your application is approved.
Enjoy greater savings and hassle-free bill payment in one single bill for both Astro and Broadband. You get to enjoy Astro and Broadband at discounted price every month over the contract period of 24 months.
Astro offers multiple TV packs including Entertainment, Sports, Movies and Kids options. You can choose a pack that matches your viewing preferences and add optional streaming apps where available.
Yes, you may subscribe to Astro TV packs without bundling broadband. However, bundling Astro TV with Fibre Broadband may provide better monthly savings and convenience with a single bill.
For small households with light streaming and browsing, 100Mbps is usually sufficient. Larger families, gamers or heavy streamers may benefit from 500Mbps or 1Gbps plans for smoother performance across multiple devices.
Most Astro TV and Fibre broadband plans come with a 24-month contract. Early termination charges may apply if cancellation is made before the contract ends.
Yes, you may upgrade your TV pack or broadband speed at any time, subject to eligibility and coverage. A new contract period may apply depending on the upgrade.
Your monthly bill will be issued directly by Astro. You may receive it via email or access it through your Astro account. Bundled customers will receive a single combined bill for TV and broadband services.
Payment methods may include online banking, auto debit, credit card or other approved payment channels provided by Astro. Our team can guide you during the registration process.
If you experience any service interruption, you may contact Astro customer support for technical assistance. In many cases, issues can be resolved remotely or a technician will be arranged if necessary.
Yes, relocation is subject to service availability at your new address. Relocation charges and contract adjustments may apply depending on your plan.
No, you do not need a credit card to submit your application. Payment setup will be arranged directly with Astro after your service is approved.
Selected Astro TV packs allow optional add-ons such as streaming services depending on current promotions and availability. Additional monthly charges may apply.
Yes, a WiFi router is typically provided during fibre installation. The router model may vary depending on the selected broadband speed plan.
Yes, we will check the service coverage at your address before proceeding with your application to ensure broadband is available at your location.
For Malaysians, please provide a copy of your MyKad. For foreigners, provide a copy of your passport when submitting your broadband application.
After your application is approved, the service provider typically contacts you within 2 to 7 working days to arrange the broadband installation appointment.
Most Astro Broadband plans come with a 24-month contract starting from your installation date. If you relocate, a new 24-month contract may apply at your new address.
Yes, you can relocate your broadband service, subject to service availability at the new address. Your contract may reset for another 24 months from the new installation date.
Yes, you may request to relocate broadband devices within your home. Non-standard installation charges may apply and are payable to the installer directly after assessment.
Yes, you can switch to Astro Broadband. To avoid service interruption, it is recommended to activate the new service before terminating your current broadband contract.
Standard installations may be free during promotions, but non-standard installations (e.g., device relocation or complex wiring) may incur extra charges payable directly to the installer.
Having trouble with your phone line ?
You may proceed to contact below dedicated service provider directly
1 800 1818 18
You may register for auto-debit via: -
1.My Astro website.

2.MyAstro App.

3.Any of our AstroExperience Store.
If you have forgotten your username or password, you may follow the steps below:
Step 1. Go to netflix.com
Step 2: Click on Sign In
Step 3: Click on "Need Help
Please refer below to set up your Ultra/Ulti Plug & Play Box.
To connect via LAN cable:
Note: If you have a two-in-one modem & router, you can skip Step ii).
To connect via Wi-Fi:
Remove your LAN cable from your old Astro box, and do not plug it into your new Plug & Play Box.

You may proceed with the following troubleshooting steps and it shouldn't take you much longer than 15 min
1. Please standby a computer/laptop to access to the internet and connection must be via LAN cable (connect the LAN cable to the Yellow port at Tplink Router and direct to the computer/laptop).
2. You may open any web browser such as Google Chrome, Internet Explorer, Mozilla Firefox and etc.
3. On the address bar, please go to tplinkwifi.net and to access to below login page. Type the Username and Password, then click "Login".

The default login of the router is available on the sticker at the back of the router. If you have done a configuration on your router previously, the password may be different.

For example, below is the login details of the above router:
Username: admin
Password: TIMECE24
4. Once you have successfully login, the router's web-based setup page will appear. Please follow below steps for the configuration.
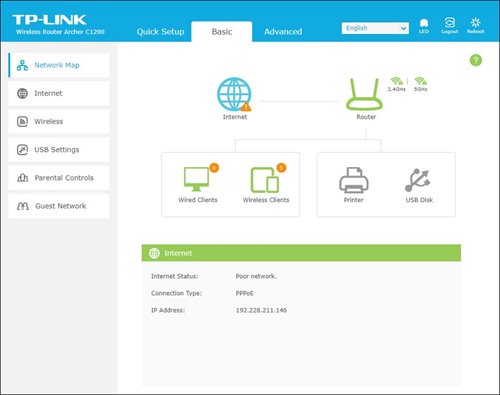
5. From the top menu, choose Advanced and click the Wireless tab on the left menu. Then, select Wireless Settings from the sub menu. Below screen will appear for 2.4GHz selection.

i. Please ensure to tick Enable Wireless Radio function.
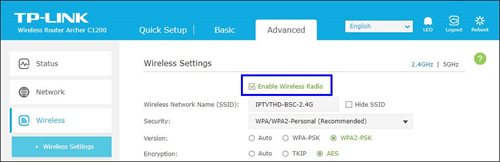
ii. To change the channel, click the drop-down arrow for Channel, then select your desired channel.
Choose between 1 to 13 (Suggested channels : 1,6,11). Then, click "Save" for the changes to take place.

iii. Click Save for the changes to take place. The router will auto reboot and connection will re-establish after few minutes.

iv. Next, select 5GHz to make changes on the wireless channel for 5GHz.
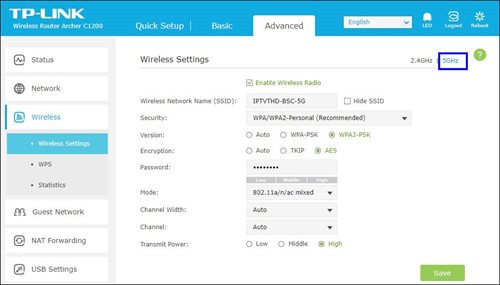
v. Click the drop-down arrow for Channel, then select your desired channel from the selection.

vi. Click Save for the changes to take place. The router will auto reboot and connection will re-establish after few minutes.

STEP 1
Check your current software version on your box.
If the software version updated (Refer to Table 1), proceed to STEP 2.

If software version different from Table 1, click here for Software Update guide.
Once software is updated, tune to the impacted channel.
If issue persist, proceed to STEP 2.
STEP 2
Run Test Satellite Frequency.
Click here for the guide.
If Test Pass, proceed to submit report here.
Guide to submit report:
At Feedback Type select "I have missing channel".
Fill up all the required information and submit.
Please indicate if you agreed to recontract for 12 months (technical visit is FOC) or paid visitation (RM65).
You will receive appointment details via SMS within 48 hours.

If Test Fail, proceed to STEP 3.

STEP 3
Proceed to Update Satellite Frequency.
Click here for the guide.
Once completed, tune to the impacted channel.
If issue persist, proceed to submit report here.
Guide to submit report:
At Feedback Type select "I have missing channel".
Fill up all the required information and submit.
Please indicate if you agreed to recontract for 12 months (technical visit is FOC) or paid visitation (RM65).
You will receive appointment details via SMS within 48 hours.
You will be contacted by an Astro representative within two working days to advise you on the next course of action.
You may check your bills and outstanding via:
1. Tune to Astro channel 200 - select "Add-Ons"

2. Select the option for Monthly Subscription
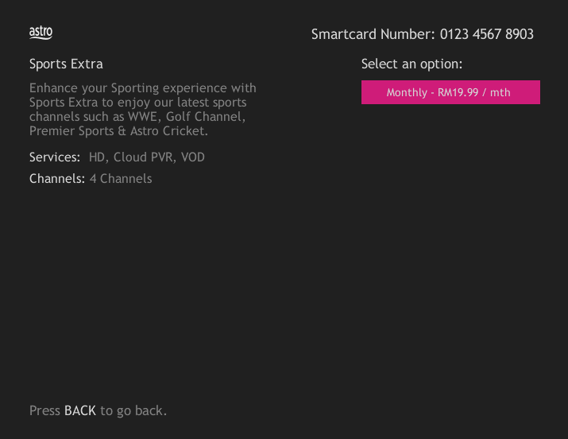
3. Send the WhatsApp code as per displayed on the TV screen

Liga Malaysia is available for all customers with a HD enabled box including Zapper, DMT5, Ulti Box and Ultra Box.
You may report the incident on WhatsApp at 03-9543 3838 by typing PNP and our access our user guide or request for further help from our dedicated agents. Please have your Airway Bill tracking numbers ready for validation. If a replacement box/Astro SIM card is deemed necessary, a new Box and a new Astro SIM card will be couriered to your service address.
Service Tax is charged based on the date the service is rendered. For services rendered on or after 1st March 2024, the Service Tax rate would be at 8% whilst for services enjoyed before 1st March 2024, the Service Tax rate would be 6%.
Yes, you may terminate the service. However, an early cancellation fee will be applied for terminations/cancellations within 24 months. Please refer to the Astro Fibre's cancellation details.
Please contact your issuing bank for further information. Astro does not directly handle standing instructions. Please utilise our auto-debit facility if you would like hassle-free payments.
Depending on your service, it is mandatory to return some devices as per our T&Cs, whilst other devices should be disposed of and recycled at collection centres registered under the Department of Environment. To find out what you should do with your devices after service termination, please click here.
Please rest assured that streamingapps labelled with "coming soon"
will be available on Astro in the near future.Please visit product.astro.com.my/appsfor more information on the streaming apps available on Astro or follow oursocial media to get notified on latest launches.
Facebook: @Astro
Instagram: @astromalaysia
Twitter: @astroonline
Kindly take note that streaming appslabelled with “coming soon” will be made available on Astro once they areready. Astro reserves the right to delay or cancel streaming app launches, ifnecessary.
For Residential Astro Pay TV customers: Yes, you are allowed to change your package to the one that best suits your entertainment needs. You may make the following pack changes:
For these changes, you will remain on same contract duration, or you can choose to change to longer commitment. If you downgrade your packs, you will be charged a cancellation fee for pack, and you can then choose a new contract for the new pack. Kindly note additional contract details for Disney+ Hotstar and Netflix.
(Please refer to the section "Changes to your Astro Contract" for more details)
Astro GO is a companion app that is complimentary for all Astro subscribers and allows up to 2 users to stream at the same time. 200 hours of cloud recording* come complimentary with your Pay TV subscription.
Astro GO+ is an add-on service that enables up to 4 users to stream Astro GO and/or Multiroom Smart TV** at the same time. The amount of cloud recording storage will also be increased to 1500 hours.

*Cloud recording hours are shared across your Astro Box, Astro GO and Multiroom Smart TV
** Provided that you have a Multiroom Smart TV subscription
Please follow the steps below to reset your password:
To set up a Mesh WiFi network around your house, the Mesh unit will need to be paired with the WiFi router. Steps to pair these two devices are as follows:
i. Place the Mesh unit close to the WiFi router (within 2 meters) and power it on
ii. After the Mesh unit starts up, press and hold the WPS buttons of the Mesh unit and the WiFi router for 3 - 5 seconds in turn within 2 minutes
iii. After the WLAN and Internet indicators of the Mesh turns steady blue, the Mesh is connected to the Internet
iv. Move the Mesh to the desired place where you need to expand WiFi and power it on. After the Internet indicator turns steady blue, WiFi is expanded successfully.
Yes, you have the option to transfer the credit balance to another active Astro account. It will be considered as payment to that account and is subject to Astro's terms & conditions.
No, Astro Fibre is only available for a 24-month contract period upon sign-up.
Although anyone can create an Astro ID, only the Astro account owner is allowed to link their account to the Astro ID. Otherwise, you will need permission from the account's owner in order to complete the linking.
To access these streaming apps, you would need to upgrade to the Ultra or Ulti Box by visiting product.astro.com.my/box. Alternatively, you may also reachus via WhatsApp by typing "Hi
STEP 1
Press any button on your Astro remote.
INDICATOR: LED blinking 3 times / NO LED blink
SOLUTION: Replace new battery

STEP 2
Check if you can change channel using your Astro remote control.
If issue remain after the battery replacement, try changing the channel manually directly from box front panel (If any).
If it's working, you might need to replace your Astro remote.
This might be due to a faulty Astro remote.
You may purchase it directly from Astro Exclusive Partners.

If confirm no issue with remote control, please refer to Decoder Hang at Channel troubleshooting steps here.
Your Disney+ Hotstar will be paused and will only resume once your Astro service is reinstated.
Tap on the "Account' screen on the navigation bar and scroll to the "Subscription' section. Tap on "TV Pack' to view your pack, box, multiroom, and Astro GO information.

STEP 1
Press "HOME" button on your remote control.

STEP 2
Navigate to Settings and press "OK".

STEP 3
Navigate to Installation Settings and press "OK".

STEP 4
Enter your PIN to access this setting. (Default PIN is 0000).

STEP 5
Navigate to Restore Factory Settings and press "OK".

STEP 6
Navigate to Yes, continue and press "OK" to confirm your selection.
Otherwise, navigate to No, go back to maintain the settings.

STEP 7
Please reboot your box.

STEP 8
New Installation Settings screen will appear.
Click here to follow New Installation Settings guide.

Please check your internet speed and connection status. If your internet is working without any issues, please logout & login into the app again.
If you are still having issues, proceed to submit report via WhatsApp or Feedback Form.
Your account number will be used to identify/verify you for all After Sales-Services. You may also use your mobile number/ Astro smart card number/ NRIC number or Astro Box number.
We are working with the Sony team to ensure you will be able to enjoy these 4K UHD channels soon. We will keep you posted once these channels are available to you!


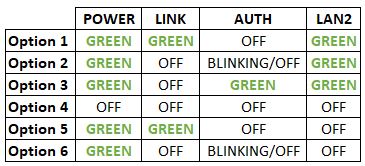

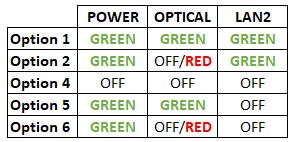


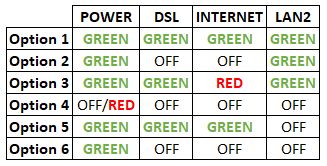
Option 1
1. Please turn off all devices (Modem and Router). By restarting your modem, you can isolate the possibility of overloaded processes in the modem, which would impact its performance.
2. Ensure the fiber cable from your wall socket and modem is securely connected.


Notes: You might be connected to LAN 1 if backbone is Maxis
Router connection

3. Please make sure the LAN cable is connected properly from router (Port 1-4 - Yellow port) to PC/Laptop.
4. If the issue persists, submit your feedback form and attach your modem light indicator picture/video for further assistance.
Option 2/ Option 3/ Option 5/ Option 6
1. Please turn off all devices (Modem and Router). By restarting your modem, you can isolate the possibility of overloaded processes in the modem, which would impact its performance.
2. Ensure the fiber cable from your wall socket and modem is securely connected.

3. Ensure both cables on the Modem (LAN Port 2) and Router (WAN Port - Red port) are properly connected.


Notes: You might be connected to LAN 1 if backbone is Maxis
Router connection

4. Please make sure the LAN cable is connected properly from router (Port 1-4 - Yellow port) to PC/Laptop.
5. Please make sure both cables on Router (Any Yellow port) and Astro Decoder (Network Port behind decoder) are properly inserted.


6. Switch on modem and router and please wait for 2 minutes to stabilise the devices after reboot.
7. If the issue persists, submit your feedback form and attach your modem light indicator picture/video for further assistance.
Option 4
1. Ensure Modem/Router are connected tightly to the power socket.

2. Try to use another power socket / power source to eliminate faulty power sockets/power sources which could cause the issue.
3. If the issue persists, submit your feedback form for further assistance.

| Step 1: Visit https://id.astro.com.my/ and click on “Forgot Astro ID?” | Step 2: Enter your Account/Smartcard Number. If you do not know where to find it, click on “Where to find your Account/ Smartcard Number” |
STEP 1
Press "HOME" button on your remote control.

STEP 2
Navigate to Settings and press "OK".
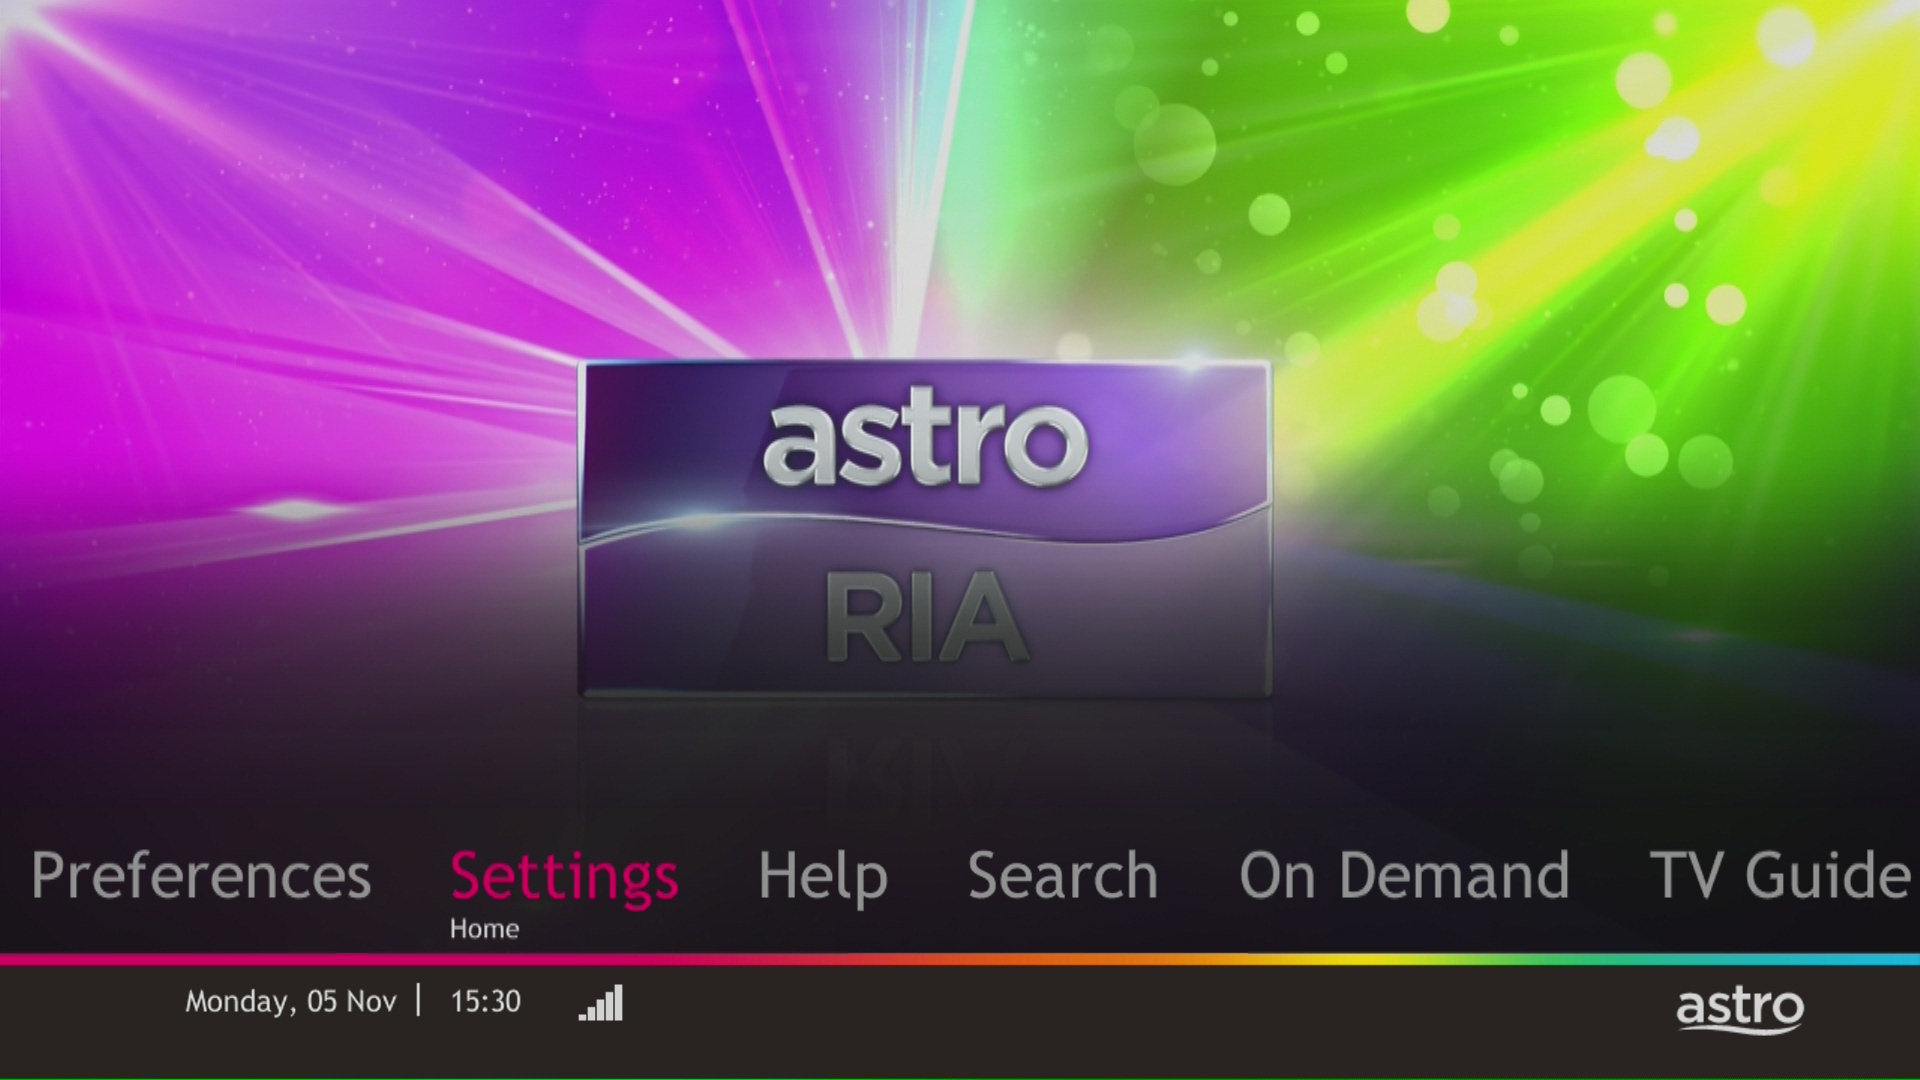
STEP 3
Navigate to STB Diagnostics and press "OK".

STEP 4
Take a look at the HDMI Connection Status.

This issue occurs because your TV does not support the higher resolution.
STEP 1
Switch off the power for your box and make sure that the adapter's power light is off.

STEP 2
Switch on the power for your box and make sure that the adapter's power light is on.

STEP 3
Press the standby button repeatedly after switch on the power.
The Startup Options screen will appear on your TV.

STEP 4
Press "987" to access the Advanced Startup Options menu.
Then, press "1" to initiate a reset setting.

STEP 5
Press "OK" to confirm restore to factory setting.

STEP 6
After the factory setting is restored, TV will turn blank.
Please wait until the box completes initiate setup.

STEP 7
Press "1" to initiate Linux download on the software.

STEP 8
Once completed, the following screen will appear on your TV.
Refer to Installation Setup guide here to complete the setup.

Unfortunately, you cannot link your direct Disney+ Hotstar subscription to your Astro account. Please ensure that the mobile number used for your direct subscription to Disney+ Hotstar is different from the mobile number used to activate Disney+ Hotstar entitlement via your Astro subscription. If you do not have an alternative mobile number to nominate, kindly contact Disney+ Hotstar's customer service directly at disneyplus.my@hotstar.com for details on how to cancel your direct subscription.
STEP 1
Switch off the power for your box and make sure that the adapter's power light is off.

STEP 2
Locate the Smartcard at the front or right side and gently pull it out.
Make sure that the adapter's power light is off.

STEP 3
Wipe the Smartcard's gold chip clean using a dry soft cloth.

STEP 4
Make sure the gold chip is facing upwards and reinsert it all the way in.

STEP 5
Switch on the power for your box and make sure that the adapter's power light is on. Please wait for 5 minutes.

STEP 6
Turn on your box. You should no longer be experiencing this problem.

If issue persist, please submit the issue on our Feedback Form and attach a picture of your smart card number for assistance.
Connect your PVR to Wi-Fi and enjoy access to our library of Video On Demand. Replay old seasons, catch-up latest episodes of your favourite shows, anytime you want. To connect your PVR, follow the steps below depending on your box type:
(a) Wi-Fi Enabled PVR (DMT5)

· Press the “Home” button and select “Settings” > “Network” > “Wi-Fi”
· Allow the PVR to scan Wi-Fi networks available and subsequently choose your home Wi-Fi network > Enter your Wi-Fi password if required
· Once connected, the icon below will appear on the screen.

Tip: Use the alpha-numeric keyboard on your Astro Remote to key in your password
· Press the “Home” button and select “On Demand” to start watching videos on demand!
(b) Non-Wi-Fi Enabled PVR (HD PVR)

There are two ways to connect your HD PVR decoder to your home Wi-Fi
(i) Using the Ethernet (LAN) cable
· Plug in the LAN cable from your modem into the PVR network port
· Once connected, the icon below will appear on the screen
· Press the “Home” button and select “On Demand” to start watching videos on demand!
(ii) Using an Astro Wi-Fi dongle as per shown below

Step 1 - Plugin the Wi-Fi dongle into the front USB part of your PVR decoder.
Step 2 - A prompt will appear stating "Do you wish to connect to a wireless network?", select "Yes, continue."
Step 3 - Once connected, the Wi-Fi icon will appear on the screen. Now you are ready to download and enjoy Astro's on demand entertainment.
Step 4 - Press the “Home” button and select “On Demand” to start watching videos on demand!
*The Wi-Fi dongle is only applicable for the non-Wi-Fi enabled PVR (as per the picture).
STEP 1
Press "HOME" button on your remote control.

STEP 2
Navigate to Update Satellite Frequency and press “OK”.

STEP 3
Choose Reprogramming and press “OK”.

STEP 4
Select Yes, continue and press "OK" to proceed with the update.
Otherwise, select No, go back to cancel.

STEP 5
Satellite Frequency Update progress screen will be displayed.

STEP 6
The test result will be displayed once completed.
Press "OK" to go back to channel.

You will only be able to watch Astro GO and/or Multiroom Smart TV on up to 2 devices at the same time as opposed to 4 devices with Astro GO+.
Your cloud recording storage will also decrease from 1500 hours down to 200 hours. Your stored recordings/downloaded shows that exceed 200 hours will also be removed.
Having trouble with your phone line ?
You may proceed to contact dedicated service provider directly - 1 800 8211 23
The default PIN is 0000. You may change your PIN to a secure one by doing this at Settings, under your Preferences, select PIN Management, enter your old PIN or default PIN and proceed to create a new PIN.

Mesh WiFi network refers to a unified wireless network that is formed by utilizing inter-connected WiFi nodes (Mesh devices) placed throughout the house.
Your Astro GO email will be delivered to you within an hour upon checkout. Please click the link provided to set up your password and download the Astro GO app on your device by clicking here (Google Play Store) or here (iOS App Store). If you want to stream it directly via your computer or laptop, Astro GO is also available at astrogo.astro.com.my. Log in with your Astro ID and start streaming!
1. Ultra Box magenta light / Ulti Box purple light - Your box is turned "On".
Press the Home button to launch Video On Demand and stream anytime or press channel number on your remote.

2. Ultra Box / Ulti Box orange light - Your box is on "Standby" mode.
Your box is ready to be turned "On" or leave it in this mode to receive new software updates.

3. Ultra Box / Ulti Box blinking orange light - Your box is booting up.
Please wait a few minutes for the box to start.
4. Ultra Box / Ulti box blinking blue light - Your box is downloading a software update.
Please wait a few minutes for the download to complete.

Yes, customers will be charged 8% Service Tax for packages purchased after 29th February due to the implementation of the 8% Service Tax starting 1st March 2024.
Starting 23 August 2022, Astro customers will progressively be able to access Disney+ Hotstar via the Ulti Box, in addition to the Ultra Box, mobile app and website.
Astro introduces Liga Malaysia for all Astro customers to watch the Malaysian Football League’s Liga Malaysia competitions LIVE, comprising Perlawanan Sumbangsih (Piala Sultan Haji Ahmad Shah), Liga Super, Piala FA and Piala Malaysia live in HD on Astro Arena (CH801), Arena Bola channels (CH803 and CH804) and stream on Astro GO until further notice.
No, customers are only allowed to choose ONE billing option (either Paper Bill or E-bill or SMS bill). However, customers who opted for Paper Bill will still be able to check their bills through Astro Self-Service Portal, IVR, Channel 200 and WhatsApp.
Please refer to the Welcome Card inside the Plug & Play Box package and scan the QR code. You may choose to watch either the self-installation video or the Augmented Reality (AR) Installation Video to activate your Plug & Play Box. You can also download the Installation Guide from the Astro Get Started Page.
Please install and activate your Plug & Play Box within 7 days of receiving your Plug & Play Box and Astro SIM card. If you are unable to activate your Plug & Play Box within 7 days, the Plug & Play Box will be automatically activated by Astro on the 8th day.
The billing and warranty of the Plug & Play Box shall begin on the same date of which the Plug & Play Box is activated.
In the event that you have ordered more than one (1) Plug & Play Box, please refer to the Astro SIM card letter (included with the Astro SIM card delivery) to match the right Astro SIM card to the respective Plug & Play Box. Each Astro SIM card has been paired with a specific Plug & Play Box, thus the correct matching of box and SIM card is required for it to work properly.