



Nationwide Installation
Applying for
| Astro Njoi UniFi Maxis |
Frequently Asked Questions
Find your answers here.
We provide one stop service to apply Astro and Broadband for you.
You can avoid driving and queuing at the sales counter. We are the dealer that can help you to handle your application from the beginning to the end.
We do not charge you when you apply from us. There is no credit card information required to apply here. Charges are the same as you apply from the sales counter.
First, you can apply online, we will get back to you immediately during business hour. WhatsApp/Email/Fax us your Photocopy of IC (for malaysian) / Passport (for foreigners). When we receive all the information, we will proceed with your application immediately.
Once we receive your application with complete information, we will process your application immediately during business hour. The contractor from the service provider will then contact you for installation appointment once your application is approved.
Enjoy greater savings and hassle-free bill payment in one single bill for both Astro and Broadband. You get to enjoy Astro and Broadband at discounted price every month over the contract period of 24 months.
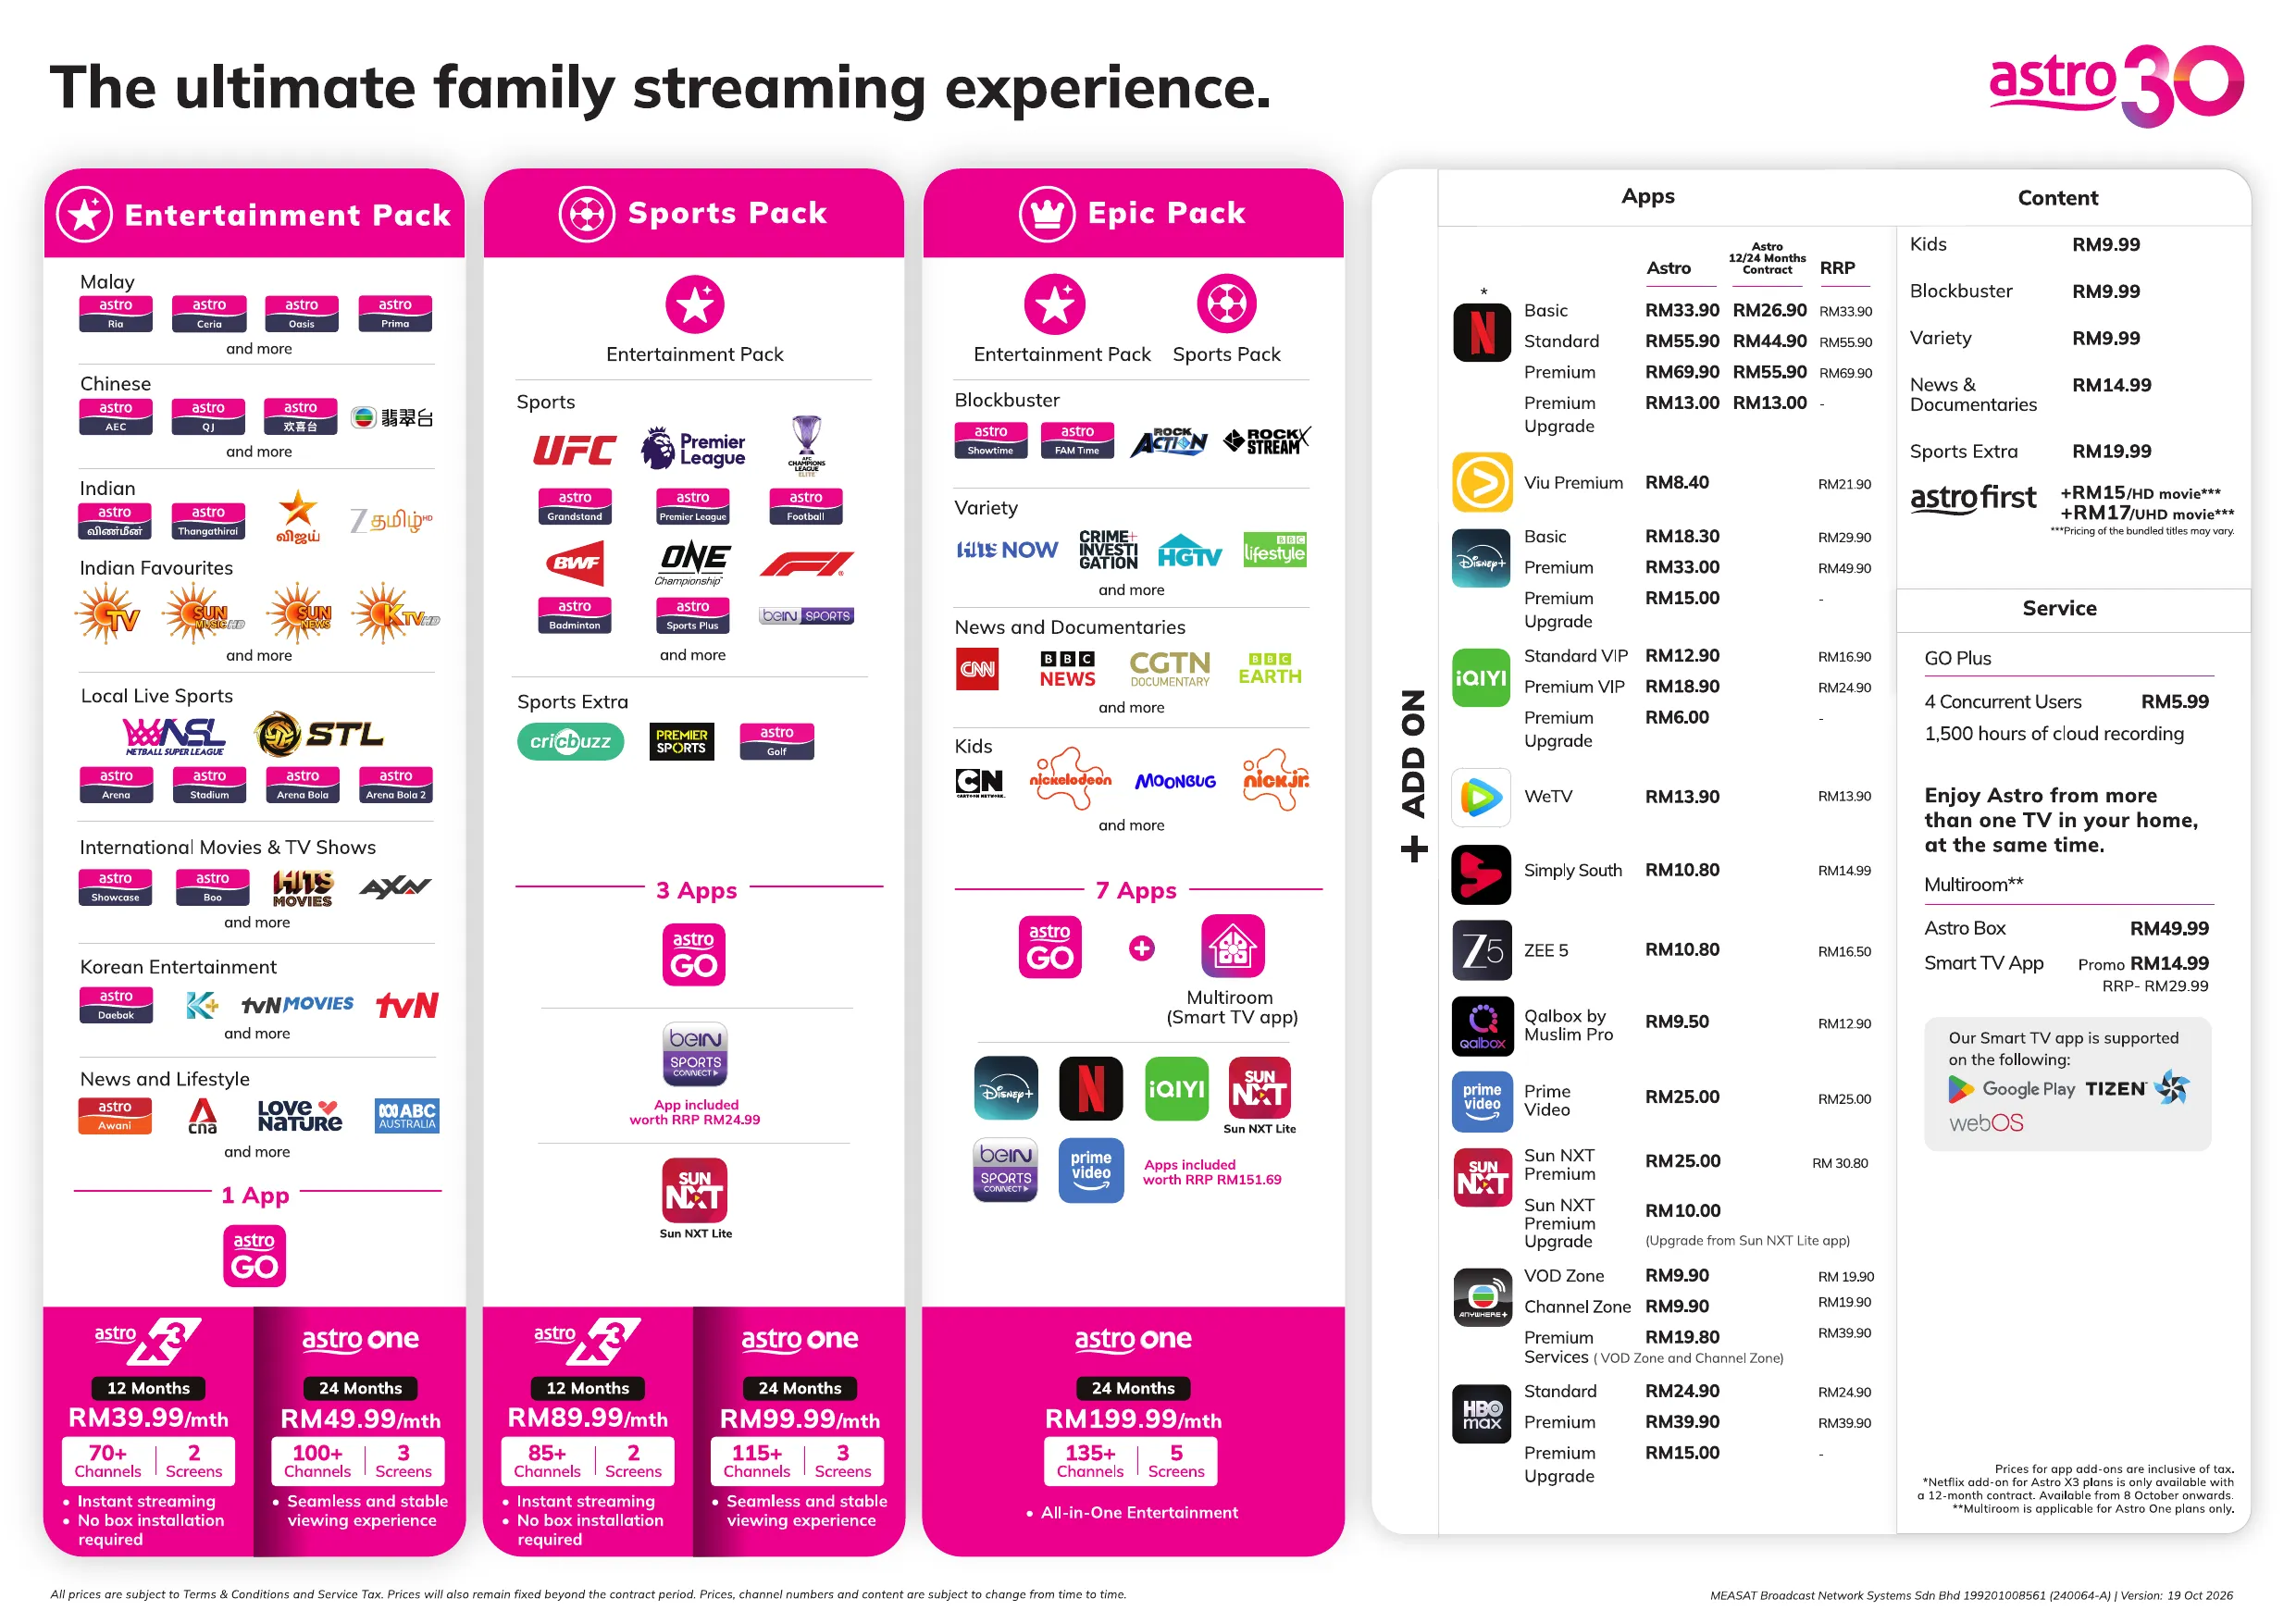
Astro offers multiple TV packs including Entertainment, Sports, Movies and Kids options. You can choose a pack that matches your viewing preferences and add optional streaming apps where available.
Yes, you may subscribe to Astro TV packs without bundling broadband. However, bundling Astro TV with Fibre Broadband may provide better monthly savings and convenience with a single bill.
For small households with light streaming and browsing, 100Mbps is usually sufficient. Larger families, gamers or heavy streamers may benefit from 500Mbps or 1Gbps plans for smoother performance across multiple devices.
Most Astro TV and Fibre broadband plans come with a 24-month contract. Early termination charges may apply if cancellation is made before the contract ends.
Yes, you may upgrade your TV pack or broadband speed at any time, subject to eligibility and coverage. A new contract period may apply depending on the upgrade.
Your monthly bill will be issued directly by Astro. You may receive it via email or access it through your Astro account. Bundled customers will receive a single combined bill for TV and broadband services.
Payment methods may include online banking, auto debit, credit card or other approved payment channels provided by Astro. Our team can guide you during the registration process.
If you experience any service interruption, you may contact Astro customer support for technical assistance. In many cases, issues can be resolved remotely or a technician will be arranged if necessary.
Yes, relocation is subject to service availability at your new address. Relocation charges and contract adjustments may apply depending on your plan.
No, you do not need a credit card to submit your application. Payment setup will be arranged directly with Astro after your service is approved.
Selected Astro TV packs allow optional add-ons such as streaming services depending on current promotions and availability. Additional monthly charges may apply.
Yes, a WiFi router is typically provided during fibre installation. The router model may vary depending on the selected broadband speed plan.
Yes, we will check the service coverage at your address before proceeding with your application to ensure broadband is available at your location.
For Malaysians, please provide a copy of your MyKad. For foreigners, provide a copy of your passport when submitting your broadband application.
After your application is approved, the service provider typically contacts you within 2 to 7 working days to arrange the broadband installation appointment.
Most Astro Broadband plans come with a 24-month contract starting from your installation date. If you relocate, a new 24-month contract may apply at your new address.
Yes, you can relocate your broadband service, subject to service availability at the new address. Your contract may reset for another 24 months from the new installation date.
Yes, you may request to relocate broadband devices within your home. Non-standard installation charges may apply and are payable to the installer directly after assessment.
Yes, you can switch to Astro Broadband. To avoid service interruption, it is recommended to activate the new service before terminating your current broadband contract.
Standard installations may be free during promotions, but non-standard installations (e.g., device relocation or complex wiring) may incur extra charges payable directly to the installer.
Please use your Astro ID to log in to the Astro Fibre App. If you do not have an Astro ID, kindly follow the simple steps here to create one.
Visit our page to find out about our new packs.
Astro is continuously improving our user interface and introducing new features to our platforms to ensure that your Astro experience is more seamless, efficient and user-friendly.
For details on our latest interface, Picture-in-Picture mode and auto-start interactive mode on Astro GO, please click here.
In addition, we have also recently introduced a new look to the Title Information Page, the ability to disable the Profile Selection Screen and adjustable auto-standby timing. For more information, please click here.
Step 1:
Type ASTRO<space>BAL<space>10-Digit Astro Account No.
Example: ASTRO BAL 08XXXXXXXX
*Standard telco charges and Terms and Conditions apply
Step 2:
Send SMS to 66688
Starting 12 December 2023, users have to use their registered email address, mobile number or a social account (Facebook, Google or Apple) to log into any of Astro's digital platforms, including My Astro, Astro GO and Astro's official website. Usernames as an Astro ID is no longer available. This change was made to ensure details linked to your Astro account are always updated and to improve the overall user experience on our platforms.
1. Clearly indicate full name of Astro customer, contact number and Astro subscription account number when making each payment (e.g. on bank-in slips)
2. For Direct Debit, please contact your bank for standing instructions. Provide the full name of Astro customer and Astro account number. The Direct Debit service may not be available with all banks. Please check with your bank for confirmation of Direct Debit service.
3. Please inform us of any changes in billing address/information by contacting us via one of these platforms.
IMPORTANT NOTICE: To avoid any problems in payment processing, please pay only at authorised Astro payment channels
No. Astro GO is a FREE entitlement exclusively for customers with an Astro subscription. If you do not have an Astro subscription account, please visit astro.com.my to find out more.
STEP 1
On your remote, press the HOME button and the home menu will be displayed on top of your screen.

STEP 2
Navigate to Settings.

STEP 3
Navigate to Parental Control and press "OK".

STEP 4
Please enter your PIN (Default PIN is 0000).

STEP 5
Navigate to your preferred category to block and press "OK".

Your existing offers with us will not be affected and will continue until the agreed upon date.
Yes, you can upgrade your internet speed. However, speed downgrade is not allowed.
Yes,existing Astro & Broadband customers within contract or out of contract can subscribe to Astro Fibre offer. The 24-month contract will be renewed.
However, your contract with Maxis/Allo needs to be terminated before signing up to this offer. An early cancellation fee applies if you are still within contract.
*Subject to Terms &Conditions of your contract
Your monthly bill of the previous and new pack will be prorated. This will be reflected into your bill accordingly.
Yes, you can manage all of your Astro Fibre subscriptions with the Astro Fibre App. However, you would need to create a different Astro ID for each Astro Fibre account.
Please make sure that:
- You are logging in with the correct registered Astro ID (email or phone number) and password. If you can’t remember your password, please proceed to use the “forget password” function.
- You have an Astro ID that is linked to an Astro account. (note: NJOI – linked users will not be able to log into Astro GO)
- Your Astro account is active and not under suspension.
If the above points have been met, you may try some quick solutions below:
- Clear the cache on your browser or app.
- Check if you have the latest version of the browser or app.
- Log out and log back into the browser or app.
- Relaunch the browser or app.
- Restart your mobile device.
- Restart your internet connection.
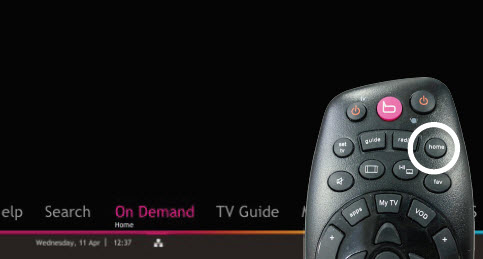
STEP 1
On your remote, press the “HOME” button and the home menu will be displayed at the bottom of your screen.
STEP 2
Navigate to SETTINGS and press “OK”.

STEP 3
Navigate to STB DIAGNOSTICS and press “OK”.

STEP 4
Refer to the signal strength % shown on the top left of your screen.

Your purchase will be reflected on your next monthly Astro bill. For example, if you rented a movie for RM 15.00 for 2 days and your next bill statement is in 2 weeks. RM 15.00 will be reflected in your Astro subscription bill in two weeks' time.
The eKYC link is only valid for 3 days to complete the eKYC verification process. You will be required to submit a fresh Astro account application.
Please rest assured that streamingapps labelled with "coming soon"
will be available on Astro in the near future.Please visit product.astro.com.my/appsfor more information on the streaming apps available on Astro or follow oursocial media to get notified on latest launches.
Facebook: @Astro
Instagram: @astromalaysia
Twitter: @astroonline
Kindly take note that streaming appslabelled with “coming soon” will be made available on Astro once they areready. Astro reserves the right to delay or cancel streaming app launches, ifnecessary.
STEP 1
On your remote, press the “HOME” button and the home menu will be displayed at the bottom of your screen.

STEP 2
Navigate to SETTINGS and press “OK”.
STEP 3
Navigate to STB DIAGNOSTICS and press “OK”.
STEP 4
Select the “Network” tab in the STB Diagnostics page.
Please ensure the Tunes service multicast status is Multicast Up.
If the status is Multicast is Not Available, please reboot your box and router before verifying this status.

If issue persists, please submit the issue in our Feedback Form and attach a picture of your Network tab of the STB Diagnostics for assistance.
STEP 1
Check on the adapter's power light.
If the adapter's power light is ON, please refer to Blank Screen troubleshooting steps here.
Otherwise, if the adapter's power light is OFF, switch off the power for your box.

STEP 2
Ensure power cable is connected tightly.
Plug in power cable to different power socket and switch on the plug.
You should no longer be experiencing this problem.
If issue remains, proceed to STEP 3.

STEP 3
Try a different power socket to connect the equipment.
Turn on the power socket and check the adapter's power light.

If there is no light on your power adaptor's, please submit the issue on our Feedback Form and attach a picture of your smart card number for assistance.
Please indicate in the form if any lightning strike/thunderstorm/power trip occurred.
Please contact us through one of our platforms found here or Self-serve by logging in to Astro Self-Service Portal within 3-7 days before moving out and we will sort everything out for you!
STEP 1
On your remote, press the HOME button.

STEP 2
Navigate to SETTINGS icon and press "OK".

STEP 3
Navigate to Manage Satellite Frequency and press “OK”.

STEP 4
Choose Test Satellite Frequency and press “OK”.

STEP 5
Choose "Confirm" to continue Test Satellite Frequency and press “OK”.

STEP 6
Satellite Frequency Test progress screen will be displayed.

STEP 7
The test result will be displayed once completed.

You will be able to view your new package(s) within 24 hours of subscribing. Please note that if you are an Astro customer subscribing to HD channels, you will have to connect an HDMI cable to your TV before you will be able to enjoy the channels.
STEP 1
Switch OFF the power of your Ultra / Ulti box and make sure that the adapter's power light is off.

STEP 2
Switch ON the power of your Ultra / Ulti box and make sure that the adapter's power light is on.

STEP 3
On your remote control, press the standby button repeatedly until the Startup Options appear on TV.

STEP 4
Press "1".

STEP 5
Press "1".

STEP 6
The Software Update progress screen will appears.
The update will take 10 - 15 minutes to complete.
Please be patience.

The balance will be credited into your account, which will be reflected when you receive your next bill. The balance credit will be used to offset your bill balance.
For more info on the product including offers and setup, visit product.astro.com.my/multiroom
Please ensure to put your box on standby mode to refresh the signal.
a. Using IVR
1. Dial 03-95433838 and select you preferred language.
2. Select Account Related.
4. Select Refresh Smartcard.
b. Using MyAstro web
STEP 1
Go to https://myastro.astro.com.my/ in your web browser.
STEP 2
Keyin your Email / Mobile number and password. Then, press "LOG IN".

STEP 3
Click on TV pack.

STEP 4
Choose Main Room for the Primary Box; else choose Multiroom (If any).

STEP 5
Click on "Refresh" to refresh signal on your box.
For Main Box 
For Multiroom
STEP 6
After tap the Refresh, below notification will be displayed as below.
For Main Box 
For Multiroom
c. Using My Astro App
STEP 1
Open My Astro App and click "Login".

STEP 2
Keyin your Email / Mobile number and password. Then, press "LOG IN".

STEP 3
Go to "Account".

STEP 4
Scroll down to "TV pack" and click on it.

STEP 5
Choose Main Room for the Main Box; else choose Multiroom (If any).

STEP 6
Tap on "Refresh" to refresh signal on your box.

STEP 7
After tap the Refresh, below notification will be displayed as below.

Astro ID and / or account deletion is permanent. Upon deletion, it will be unlinked from your TV subscription account and you will be logged out from all the associated Astro apps and / or services connected including the partner apps that you have logged in using the same Astro ID. If you have any queries regarding Astro ID or would like to request for Astro ID account deletion, click on submit your request here, fill in the required details and our Astro representative will get back to you within 3 business days for security verification purposes.
STEP 1
Check the Audio settings on your box and set to Auto.
Refer guide to change Digital Audio Settings.
STEP 2
If issue persist, check if there is any 3rd party device (sound system/hdmi splitter) connected between box and TV.
STEP 3
If using 3rd party devices, bypass/remove 3rd party device and make sure HDMI cable connected directly from box to TV.
STEP 4
If issue persist, connect to Live Agent via WhatsApp for help.
STEP 1
Check the Audio settings on your box and set to Auto.
Refer guide to change Set HDMI Audio.
STEP 2
If issue persist, check if there is any 3rd party device (sound system/hdmi splitter) connected between box and TV.
STEP 3
If using 3rd party devices, bypass/remove 3rd party device and make sure HDMI cable connected directly from box to TV.
STEP 4
If issue persist, connect to Live Agent via WhatsApp for help.
Kindly note that affected customers will be adequately informed 30 days prior to the implementation via SMS which are sent out in phases (Starting 1 July), with scheduled announcements across WhatsApp, My Astro app, and Astro website.
STEP 1
On your remote, press the HOME button and the home menu will be displayed on top of your screen.
STEP 2
Navigate to Settings.
STEP 3
Navigate to STB Diagnostics and press "OK".

STEP 4
Select Advanced Diagnostics and press "OK".

STEP 5
Details information of Advanced Diagnostics screen will be displayed.

STEP 6
Press down arrow on your remote to get more information.

The expiry date is when your current Disney+ Hotstar entitlement ends, except if your Astro subscription is out of contract, in which case this expiry date may not apply to you. For details on your subscription expiry date, please call our Customer Contact Centre or WhatsApp us "DH Help
Step 1: You request for a move.
Step 2: One of our agents will contact you within 24 hours to set an appointment if you’re using Self Service - Astro Self-Service Portal.
Step 3: You will receive a reminder of your appointment an hour before your scheduled time.
Step 4: The technician will dismantle your satellite dish.
If there is no satellite dish, customers should dismantle the modem, router, and decoder by themselves.
Step 5: You will need to transport your device(s) to your new home.
Step 6: The technician will reinstall your satellite dish, (including modems and routers for broadband customers) at your new home based on the schedule appointment.
Note For IPTV Customers:
1. Upon relocation request, all exiting IPTV customers will be converted to our Astro & Broadband service. Customers can choose to have standard Astro service with satellite dish, or unicast Plug & Play without satellite dish.
2. If customers choose to have satellite dish, an additional RM150.00 will be charged for satellite installation. If customers choose to have unicast Plug & Play service, no satellite dish is required, hence no extra charge will be incurred.

- Please standby computer/laptop to access to the internet and connection must be via LAN (cable) [Connect the LAN (cable) to the yellow port in Maxis Router and direct to computer/laptop].
- You may open any web browser such as Google Chrome, Internet Explorer, Mozilla Firefox and etc.
- On the address bar, please go to http://192.168.1.254 and below page will appear.

The default login of the router as below. If you have done a configuration on your router previously, the password may be different.
Username: user
Password: Router S/N (Available on the sticker at the back of the router)
4. Once you have successfully login, the router's web-based setup page will appear. Please follow below steps for the configuration.

5. From the left menu, choose Wireless 2.4GHz and then click Basic Settings tab on the left menu to access to below screen.

6. You may change the Wireless Network Name (SSID) and the SSID Password to follow your preferences, then click "Save" for the changes to take place.
Please reconnect to the new wireless name with the new password once completed.
7. Since this is a dual band router, you will have 2 Wireless Network Names (SSID) i.e. 2.4GHz and 5GHz. You may connect to any of the SSID, preferably with a stronger signal available.
You may change the Wireless Network Name (SSID) and the SSID Password to follow your preferences for 5GHz by choosing Wireless 5GHz then click Basic Settings.
Click "Save" for the changes to take place and reconnect to the new wireless name with the new password once completed.

Customers with HD boxes can subscribe to the All-New Astro Pack without a box upgrade except if the customer request to move to OTT bundled pack which is mandatory to upgrade to Ulti or Ultra.
Note: OTT is referring to either Netflix, D+H or both.
Yes, switching package is allowed. However, switching package from Non-Deal to Deal bundle will refresh a new 24-month contract.
For customers subscribed to our New Astro Packs (for example: Primary, Entertainment or Sports Packs), you will be charged a one-off switching fee of RM10 (excl. govt tax) if you decide to switch to another ala-carte add-on with a lower fee. For example, removing Korean add-on (RM9.99/month) and purchasing Horror add-on (RM5.99/month) will incur a RM10 (excl. govt tax) switching fee to your account.
For customers subscribed to our Old Astro Packs (for example: Super or Dynasty Packs), there will be a one-off switching fee of RM10 (excl. govt tax) if you decide to switch to another ala-carte add-on with a lower or same fee. For example, removing Korean add-on (RM9.99/month) and purchasing Horror add-on (RM5.99/month) OR Kids add-on (RM9.99/month) will incur a RM10 (excl. govt tax) switching fee to your account.
STEP 1
On your remote, press the HOME button.
STEP 2
Navigate to SETTINGS icon and press "OK".
STEP 3
Navigate to Manage Satellite Frequency and press “OK”.
STEP 4
Choose to Update Satellite Frequency and press “OK”.

STEP 5
Choose "Confirm" to continue Satellite Frequency Update and press “OK”.

STEP 6
Satellite Frequency Update progress screen will be displayed.
The updates will take approximately 20 minutes.

STEP 7
The status will be displayed once update is complete.

Yes, please WhatsApp "DH Help
If you would like to upgrade your pack to include Disney+ Hotstar Premium, please contact Astro Customer Contact Centre at 03 9543 3838. Alternatively, please WhatsApp Astro at 03 9543 3838 and type DH Help for further assistance.
Your Astro GO email will be delivered to you within an hour upon checkout. Please click the link provided to set up your password and download the Astro GO app on your device by clicking here (Google Play Store) or here (iOS App Store). If you want to stream it directly via your computer or laptop, Astro GO is also available at astrogo.astro.com.my. Log in with your Astro ID and start streaming!
No there will not be any penalty.
For the Multiroom subscription on a box setup, if your subscription is within the 24-month contractual period. Then a pro-rated penalty of RM600 will be applied for any Astro box except for Ultra Box, which the penalty will be RM1,000.
Please refer to these FAQs for more information, or click here to learn more and sign up for the Ultra Box. Alternatively, you may call 03-7481 8000 to get in touch with an Astro representative.
STEP 1
Press "HOME" button on your remote control.
STEP 2
Navigate to Settings and press "OK".
STEP 3
Navigate to Digital Audio and press "OK".

STEP 4
Choose your preferred selection and press “OK”.

STEP 5
Select Yes, continue and press "OK" to confirm on the changes.
Otherwise, select No, go back to cancel.

We are sorry you are thinking of leaving us.
If you wish to cancel your Astro subscription, kindly do take note of the information below if your account is still within contract period,
- Termination Request must be completed by the account holder.
- You need to settle the outstanding balance and penalty (if any).
- All Termination Request require a 30-day notice period.
1. Ensure power cable is connected tightly.
2. Try to use another power socket / power source to eliminate faulty power sockets/ power sources which could cause the issue.

3. If the issue persists, submit your feedback form for further assistance.
STEP 1
Choose your language preferences for both Menu Language and Info Language. Then, press "OK".

STEP 2
Select you box operating mode and press "OK".

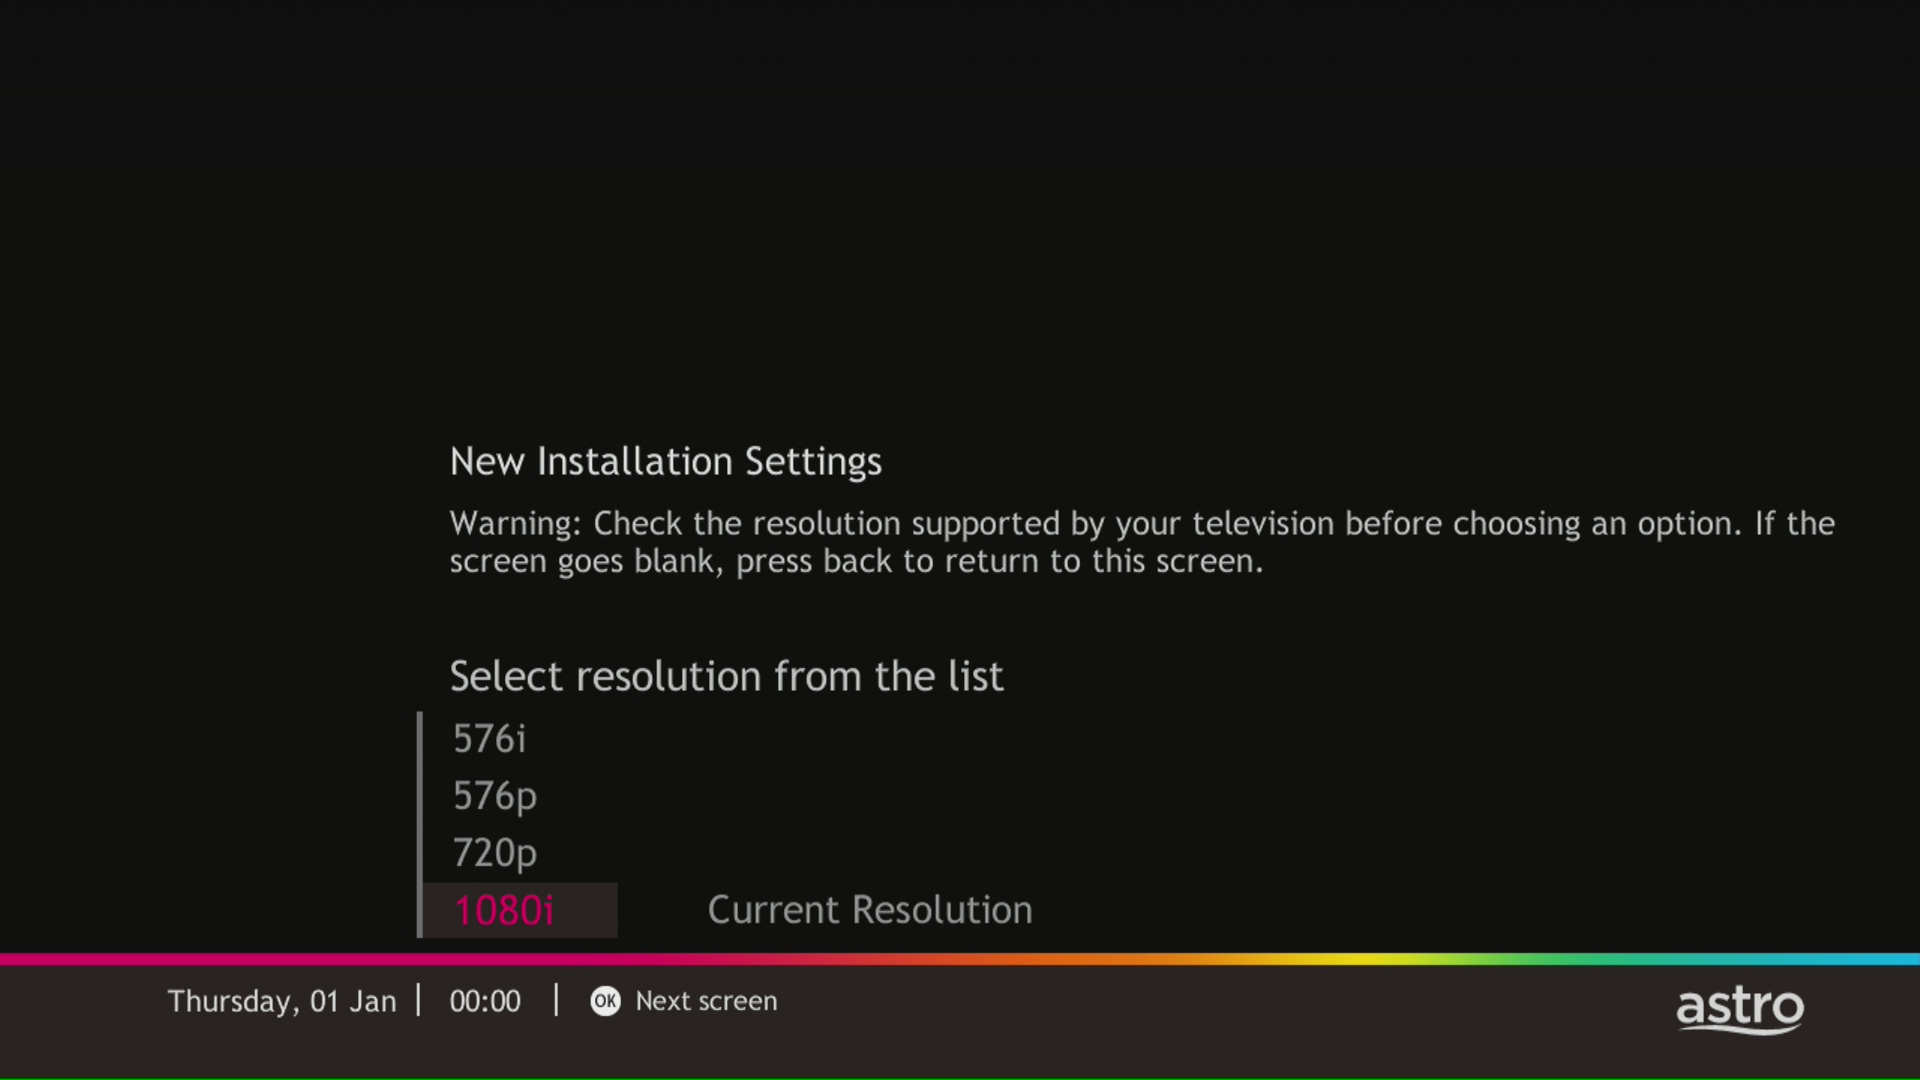
STEP 3
Select the resolution supports by your TV and press "OK".
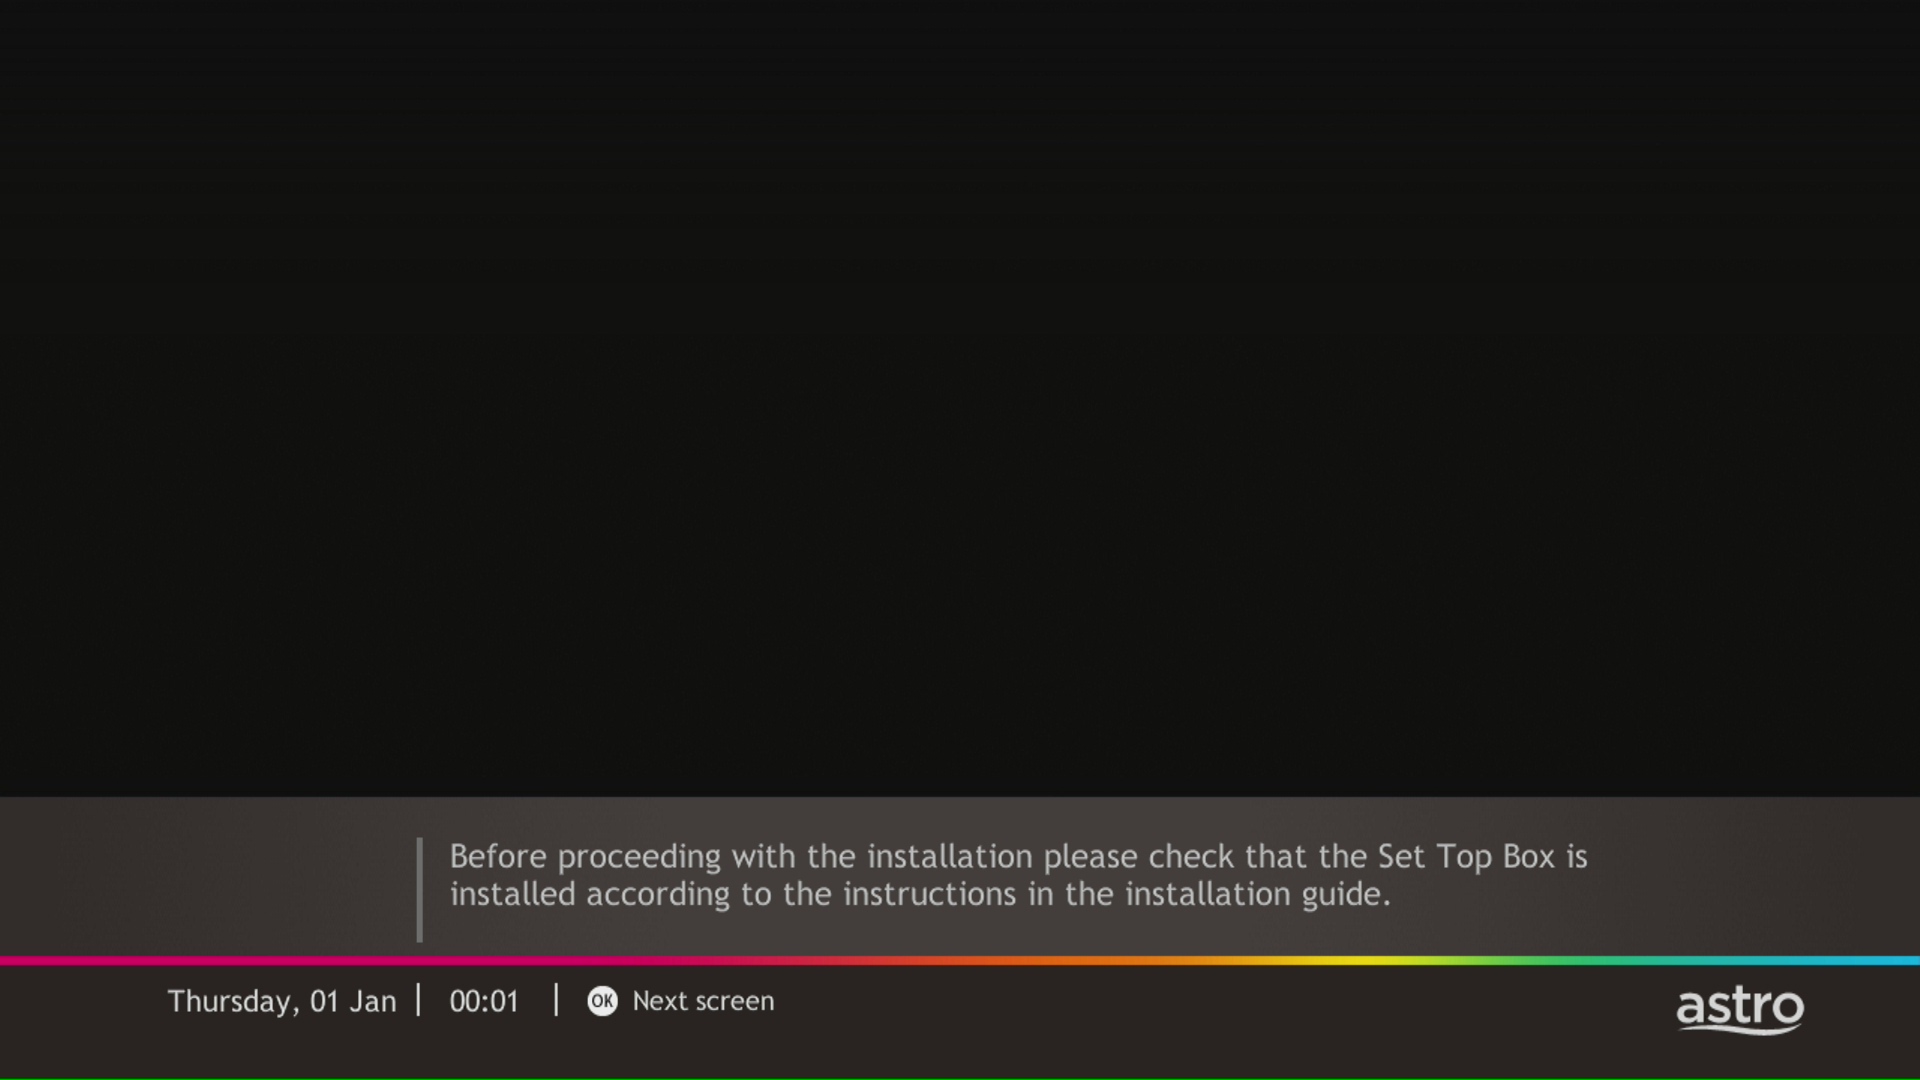
STEP 4
Press "OK" to proceed to the next screen.
STEP 5
Please select the LNB type and press "OK".

STEP 6
Select this as the Entry Point and press "OK" to confirm your selection.

STEP 7
Signal reading results for Tuner 1 and Tuner 2 screen will be displayed. Then, press "OK" to proceed to next screen.

STEP 8
Select Yes, continue and press "OK" to connect to Wi-Fi network.
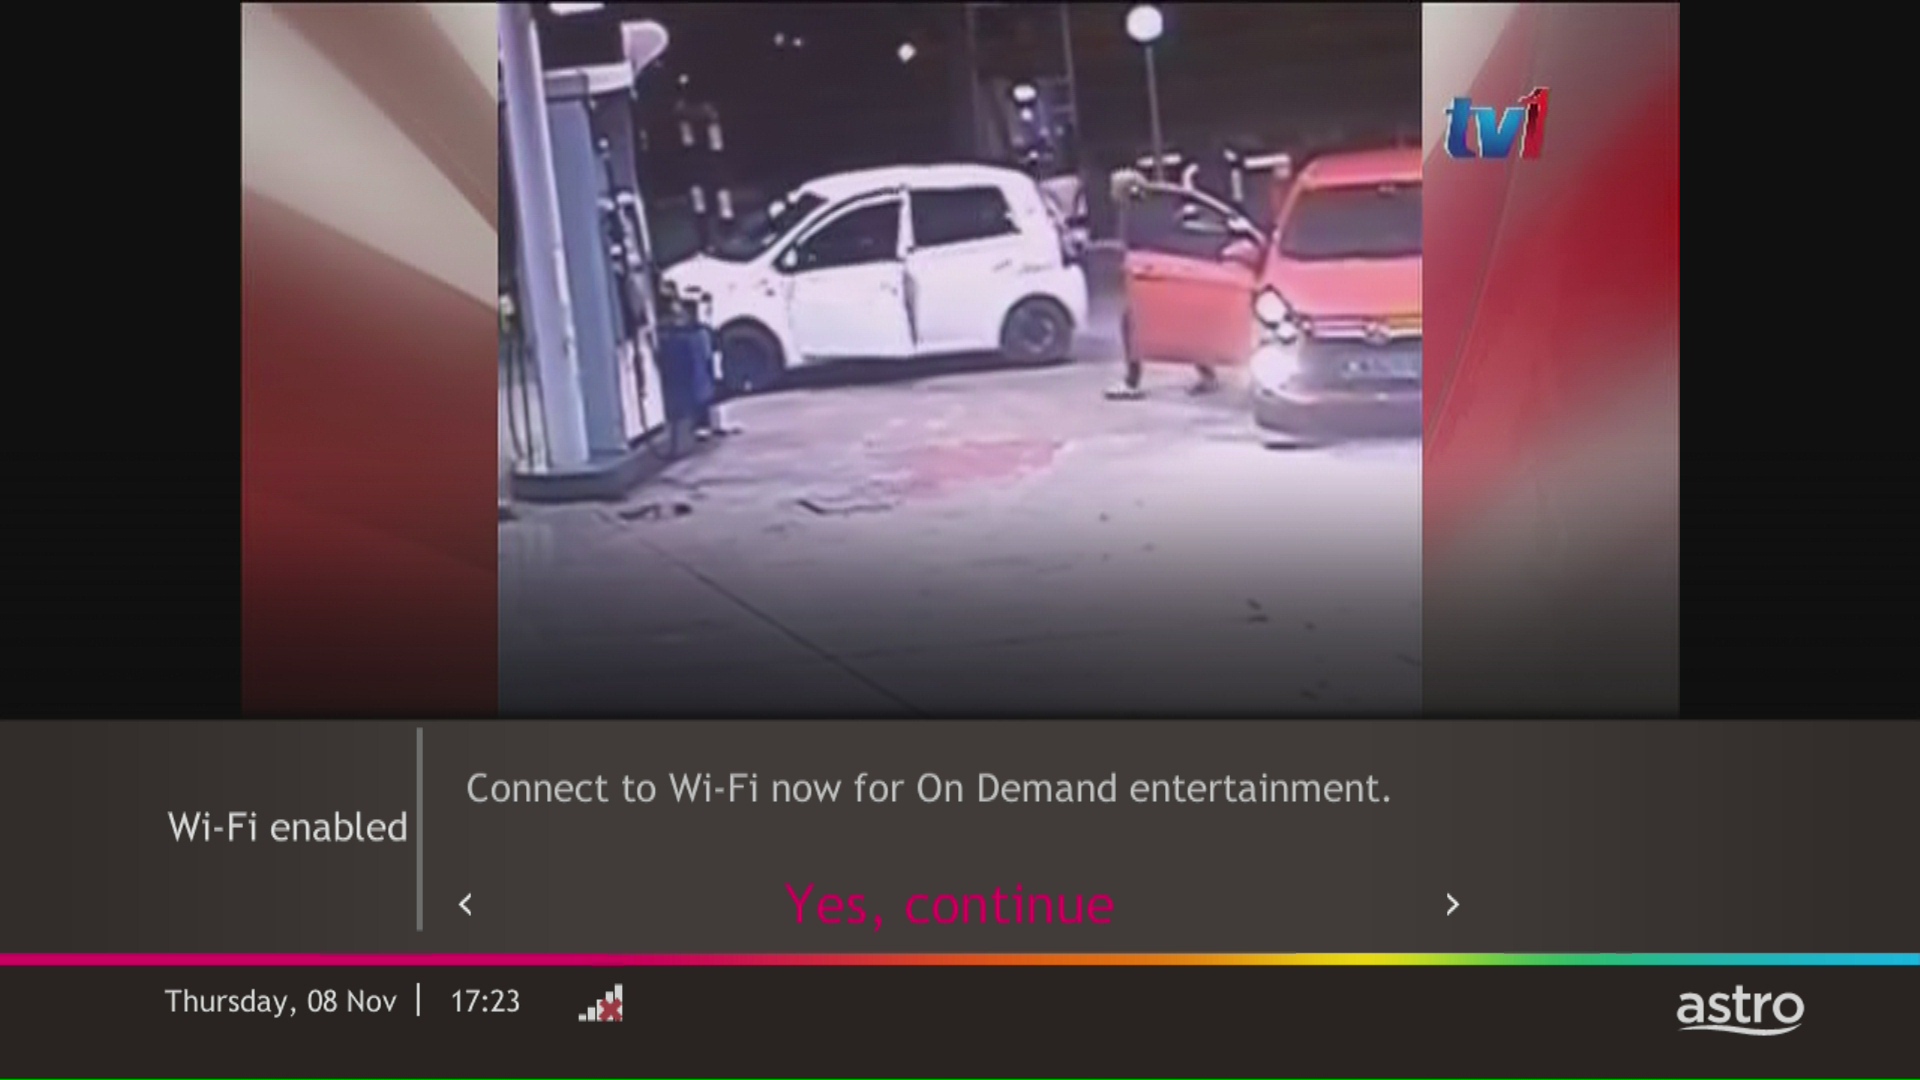
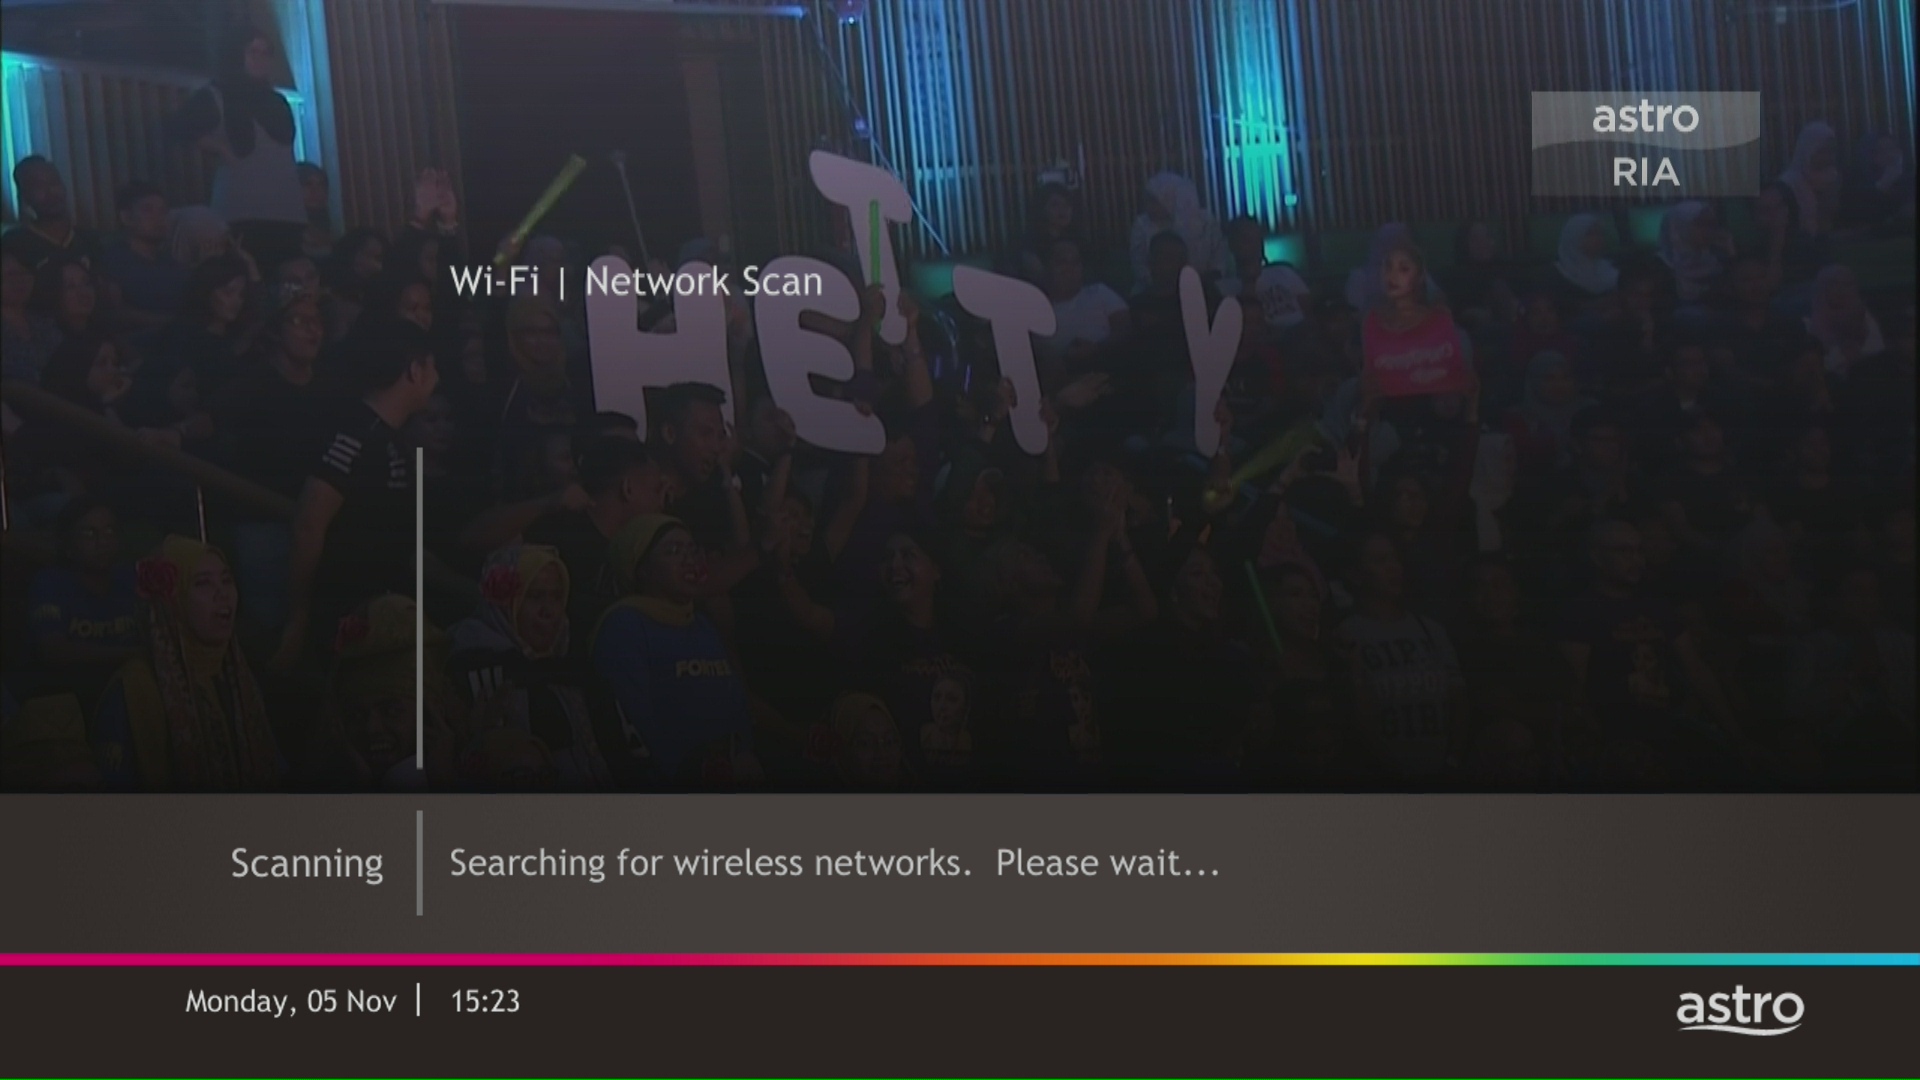
STEP 9
Please wait while the box scanning for the available Wi-Fi network.
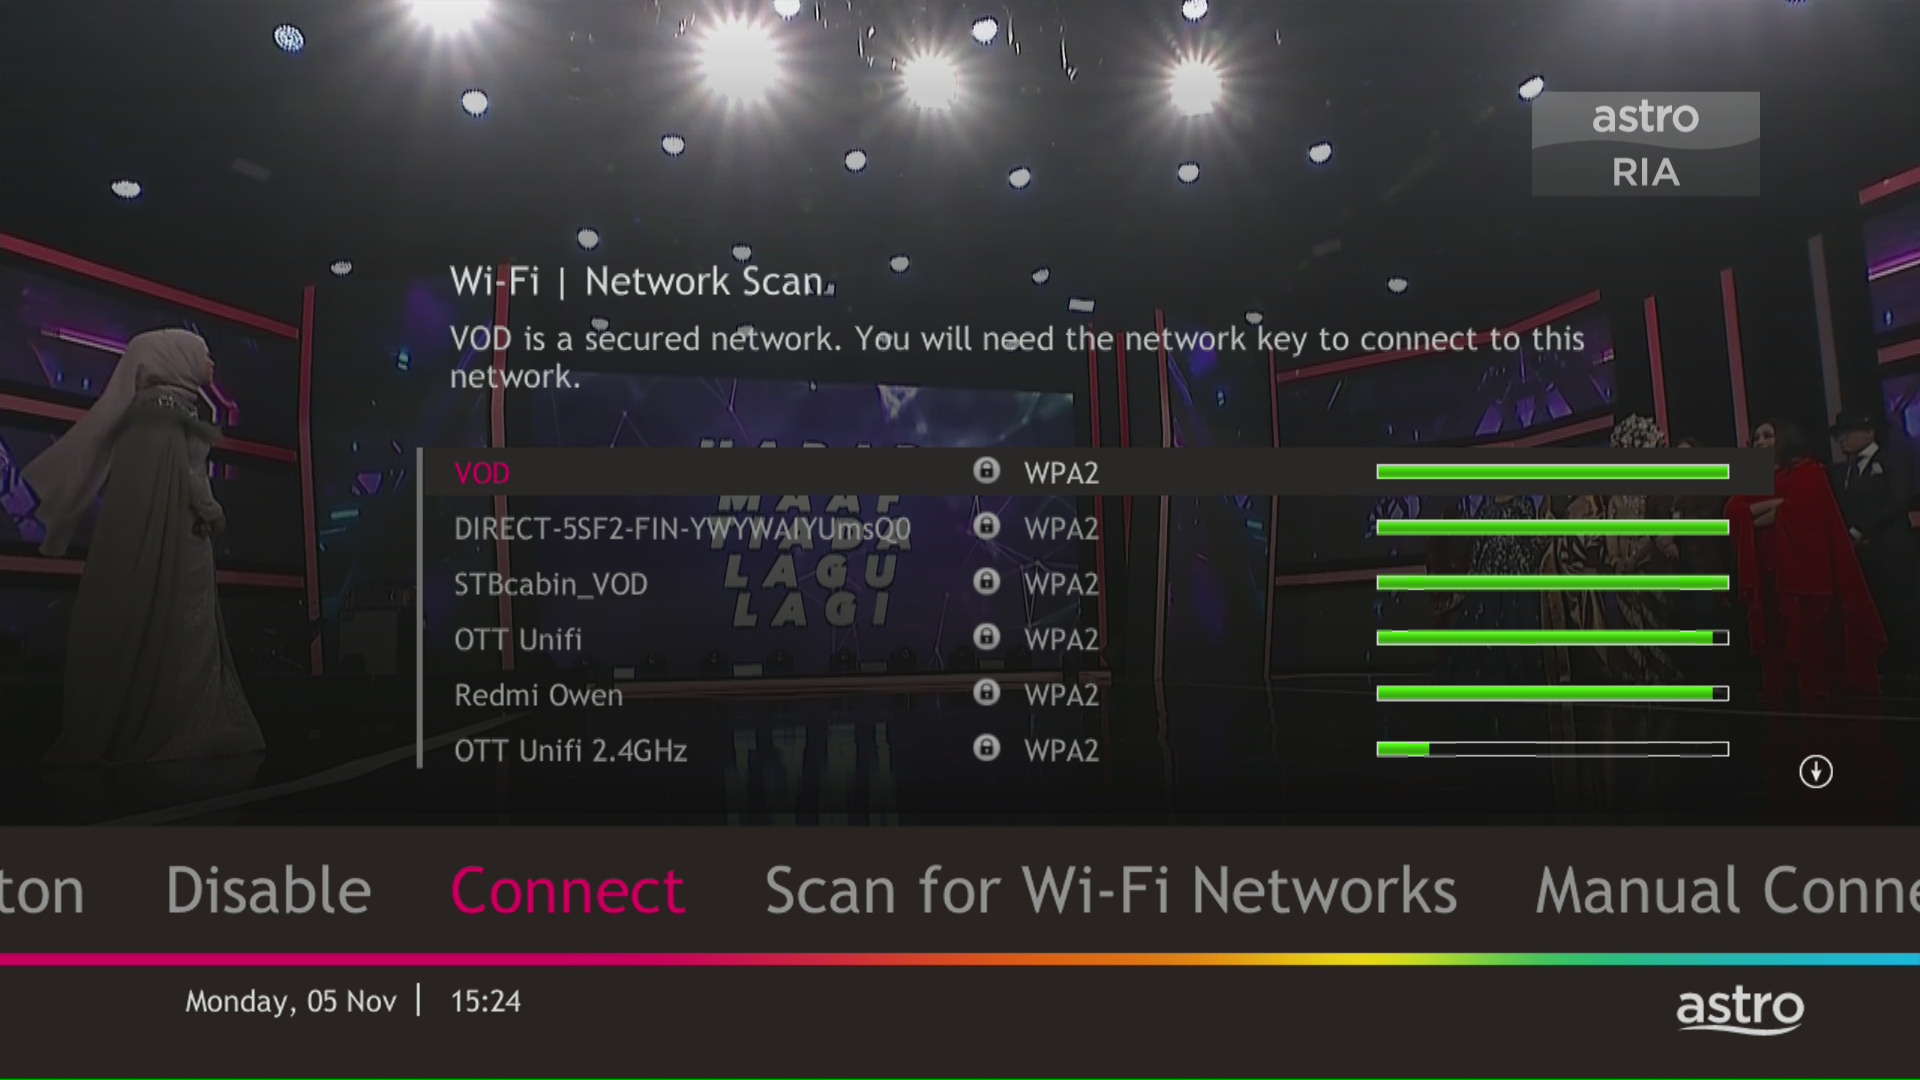
STEP 10
Select your Wi-Fi network and navigate to "Connect".
STEP 11
Please enter the password to connect to your network and press "OK".

STEP 12
You are successfully connected when this screen appears.

The Ultra/Ulti Plug & Play Box comes with a one-year box hardware warranty.
For self-installation, there is a warranty seal at the bottom of the Ultra/Ulti Plug & Play Box, which must not be removed or tampered with as this would void the one-year Ultra/Ulti box hardware warranty.
For Astro Fibre, you may choose from a selection of Broadband speeds from 100Mbps to 800Mbps for as low as RM129/month and receive a free WiFi 6 router & Astro Fibre App. On top of this, you will also get to enjoy a complimentary speed upgrade for 24 months. A new 24-month contract will begin upon successful installation and full details of this offer are as follows:
| Astro Fibre Standalone Price per month | ||
| 100Mbps | 500Mbps | 800Mbps |
| RM129 (speed upgrade to 500Mbps for 24 months) | RM189 (speed upgrade to 800Mbps for 24 months) | RM249 |