







Nationwide Installation
Applying for
| Astro Njoi UniFi Maxis |
Frequently Asked Questions
Find your answers here.
We provide one stop service to apply Astro and Broadband for you.
You can avoid driving and queuing at the sales counter. We are the dealer that can help you to handle your application from the beginning to the end.
We do not charge you when you apply from us. There is no credit card information required to apply here. Charges are the same as you apply from the sales counter.
First, you can apply online, we will get back to you immediately during business hour. WhatsApp/Email/Fax us your Photocopy of IC (for malaysian) / Passport (for foreigners). When we receive all the information, we will proceed with your application immediately.
Once we receive your application with complete information, we will process your application immediately during business hour. The contractor from the service provider will then contact you for installation appointment once your application is approved.
Enjoy greater savings and hassle-free bill payment in one single bill for both Astro and Broadband. You get to enjoy Astro and Broadband at discounted price every month over the contract period of 24 months.
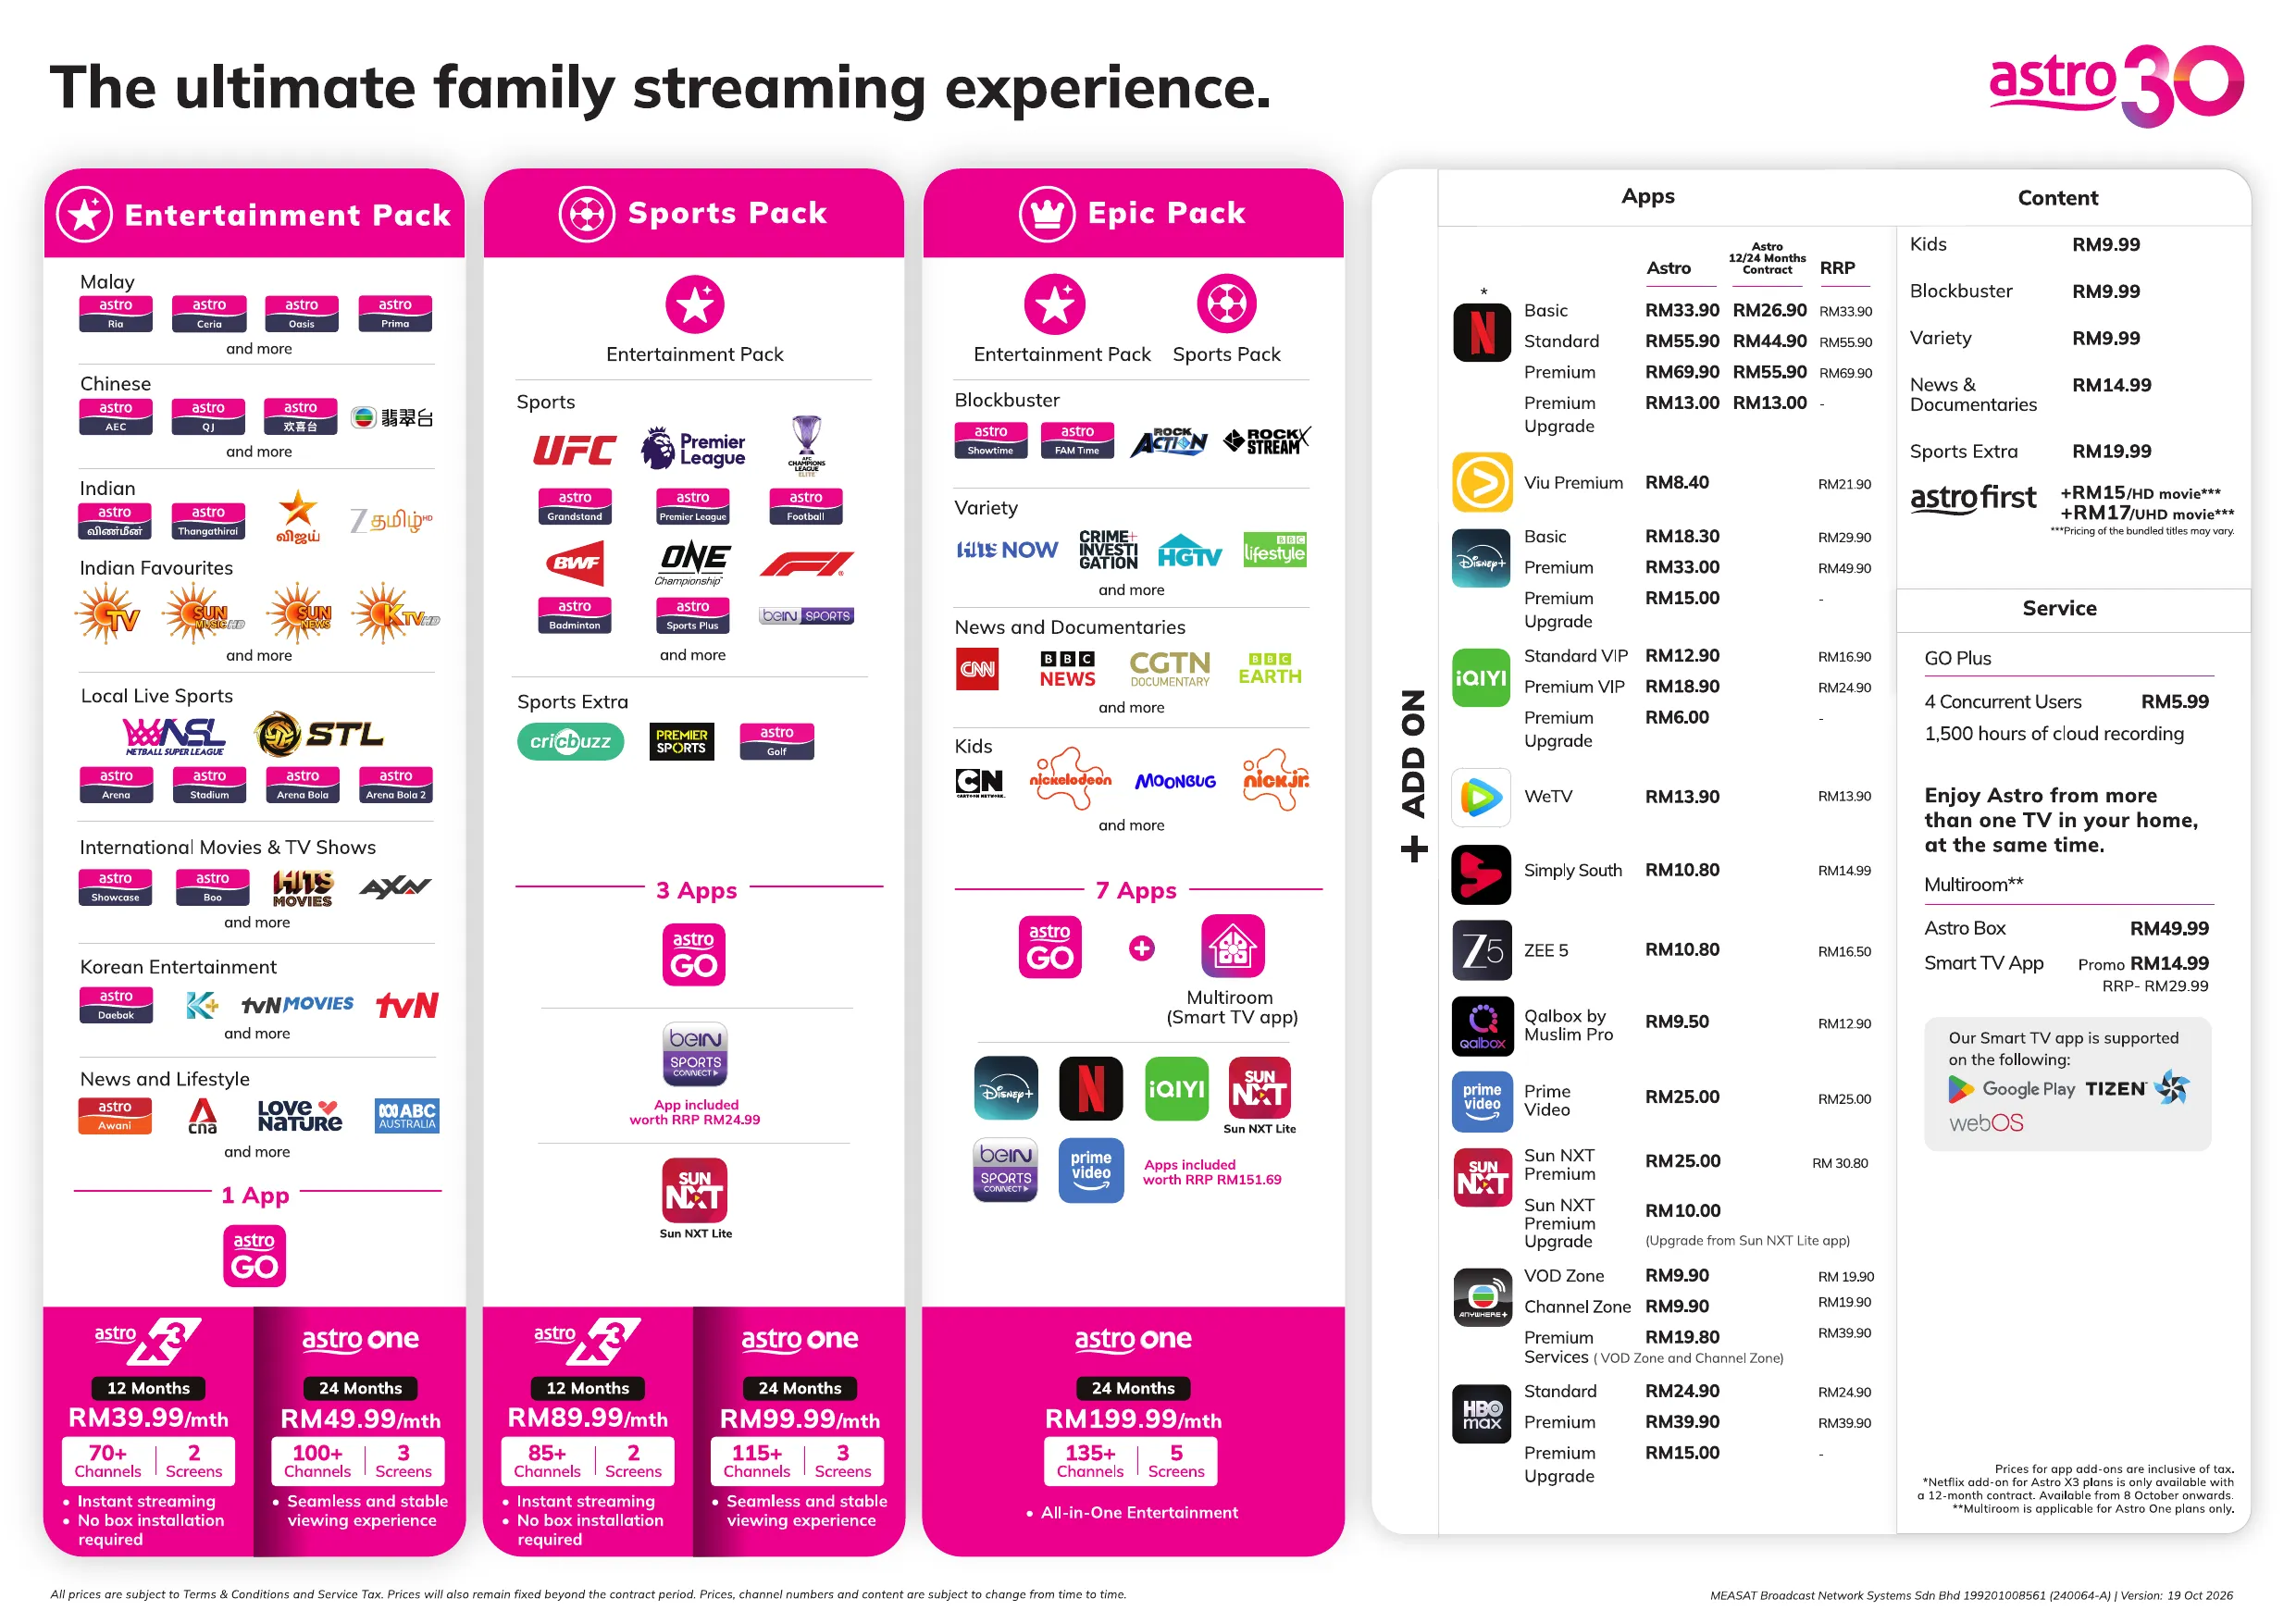
Astro offers multiple TV packs including Entertainment, Sports, Movies and Kids options. You can choose a pack that matches your viewing preferences and add optional streaming apps where available.
Yes, you may subscribe to Astro TV packs without bundling broadband. However, bundling Astro TV with Fibre Broadband may provide better monthly savings and convenience with a single bill.
For small households with light streaming and browsing, 100Mbps is usually sufficient. Larger families, gamers or heavy streamers may benefit from 500Mbps or 1Gbps plans for smoother performance across multiple devices.
Most Astro TV and Fibre broadband plans come with a 24-month contract. Early termination charges may apply if cancellation is made before the contract ends.
Yes, you may upgrade your TV pack or broadband speed at any time, subject to eligibility and coverage. A new contract period may apply depending on the upgrade.
Your monthly bill will be issued directly by Astro. You may receive it via email or access it through your Astro account. Bundled customers will receive a single combined bill for TV and broadband services.
Payment methods may include online banking, auto debit, credit card or other approved payment channels provided by Astro. Our team can guide you during the registration process.
If you experience any service interruption, you may contact Astro customer support for technical assistance. In many cases, issues can be resolved remotely or a technician will be arranged if necessary.
Yes, relocation is subject to service availability at your new address. Relocation charges and contract adjustments may apply depending on your plan.
No, you do not need a credit card to submit your application. Payment setup will be arranged directly with Astro after your service is approved.
Selected Astro TV packs allow optional add-ons such as streaming services depending on current promotions and availability. Additional monthly charges may apply.
Yes, a WiFi router is typically provided during fibre installation. The router model may vary depending on the selected broadband speed plan.
Yes, we will check the service coverage at your address before proceeding with your application to ensure broadband is available at your location.
For Malaysians, please provide a copy of your MyKad. For foreigners, provide a copy of your passport when submitting your broadband application.
After your application is approved, the service provider typically contacts you within 2 to 7 working days to arrange the broadband installation appointment.
Most Astro Broadband plans come with a 24-month contract starting from your installation date. If you relocate, a new 24-month contract may apply at your new address.
Yes, you can relocate your broadband service, subject to service availability at the new address. Your contract may reset for another 24 months from the new installation date.
Yes, you may request to relocate broadband devices within your home. Non-standard installation charges may apply and are payable to the installer directly after assessment.
Yes, you can switch to Astro Broadband. To avoid service interruption, it is recommended to activate the new service before terminating your current broadband contract.
Standard installations may be free during promotions, but non-standard installations (e.g., device relocation or complex wiring) may incur extra charges payable directly to the installer.
The matches will be available on the channels Astro Arena Bola (CH803) and Astro Arena Bola 2 (CH804), On Demand and Astro GO.
To continue enjoying your PVR decoder and service, you must maintain a minimum monthly subscription fee of RM60 (not inclusive of the recording fee and Govt. Tax).
No, Astro First movies/series are available as Per-per-view basis. Pricing is indicated on each of the programme posters. All prices are subjected to 6% service tax.
Astro Rewards is your free loyalty programme - a way for us to say thank you for being with us.
We're always adding new and exciting gifts, deals, and experiences for you - all ready and waiting in the My Astro app for you, right at your fingertips. Here's the best part, the longer you're with us, the better your rewards!
Astro is continuously improving our user interface and introducing new features to our platforms to ensure that your Astro experience is more seamless, efficient and user-friendly.
For details on our latest interface, Picture-in-Picture mode and auto-start interactive mode on Astro GO, please click here.
In addition, we have also recently introduced a new look to the Title Information Page, the ability to disable the Profile Selection Screen and adjustable auto-standby timing. For more information, please click here.
Any packages with Entertainment Plus, Movies Plus & Sports Plus will include Netflix. The default Netflix offering is Netflix Standard (2 screens and HD viewing) as part of your Entertainment Plus, Movies Plus and Sports Plus subscription. You can upgrade up to Netflix Premium (4 screens and 4K UHD viewing) at a price of RM 10 (inclusive of govt. tax).
Note: For the above subscriptions, you may use the email address used for your existing subscription with Netflix to activate and the future billing for Netflix will be transferred to your Astro bundle charges. For users that are billed for Netflix through Apple before joining the Astro bundle, remember to cancel your Apple billing arrangement after activating the Astro bundle else you may be double charged for your Netflix account.
If you do not have a bundle which includes Netflix, you may also add a new Netflix subscription to your Astro Bill for billing convenience.
Advance payment can be made via credit/debit card or online banking.
Mac OS X
1. Click the Go tab in the top menu bar and select Utilities from the drop-down menu.
2. Type "network utility" in the search bar in the top right-hand corner of the Utilities window and then hit the "Enter" key on your keyboard.

3. Click the Network Utility icon to open the Network Utility window.
4. For Ping Test, select the Ping tab and then type the address you'd like to ping in the text box. Click Ping and wait for the ping results.

5. For Traceroute Test, select the Traceroute tab and then type the address you like to traceroute in the text box. Click Trace and wait for the traceroute results.

Windows 10
1. Click the Search icon (magnifying glass) in the bottom left-hand corner and type "cmd" into the search bar.

2. Select the Command Prompt app - it will be at the top of the list of search results as the best match.

3. A black box with a flashing cursor will open; this is the Command Prompt.
For Ping Test, type "ping" and then hit the Space bar on your keyboard. Type in the address you like to ping and then hit the Enter key on your keyboard. Wait for the ping results.

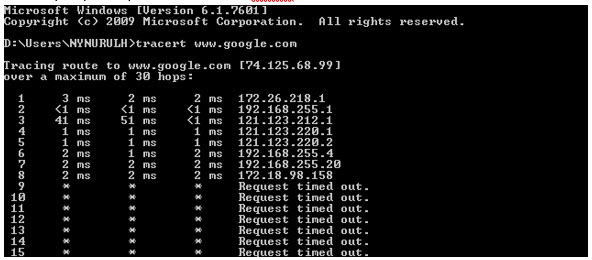
For Traceroute Test, type "tracert" and then hit the Space bar on your keyboard. Type in the address you like to trace and then hit the Enter key on your keyboard. Wait for the tracert results.

Windows 7 & Vista
1. Open the Start menu by clicking the Windows icon at the bottom left-hand corner of the screen.
2. Type "cmd" in the search bar at the bottom of the menu.
3. Click cmd found in the search results for Programs.

4. A black box with a flashing cursor will open; this is the Command Prompt.
For Ping Test, type "ping" and then hit the Space bar on your keyboard. Type in the address you like to ping and then hit the Enter key on your keyboard. Wait for the ping results.

For Traceroute Test, type "tracert" and then hit the Space bar on your keyboard. Type in the address you like to trace and then hit the Enter key on your keyboard. Wait for the traceroute results.

Windows 8
1. Move the mouse to the right-hand corner of the screen to make the vertical menu bar (charm bar) appear. Click Search.
2. Type "cmd" in the search bar and hit the Enter key on your keyboard.

3. Click cmd that found in the search results for Programs.
4. A black box with a flashing cursor will open; this is the Command Prompt.
For Ping Test, type "ping" and then hit the Space bar on your keyboard. Type in the address you like to ping and then hit the Enter key on your keyboard. Wait for the ping results.

For Traceroute Test, type "tracert" and then hit the Space bar on your keyboard. Type in the address you'd like to trace and then hit the Enter key on your keyboard. Wait for the traceroute results.
Windows XP
1. Click the Start button in the bottom left-hand corner of the screen.
2. Click the Run option in the right-hand column.

3. Type "cmd" in the text box and then hit the Enter key on your keyboard.
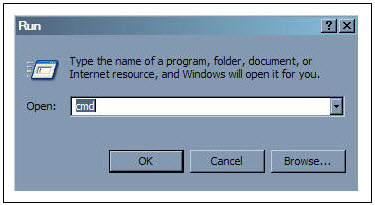
4. A black box with a flashing cursor will open; this is the Command Prompt.
For Ping Test, type "ping" and then hit the Space bar on your keyboard. Type in the address you'd like to ping and then hit the Enter key on your keyboard. Wait for the ping results.

For Traceroute Test, type "tracert" and then hit the Space bar on your keyboard. Type in the address you'd like to trace and then hit the Enter key on your keyboard. Wait for the tracert results.
STEP 1
On your remote, press the HOME button and the home menu will be displayed on top of your screen.

STEP 2
Navigate to SETTINGS and press "OK".

STEP 3
Navigate to STB Diagnostics and press "OK".

STEP 4
Navigate to Network Diagnostics and press "OK" .

STEP 5
Please ensure the Tunes service multicast status is Multicast Up.
If the status is Multicast is Not Available, please reboot the decoder and router before verifying this status.
If issue persists, please submit the issue on our Feedback Form with error details and attach a picture of your Network Diagnostics.
STEP 1
On your remote, press the HOME button and the home menu will be displayed on top of your screen.

STEP 2
Navigate to Settings.

STEP 3
Navigate to Master PIN and press “OK”.

STEP 4
Please enter your PIN (Default PIN is 0000).

STEP 5
Please enter your new PIN.

STEP 6
Please re-enter your new PIN to confirm.

STEP 7
Your PIN successfully changed when this screen appears.

The Kids Friendly Profile is an enhancement to the Kids User Profile feature with the following major improvements:
- Kid-Friendly Channels, On Demand content & TV Guide: Only Kid-friendly channels and On-Demand content can be viewed in the Kids Profile. Other channels and content are not viewable. The same applies to the Kids TV Guide.
- PIN control for the Kids Profile: When switching from a Kids Profile to an adult profile (i.e.: Father or Mother), a PIN entry will be required.
- Limited Kids Profile Content Search: Only Kids age-appropriate content can be searched and displayed within the Kids Profile.
- Kids Profile Based Recordings: Kids Profiles will have their own personalised age-appropriate recordings without any overlap with other user profiles. This feature will be available from 17th August onwards.
These enhancements are available across the Astro GO app, Ultra/Ulti Box, and Multiroom Box/Smart TV app.
Click here to find out more on this new feature and how to use it!
Customers on the Multiroom (Smart TV) app can stream these two channels (CH549 Love Nature & CH805 Astro SuperSport) if their TV model supports 4K UHD resolution.
Kindly note that these Sony TV models do not support 4K UHD resolution:
• Sony BRAVIA 4K GB
• Sony BRAVIA 4K UR
• Sony BRAVIA VH
*CH805 Astro SuperSport is only available to customers on the Sports, Sports Plus, Premium 1, Premium 2, Premium 4, Platinum Lite and Platinum Packs.
As our customers deserve the best entertainment experience, Astro is refreshing its content and packages to offer more choice, value, flexibility, and better experience in a streaming world as part of the new Astro experience.
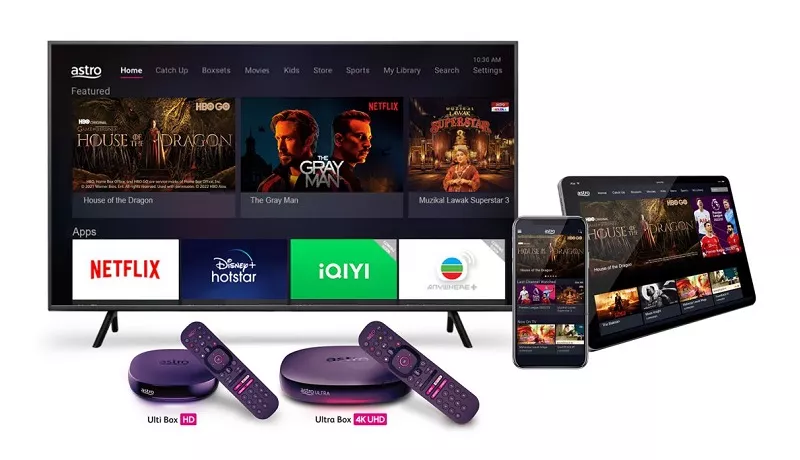
The all-new Astro packs are designed for customers in the streaming and connected world, where they can stream all the shows they love on Ultra Box and Ulti Box. Customers can now enjoy their favourite shows all on Astro, from global streaming services like Netflix, Disney+ Hotstar, HBO GO, iQIYI, TVBAnywhere+ as well as all Astro's flagship shows and the best of live sports in one place, on the big screen. Our new packages offer unbeaten value, a greater variety of content and greater convenience, all made better with our Astro & Broadband for better connectivity.
Yes, a charge of up to RM20.00 may be imposed upon reconnection.
The new packs come with 200 hours of Cloud recording by default. If your current recordings exceed 200 hours, the system will delete the exceeded hours once your package has been changed, starting with the oldest recordings first.
If you would like to retain the previous recordings which exceed 200 hours, you may opt for a selection of 400 or 1500 Cloud Recording hours at a chargeable rate of RM12 or RM15 per month (excl. govt tax) respectively. Or else, you may subscribe to the Platinum pack which comes with complimentary access to 1500 hours of Cloud Recording.
We try to make as many movies and TV shows available for download. However, for some titles, while we may have the rights to offer them via streaming, we may not be able to offer them for download.
Yes, customers whose accounts are suspended but resumed within 24 months from their offer period start date will still be able to enjoy the internet speed upgrade upon service resumption. However, the speed upgrade offer period will not be extended despite the suspension period.
Unfortunately, customers whose accounts are suspended but resumed after 24 months from their offer period start date will not be able to receive the free speed upgrade.
Unfortunately, only Astro Fibre customers who subscribe from 24 November 2023 to 31 May 2024 are eligible for this free speed upgrade. However, you may still get the speed boost by calling in to our Customer Contact Centre at 03-9543 3838 and re-contracting with us. Kindly note that your account will restart with a new 24-month contract.
Any Astro GO compatible device (mobile/tablet/PC) and Multiroom Smart TV* compatible TVs will benefit from Astro GO+.
Connect your PVR to Wi-Fi and enjoy access to our library of Video On Demand. Replay old seasons, catch-up latest episodes of your favourite shows, anytime you want. To connect your PVR, follow the steps below depending on your box type:
(a) Wi-Fi Enabled PVR (DMT5)

· Press the “Home” button and select “Settings” > “Network” > “Wi-Fi”
· Allow the PVR to scan Wi-Fi networks available and subsequently choose your home Wi-Fi network > Enter your Wi-Fi password if required
· Once connected, the icon below will appear on the screen.

Tip: Use the alpha-numeric keyboard on your Astro Remote to key in your password
· Press the “Home” button and select “On Demand” to start watching videos on demand!
(b) Non-Wi-Fi Enabled PVR (HD PVR)

There are two ways to connect your HD PVR decoder to your home Wi-Fi
(i) Using the Ethernet (LAN) cable
· Plug in the LAN cable from your modem into the PVR network port
· Once connected, the icon below will appear on the screen
· Press the “Home” button and select “On Demand” to start watching videos on demand!
(ii) Using an Astro Wi-Fi dongle as per shown below

Step 1 - Plugin the Wi-Fi dongle into the front USB part of your PVR decoder.
Step 2 - A prompt will appear stating "Do you wish to connect to a wireless network?", select "Yes, continue."
Step 3 - Once connected, the Wi-Fi icon will appear on the screen. Now you are ready to download and enjoy Astro's on demand entertainment.
Step 4 - Press the “Home” button and select “On Demand” to start watching videos on demand!
*The Wi-Fi dongle is only applicable for the non-Wi-Fi enabled PVR (as per the picture).
Refund process required 5 working days by Astro and additional 3 - 7 working days required subject to the respective processing banks.

- Please connect your computer or laptop to your Astro Fibre router using WiFi or LAN cable. Your LAN cable must be connected from the yellow port of Astro Fibre router (Any available port).
- Once connected, open any web browser such as Google Chrome, Internet Explorer, Mozilla Firefox and etc.
- On the address bar, type http://192.168.100.254 and below page will appear.

Login using your username and password if you have changed the router login setting. Otherwise, your default router login is as per below.
Username: user
Password: user
4. Once you have successfully logged in, the router's web-based setup page will appear.

5. At the top of the page, click WLAN to configure the WiFi parameters.

6. To change the channel on 2.4G, click the drop-down arrow for Channel, then select your desired channel.

7. Then, click "Save & Apply" for the changes to take place.

8. You may make the same changes for 5G by click the drop-down arrow for Channel, then select your desired channel.

9. Then, click "Save & Apply" for the changes to take place.

You may utilise your credit balance to offset future billing on your Astro account, or contact us here for further enquiries.
Customers with a Movies subscription via Movies, Premium 1, Premium 3 and Platinum packs will be able to access Disney+ Hotstar on the Ultra box.
Alternatively, customers can add on the 3-month Disney+ Hotstar pass for RM54.90. Subscribe to Disney+ Hotstar via astro.com.my/Disney.
For more support and options for your subscription, please WhatsApp us at 03 9543 3838 and type DH Help. Alternatively, you may visit astro.com.my/Disney for more information.
STEP 1
Choose your language preferences for both Menu Language and Info Language. Then, press "OK".

STEP 2
Select you box operating mode and press "OK".

STEP 3
Select the resolution supports by your TV and press "OK".
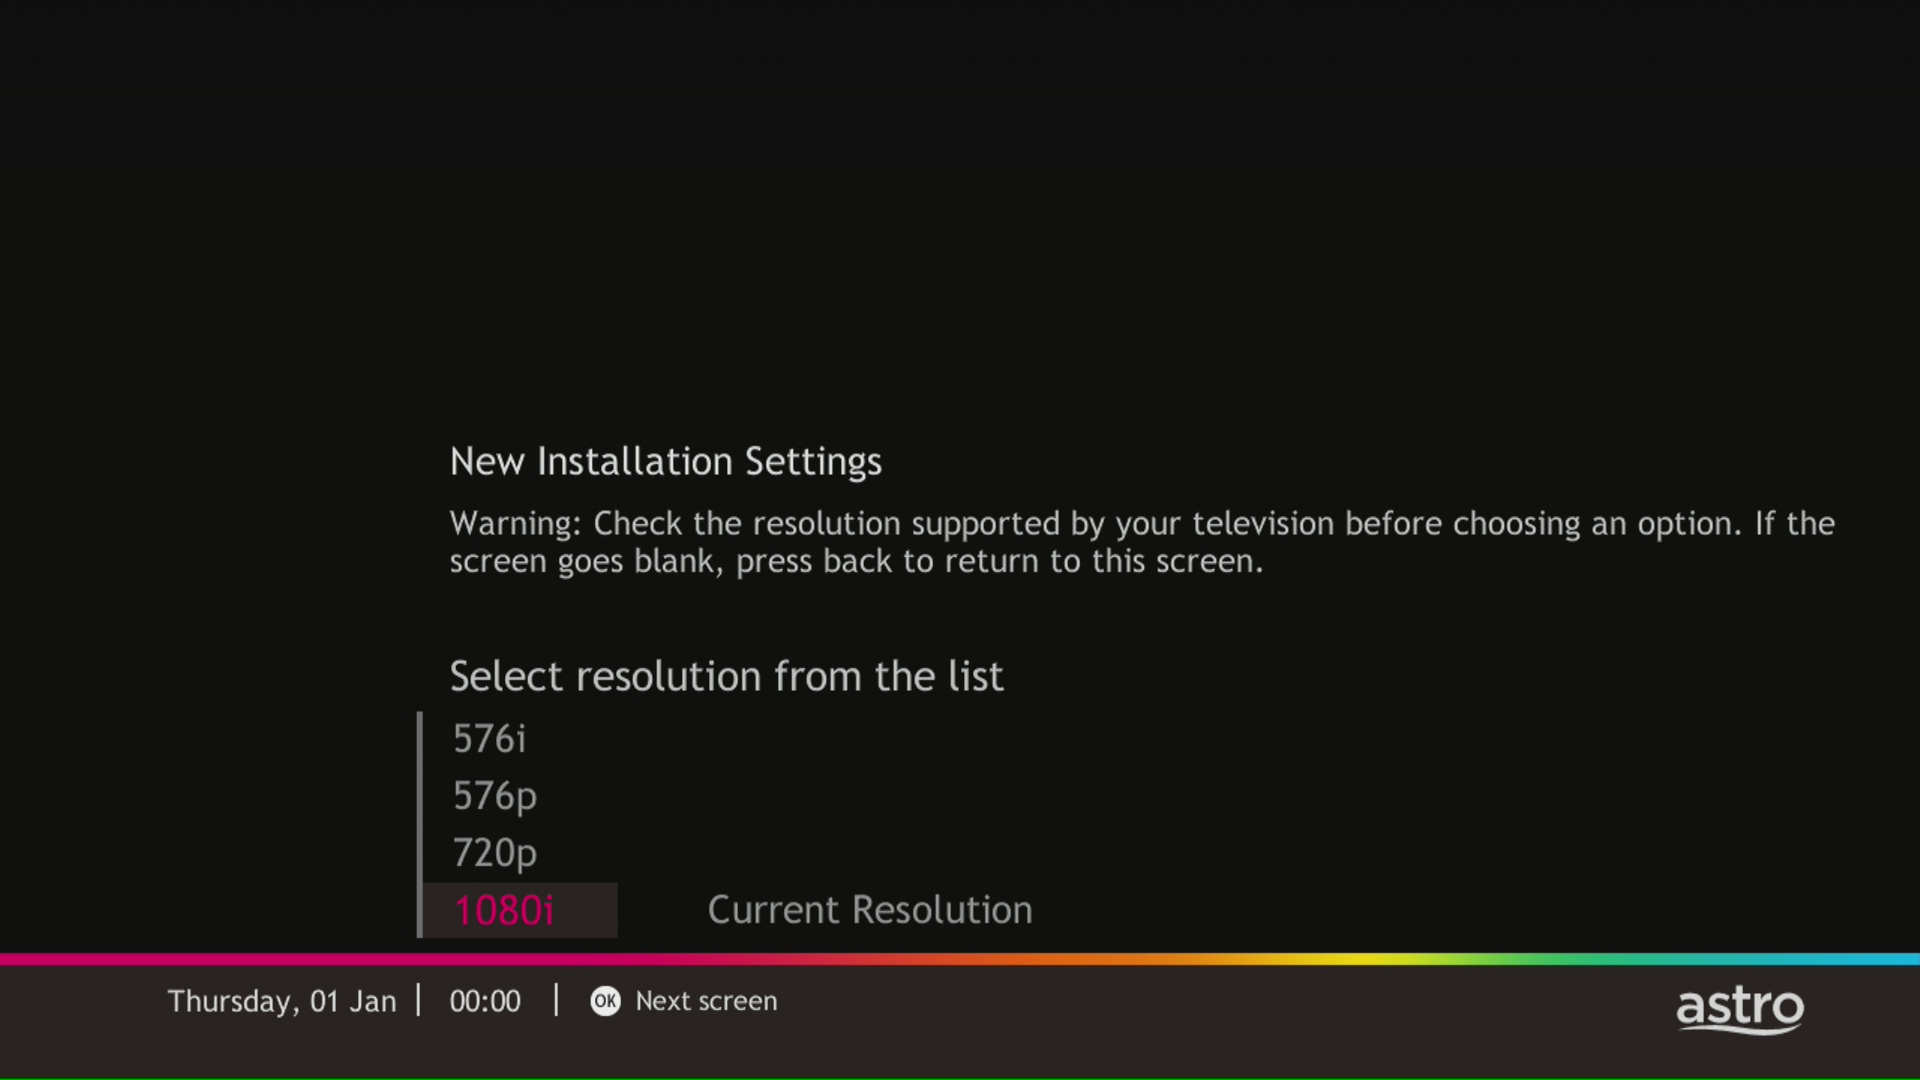
STEP 4
Press "OK" to proceed to the next screen.
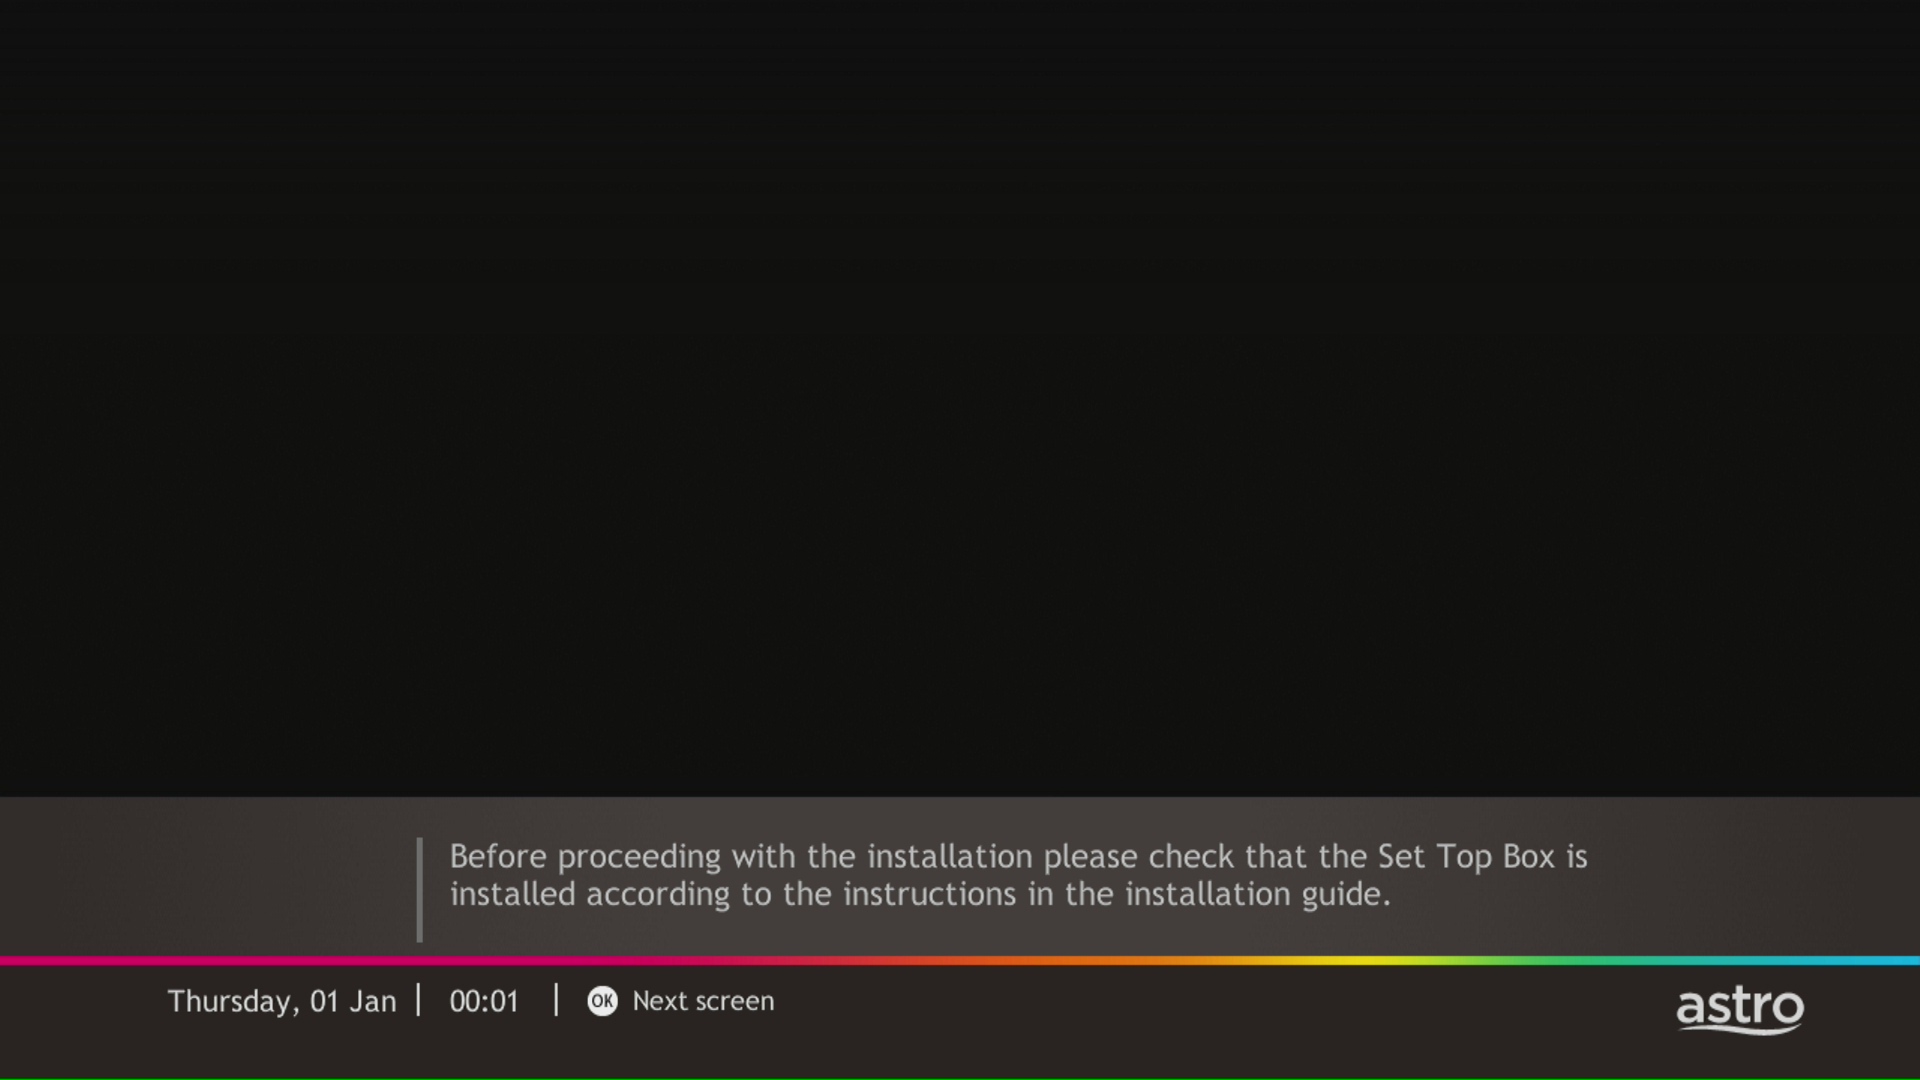
STEP 5
Please select the LNB type and press "OK".

STEP 6
Select this as the Entry Point and press "OK" to confirm your selection.

STEP 7
Signal reading results for Tuner 1 and Tuner 2 screen will be displayed. Then, press "OK" to proceed to next screen.

STEP 8
Select Yes, continue and press "OK" to connect to Wi-Fi network.
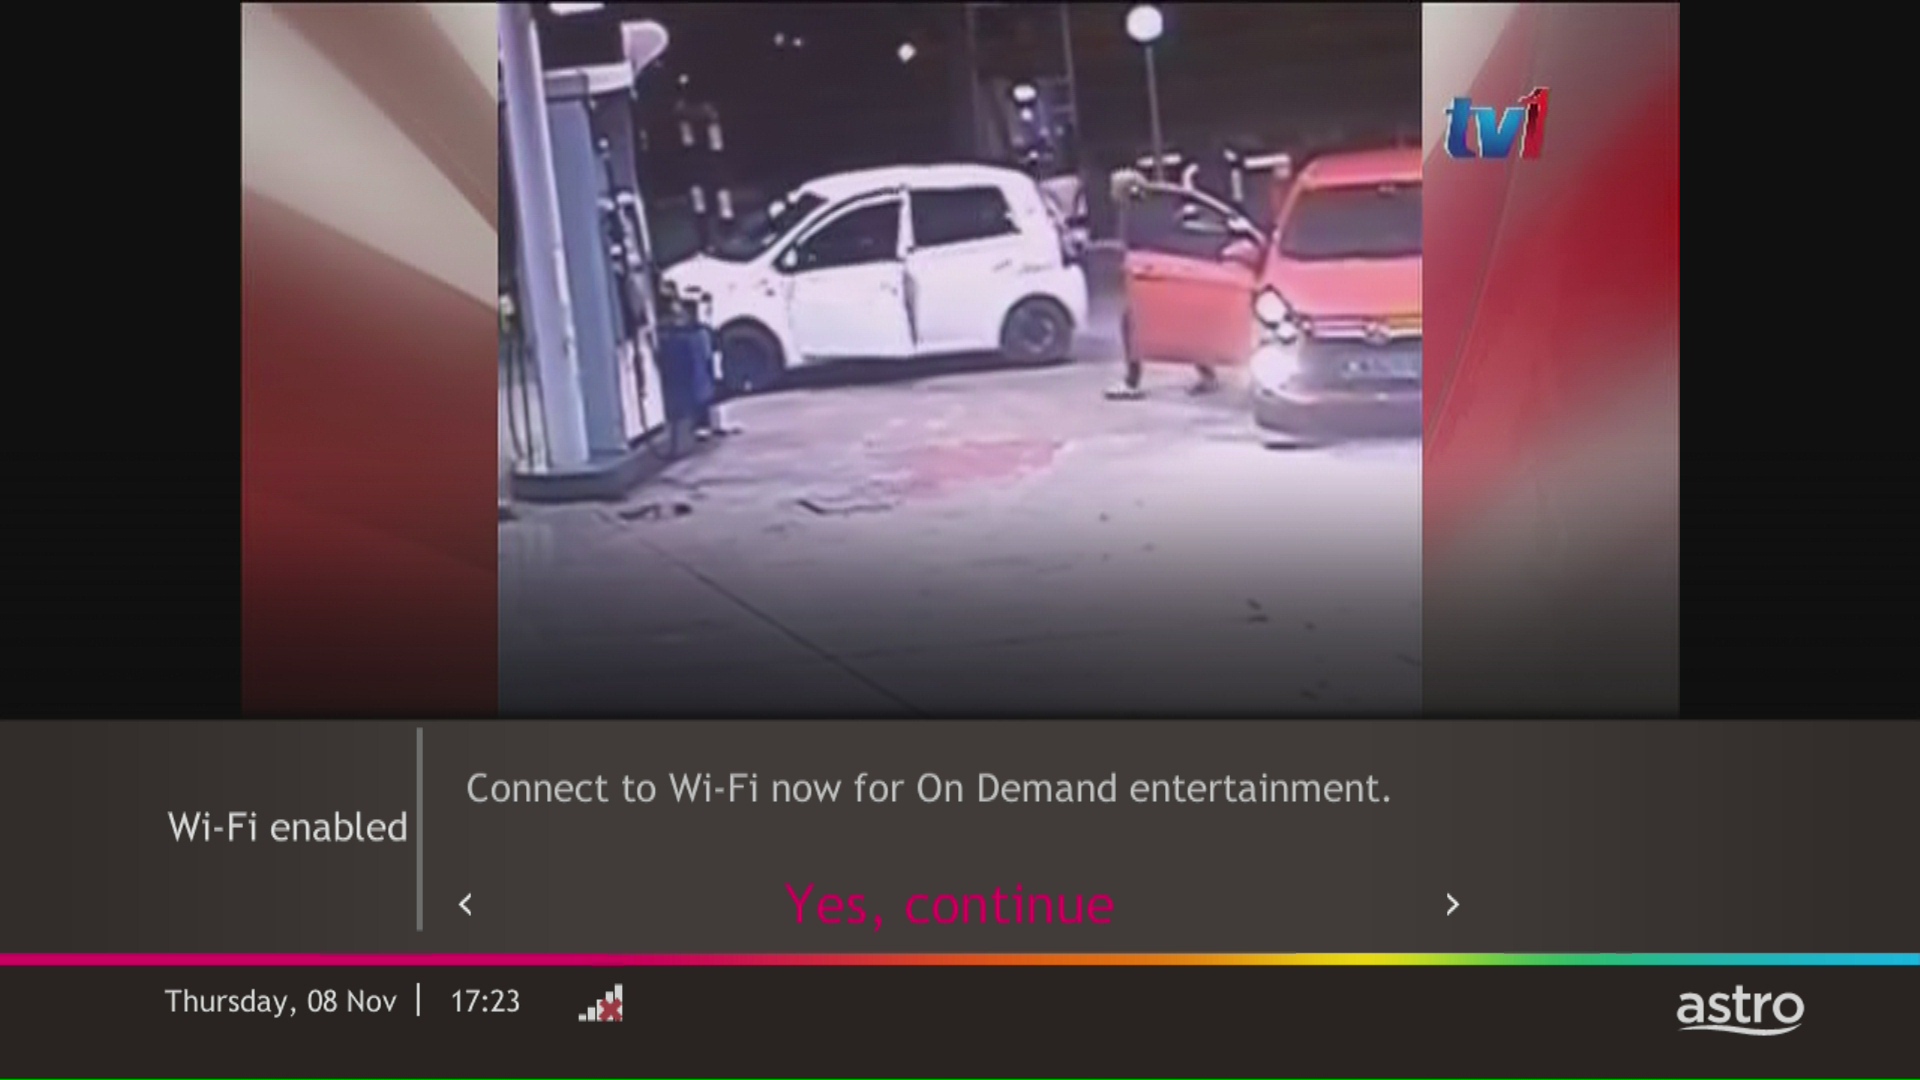
STEP 9
Please wait while the box scanning for the available Wi-Fi network.
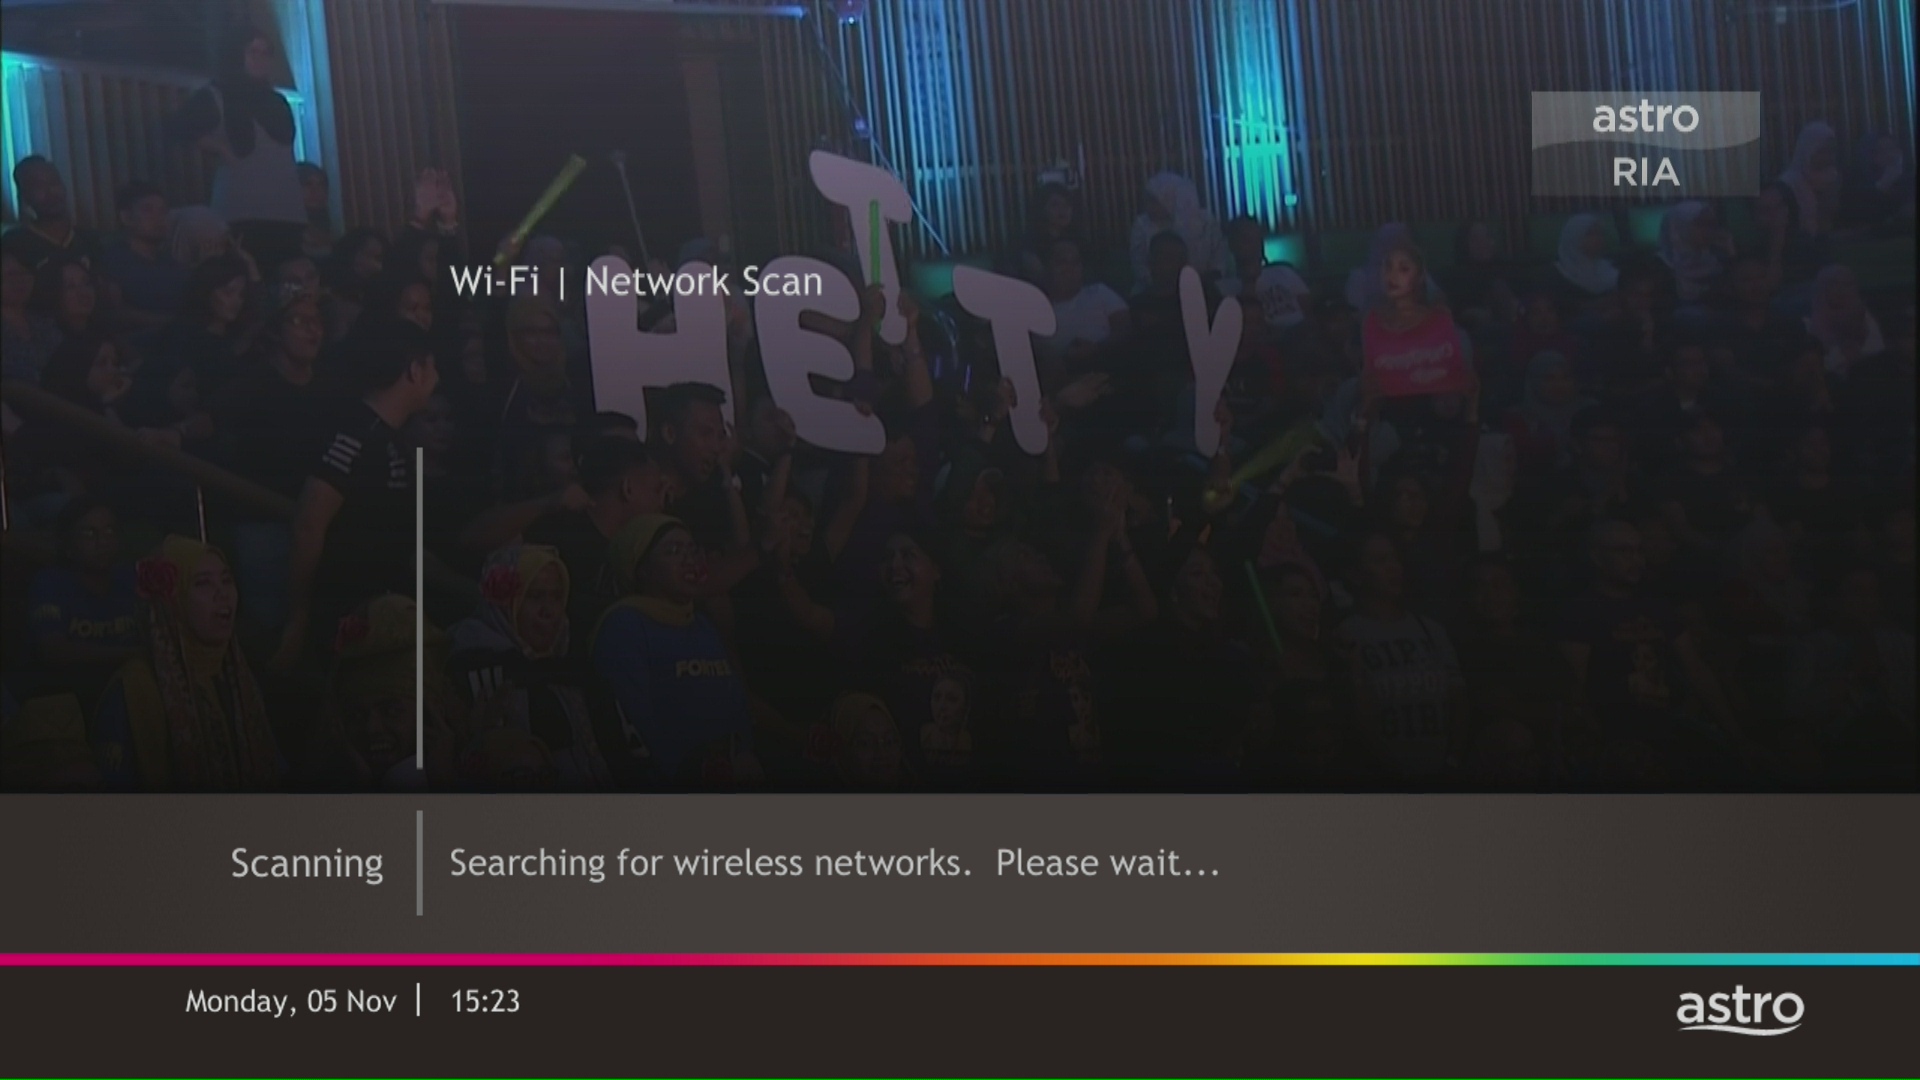
STEP 10
Select your Wi-Fi network and navigate to "Connect".
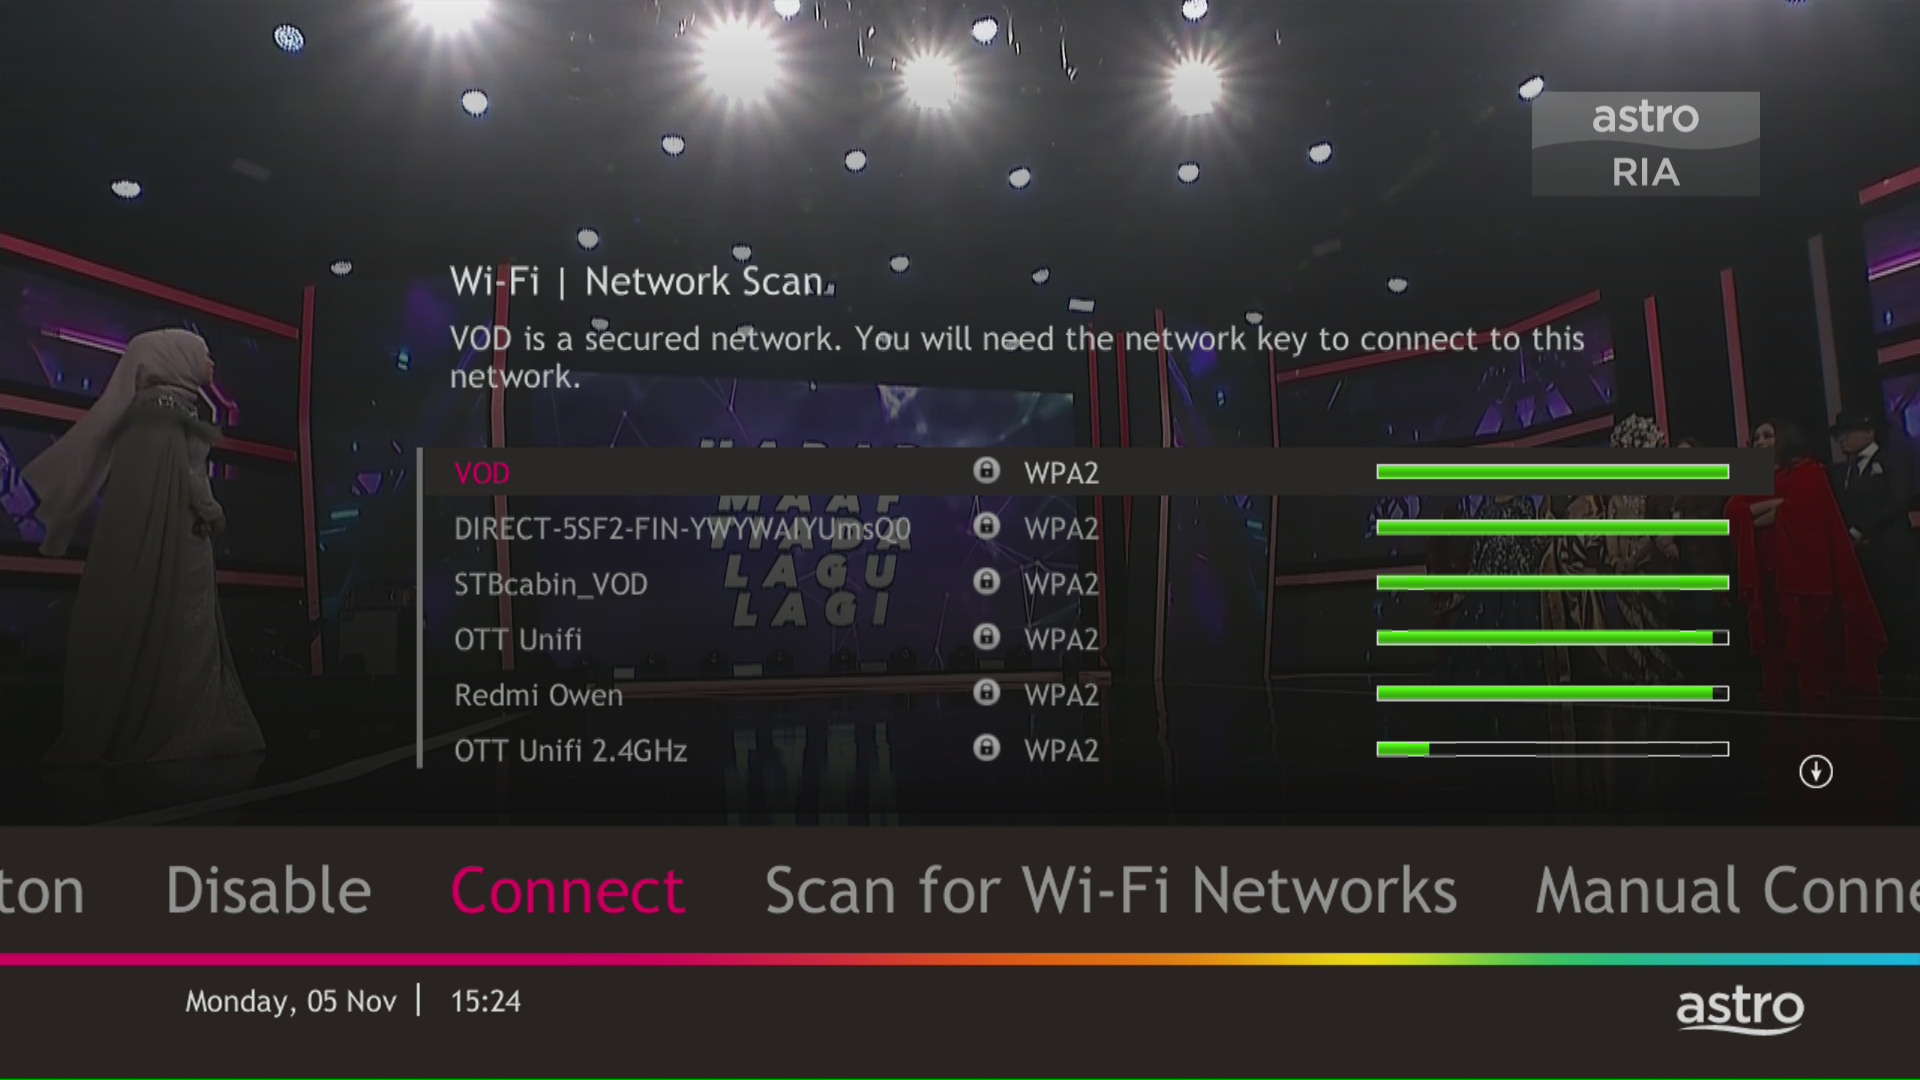
STEP 11
Please enter the password to connect to your network and press "OK".

STEP 12
You are successfully connected when this screen appears.

STEP 1
Check the Audio settings on your box and set to Auto.
Refer guide to change Set HDMI Audio.
STEP 2
If issue persist, check if there is any 3rd party device (sound system/hdmi splitter) connected between box and TV.
STEP 3
If using 3rd party devices, bypass/remove 3rd party device and make sure HDMI cable connected directly from box to TV.
STEP 4
If issue persist, connect to Live Agent via WhatsApp for help.
Yes. As a Sports Pack customer, you will get access to Liga Malaysia as well as a variety of local and international sporting events as part of your subscription.


You may proceed with below troubleshooting and it shouldn't take you any longer than 15 minutes.
1. Please standby computer/laptop to access to the internet and connection must be via LAN (cable) [Connect the LAN (cable) to the blue port at Cisco Router and direct to computer/laptop].
2. You may open any web browser such as Google Chrome, Internet Explorer, Mozilla Firefox and etc.
3. On the address bar, please go to http://192.168.1.1 and below page will appear.

4. Type the Username and Password as below. Then click OK. (These are the defaults, if you have done previous configuration on your router the password may be different).
Username: admin
Password: admin (or time123)

5. The router's web-based setup page should now appear. Please follow below steps for the configuration.

i. On the setup page, click the Wireless tab then click on the Basic Wireless Settings sub-tab.
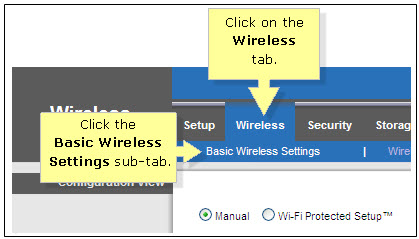
ii. On the Configuration View section, click the Manual radio button. Choosing the Manual setup will allow you to adjust your wireless channel according to your preference.

iii. Leave the Channel Width set to 20MHz Only.

iv. Click the drop-down arrow for Channel, then select your desired channel.
Choose between 1 until 11 (Suggested 1,6,11).
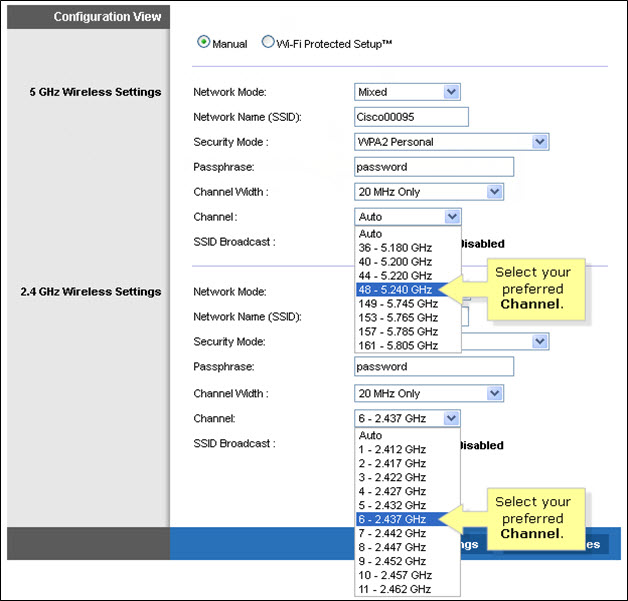
v. Click Save Settings to apply your changes. Router will auto reboot and connection re-establish after few minutes.

- Please standby computer/laptop to access to the internet and connection must be via LAN (cable) [Connect the LAN (cable) to the yellow port in Maxis Router and direct to computer/laptop].
- You may open any web browser such as Google Chrome, Internet Explorer, Mozilla Firefox and etc.
- On the address bar, please go to http://192.168.1.254 and below page will appear.

The default login of the router as below. If you have done a configuration on your router previously, the password may be different.
Username: user
Password: Router S/N (Available on the sticker at the back of the router)
4. Once you have successfully login, the router's web-based setup page will appear. Please follow below steps for the configuration.

5. From the left menu, choose Wireless 2.4GHz and then click Basic Settings tab on the left menu to access to below screen.

6. You may change the Wireless Network Name (SSID) and the SSID Password to follow your preferences, then click "Save" for the changes to take place.
Please reconnect to the new wireless name with the new password once completed.
7. Since this is a dual band router, you will have 2 Wireless Network Names (SSID) i.e. 2.4GHz and 5GHz. You may connect to any of the SSID, preferably with a stronger signal available.
You may change the Wireless Network Name (SSID) and the SSID Password to follow your preferences for 5GHz by choosing Wireless 5GHz then click Basic Settings.
Click "Save" for the changes to take place and reconnect to the new wireless name with the new password once completed.

Astro TV customers
No, you will not be required to take on a new contract after moving. If you still have an existing contract, the contract will continue.
Broadband / IPTV customers
Yes, your contract will be renewed to a new 24-month contract.
STEP 1
On your remote, press the Home button and the Home Page will be displayed on your screen.
STEP 2
Navigate to Profile.
STEP 3
The Profile Selection Screen will be displayed. 
STEP 4
Navigate to Edit Profile.
STEP 5
Choose a profile to edit.
STEP 6
Choose a new Profile Picture and press “OK”.
Please note that only one Disney+ Hotstar access is bundled to each Movies Pack subscription which allows two concurrent streams on Disney+ Hotstar.
STEP 1
On your remote, press the HOME button and the home menu will be displayed on top of your screen.
STEP 2
Navigate to Settings.
STEP 3
Navigate to Standby Mode and press "OK".

STEP 4
Navigate to your preferred selection and press "OK".

STEP 5
Navigate to Save and press "OK" to confirm your selection.

Please visit http://help.netflix.com to call or start a live chat with Netflix's customer support agents. You will be assisted to unlink your Netflix account from your Astro subscription. After the process, you may link another Netflix account to your Astro subscription.
Yes, as part of our Astro Fibre Movies & Sports Campaign, new Astro Fibre customers can enjoy 50Mbps + the Movies/Movies+/Sports/Sports+ Pack TV bundle for a special price from only RM164.99/month when they sign up within the campaign period, with more than RM800 savings in total.
You may use the 'forgot password' recovery feature on the login page. Just enter the email address/ mobile number you signed up with and we will send you a recovery email.

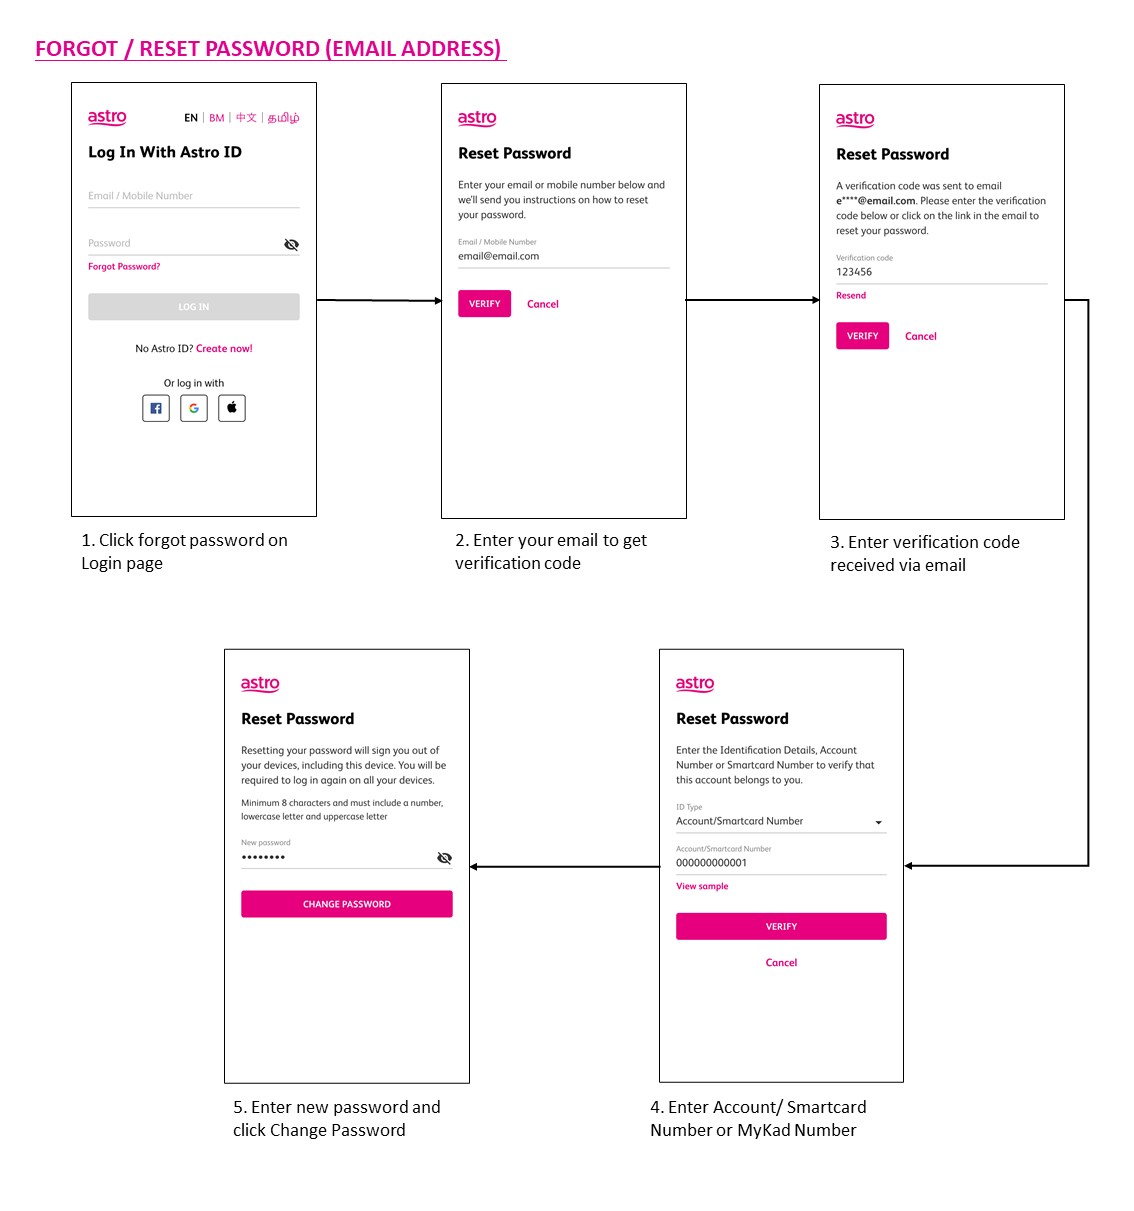
Please visit any of Astro’s digital platform that you would like to log into, such as Astro’s official website (www.astro.com.my). Then, create a new Astro ID using your email address or mobile number by clicking “No Astro ID? Create Now!”. After creating your new Astro ID, please use it to log into our digital platforms moving forward.
If you have an active Astro subscription, you may also link it to your Astro ID. Please click here for the guide.
No, the eKYC verification process must be done by the individual themselves, using their MyKad and selfie in real-time.
Starting 23 August 2022, Astro customers will progressively be able to access Disney+ Hotstar via the Ulti Box, in addition to the Ultra Box, mobile app and website.
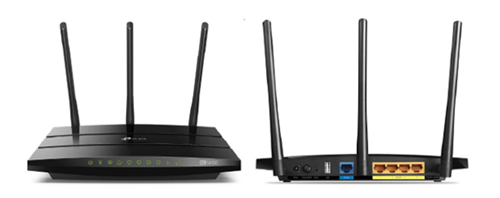
You may proceed with the following troubleshooting steps and it shouldn’t take you much longer than 15 minutes.
1. Please standby a computer/laptop to access to the internet and connection must be via LAN cable (connect the LAN cable to the Black port at D-Link Router and direct to the computer/laptop).
2. You may open any web browser such as Google Chrome, Internet Explorer, Mozilla Firefox and etc.
3. On the address bar, please go to tplinkwifi.net and to access to below login page. Type the Username and Password, then click "Login".

The default login of the router is available on the sticker at the back of the router. If you have done a configuration on your router previously, the password may be different)
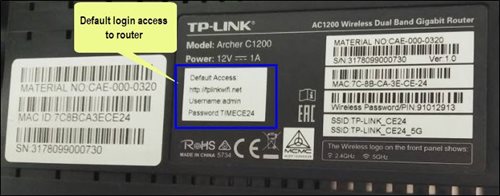
For example, below is the login details of the above router:
Username: admin
Password: TIMECE24
4. Once you have successfully login, the router's web-based setup page will appear. Please follow below steps for the configuration.
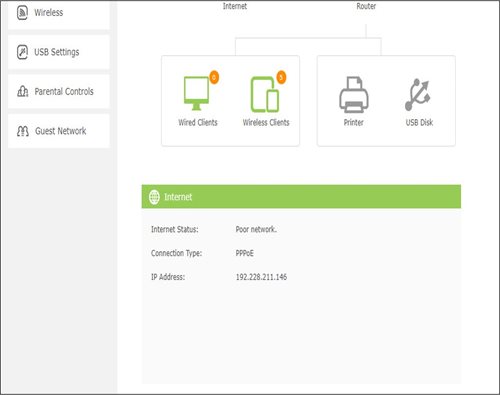
5. From the top menu, choose Basic and then click Wireless tab on the left menu to access to below screen.

6. Since this is a dual band router, you will have 2 Wireless Network Names (SSID) i.e. 2.4GHz and 5GHz. You may connect to any of the SSID, preferably with a stronger signal available.
7. You may change the Wireless Network Name (SSID) and the Password to follow your preferences, then click "Save" for the changes to take place.
Please reconnect to the new wireless name with the new password once completed.
This Disney+ Hotstar software update will be rolled out progressively to all Ulti Box customers starting 23 August 2022. Please be assured that you will be able to access the Disney+ Hotstar app on your Ulti Box soon.
If you need further assistance, please call our Customer Contact Centre or WhatsApp "DH Help
No, the Mesh WiFi add-on with Astro Fibre is available as subscription service and will not be tied to any device contract.
You will receive an email within 45 minutes of payment made to let you know whether your advance payment is successful or not. If your payment has failed, you may call Astro's Contact Centre at 03-9543 3838 or wait for an Astro representative to be in contact with you within 2 working days to assist you with your order.
My Astro is available on web browser and app. The app can be downloaded for free from the Google Play Store, Apple App Store or Huawei App Gallery.
For Ultra and/or Ulti box users, My Astro app is now added to the Top Menu so you can easily access it to manage or update your account. You may find it in the Top Menu, located next to Settings. Please refer to the image below to see what it looks like:
Currently the Multiroom (Smart TV) app is supported on four (4) brands with the software version listed below:
1. Sharp
2. Sony
3. LG
4. Samsung
STEP 1
On your remote, press the HOME button and the home menu will be displayed on top of your screen.
STEP 2
Navigate to Settings.
STEP 3
Navigate to S/PDIF Audio and press "OK".

STEP 4
Navigate to your preferred selection and press “OK”.

STEP 1
On your remote, press the Home button and the menu will be displayed on top of your screen.
STEP 2
Navigate to Settings.
STEP 3
Navigate to Restore and press "OK".
STEP 4
Navigate to Restore Factory Settings and press "OK".

STEP 5
Enter your PIN to access this setting. (Default PIN is 0000).
STEP 6
Navigate to Restore and press "OK" to confirm your selection.
Otherwise, navigate to Cancel, go back to remain the settings.
STEP 7
Please wait while the box restoring defaults and will reboot once complete.
STEP 8
Your box will automatically restart and display this screen.
Click here to follow New Installation Settings guide for Satellite
Click here to follow New Installation Settings guide for Plug and Play
Astro continuously reviews its product propositions to ensure we can provide the best customer experience for all our subscribers. We have discontinued the 50% multiroom in order to allow our Astro subscribers with a subscription fee of RM100 or more to only pay a standard RM49.99 (with box setup) to enjoy the Multiroom experience on an Ultra or Ulti Box.
We apologise for any inconvenience.
Yes, customers will be charged 8% Service Tax for packages purchased after 29th February due to the implementation of the 8% Service Tax starting 1st March 2024.
Your Astro GO email will be delivered to you within an hour upon checkout. Please click the link provided to set up your password and download the Astro GO app on your device by clicking here (Google Play Store) or here (iOS App Store). If you want to stream it directly via your computer or laptop, Astro GO is also available at astrogo.astro.com.my. Log in with your Astro ID and start streaming!