






Nationwide Installation
Applying for
| Astro Njoi UniFi Maxis |
Frequently Asked Questions
Find your answers here.
We provide one stop service to apply Astro and Broadband for you.
You can avoid driving and queuing at the sales counter. We are the dealer that can help you to handle your application from the beginning to the end.
We do not charge you when you apply from us. There is no credit card information required to apply here. Charges are the same as you apply from the sales counter.
First, you can apply online, we will get back to you immediately during business hour. WhatsApp/Email/Fax us your Photocopy of IC (for malaysian) / Passport (for foreigners). When we receive all the information, we will proceed with your application immediately.
Once we receive your application with complete information, we will process your application immediately during business hour. The contractor from the service provider will then contact you for installation appointment once your application is approved.
Enjoy greater savings and hassle-free bill payment in one single bill for both Astro and Broadband. You get to enjoy Astro and Broadband at discounted price every month over the contract period of 24 months.
Astro offers multiple TV packs including Entertainment, Sports, Movies and Kids options. You can choose a pack that matches your viewing preferences and add optional streaming apps where available.
Yes, you may subscribe to Astro TV packs without bundling broadband. However, bundling Astro TV with Fibre Broadband may provide better monthly savings and convenience with a single bill.
For small households with light streaming and browsing, 100Mbps is usually sufficient. Larger families, gamers or heavy streamers may benefit from 500Mbps or 1Gbps plans for smoother performance across multiple devices.
Most Astro TV and Fibre broadband plans come with a 24-month contract. Early termination charges may apply if cancellation is made before the contract ends.
Yes, you may upgrade your TV pack or broadband speed at any time, subject to eligibility and coverage. A new contract period may apply depending on the upgrade.
Your monthly bill will be issued directly by Astro. You may receive it via email or access it through your Astro account. Bundled customers will receive a single combined bill for TV and broadband services.
Payment methods may include online banking, auto debit, credit card or other approved payment channels provided by Astro. Our team can guide you during the registration process.
If you experience any service interruption, you may contact Astro customer support for technical assistance. In many cases, issues can be resolved remotely or a technician will be arranged if necessary.
Yes, relocation is subject to service availability at your new address. Relocation charges and contract adjustments may apply depending on your plan.
No, you do not need a credit card to submit your application. Payment setup will be arranged directly with Astro after your service is approved.
Selected Astro TV packs allow optional add-ons such as streaming services depending on current promotions and availability. Additional monthly charges may apply.
Yes, a WiFi router is typically provided during fibre installation. The router model may vary depending on the selected broadband speed plan.
Yes, we will check the service coverage at your address before proceeding with your application to ensure broadband is available at your location.
For Malaysians, please provide a copy of your MyKad. For foreigners, provide a copy of your passport when submitting your broadband application.
After your application is approved, the service provider typically contacts you within 2 to 7 working days to arrange the broadband installation appointment.
Most Astro Broadband plans come with a 24-month contract starting from your installation date. If you relocate, a new 24-month contract may apply at your new address.
Yes, you can relocate your broadband service, subject to service availability at the new address. Your contract may reset for another 24 months from the new installation date.
Yes, you may request to relocate broadband devices within your home. Non-standard installation charges may apply and are payable to the installer directly after assessment.
Yes, you can switch to Astro Broadband. To avoid service interruption, it is recommended to activate the new service before terminating your current broadband contract.
Standard installations may be free during promotions, but non-standard installations (e.g., device relocation or complex wiring) may incur extra charges payable directly to the installer.
Kindly note that affected customers will be adequately informed 30 days prior to the implementation via SMS which are sent out in phases (Starting 1 July), with scheduled announcements across WhatsApp, My Astro app, and Astro website.
Refund can only be made by the registered Astro account holders.
However, if you would like to request refunds on behalf of the account holder, you may do so by providing the supporting documents (e.g.: authorization letter, death certificate, 3rd party NRIC copy).
Yes, you will need to pay additional RM25 per remaining contract months per unit on top of the standard Broadband penalty fee should you terminate the contract within 24 months.
If you need further help with the Astro Fibre app, you may call our Customer Contact Centre at 03 - 9543 1543 and an Astro agent will be available to assist you immediately.
You can add a reminder to pay your bill, on your Google Calendar with one click. Enjoy uninterrupted services, by remembering to pay your bill on time.
STEP 1
While watching linear channel, press “OK” to launch player banner.

STEP 2
Press “OK” again to Pause. You will see an Icon on the left of TV screen.

STEP 3
Press “OK” again to resume the program.

STEP 4
Navigate to Back To Live TV and press "OK" to go back to the live view.

Step 1:
Type ASTRO<space>BARCODE<space>10 digit account number
Example: ASTRO BARCODE 0866603852
Step 2:
Send SMS to 66688
*Standard telco charges and Terms and Conditions apply
BYOND / PVR / Ultra Box
To dismantle ONLY - FOC
To reinstall ONLY – RM65
To dismantle and reinstall - RM65
Broadband / IPTV
Relocation within 6 months of contract start will be charged a RM500.00 relocation fee, and the contract will be renewed to a new 24-month contract.
Relocation after 6 months of contract start will have their contract renewed to a new 24-month contract.
Note For IPTV Customers:
1. Upon relocation request, all exiting IPTV customers will be converted to our Astro & Broadband service. Customers can choose to have standard Astro service with satellite dish, or unicast Plug & Play without satellite dish.
2. If customers choose to have satellite dish, an additional RM150.00 will be charged for satellite installation. If customers choose to have unicast Plug & Play service, no satellite dish is required, hence no extra charge will be incurred.
*Please note that additional charges may apply if the reinstallation process requires extra cables/fixings.
Depending on your service, it is mandatory to return some devices as per our T&Cs, whilst other devices should be disposed of and recycled at collection centres registered under the Department of Environment. To find out what you should do with your devices after service termination, please click here.
You will be able to check your balance, switch to e-billing, request for payment barcode and request for reconnect at standard telco rate.
Kindly ensure that your mobile number is the same as the registered phone number of the Astro account holder as the OTP will only be sent to the registered number. For further assistance, please call or WhatsApp us at 03-9543 3838. Alternatively, you may submit a request via our online Feedback Form here: astro.com.my/contactus/form.aspx.
Please follow the steps below to verify your Astro ID:

Please disregard the reminder if payment had been made and do check if you have any outstanding balance on Astro Quick Pay.
No, you will not be charged 8% Service Tax for reconnection performed before 1st March 2024. Only reconnections executed on or after 1st March 2024 are subject to the 8% Service Tax.
Astro invests billions of ringgits in content annually to keep Malaysians entertained and informed. Hence, we work alongside industry players, content partners and regulators in protecting intellectual property so that Astro can continue to produce and aggregate compelling content for our viewers.
We continue to educate and raise awareness among the public and businesses about the economic and social losses caused by content piracy. You can play your part in combating piracy by reporting potential copyright infringement of Astro content to the Domestic Trade and Consumer Affairs Ministry (KPDNHEP) on the following channels:
- 1-800-886-800 (hotline)
- 03-8882 6088 (Enforcement Command Centre)
- +6019-279 4317 (WhatsApp)
Auto-debit payment will be debited from your account 5-7 working days after your billing cycle date.
If your auto-debit payment is unsuccessful, you will receive an SMS alert.
You have the liberty to manage device connection on your own.
Astro Multiroom service mirrors all content from your primary subscription, except selected Special Interest and pay-per-view channels such as Astro First/Best movies.
For customers with Multiroom box, the Plug & Play setup with Astro Broadband will not have access to NHK World. The Plug & Play setup without Astro Broadband will not have access to NHK World.
Please note that only one Disney+ Hotstar access is bundled to each TV Pack subscription which allows two concurrent streams on Disney+ Hotstar.
For Residential Astro Pay TV customers: Yes, you are allowed to change your package to the one that best suits your entertainment needs. You may make the following pack changes:
- Pack upgrades
- Movement within Entertainment, Movies or Sports (e.g., switching from Sports to Entertainment)
- Movement within Premium pack (to a different combination of content)
For these changes, you will remain on same contract duration, or you can choose to change to longer commitment. If you downgrade your packs, you will be charged a cancellation fee for pack, and you can then choose a new contract for the new pack. Kindly note additional contract details for Disney+ Hotstar and Netflix.
(Please refer to the section "Changes to your Astro Contract" for more details)
Yes, Astro is bounded by the PDPA act. All information received will be used in accordance with our Privacy Notice.
The Download/Upload for each of the speed is as follow:
50Mbps/20Mbps
100Mbps/50Mbps
500Mbps/100Mbps
800Mbps/200Mbps
*Actual download/upload speeds is dependent on external factors, including but not limited to the distance between your devices and the WiFi router, network capacity and the number of connected users, the quality of your internal wiring, any obstructions of WiFi signals, the signal strength of wireless connection from your devices and if you are using a wireless connection.
Please refer to these FAQs for more information.
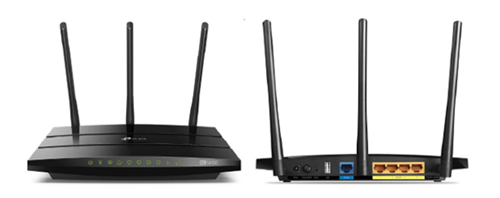
You may proceed with the following troubleshooting steps and it shouldn’t take you much longer than 15 minutes.
1. Please standby a computer/laptop to access to the internet and connection must be via LAN cable (connect the LAN cable to the Black port at D-Link Router and direct to the computer/laptop).
2. You may open any web browser such as Google Chrome, Internet Explorer, Mozilla Firefox and etc.
3. On the address bar, please go to tplinkwifi.net and to access to below login page. Type the Username and Password, then click "Login".

The default login of the router is available on the sticker at the back of the router. If you have done a configuration on your router previously, the password may be different)
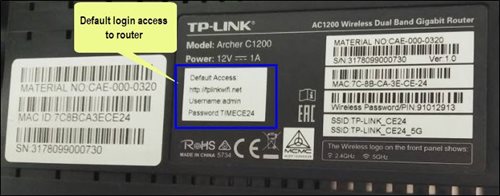
For example, below is the login details of the above router:
Username: admin
Password: TIMECE24
4. Once you have successfully login, the router's web-based setup page will appear. Please follow below steps for the configuration.
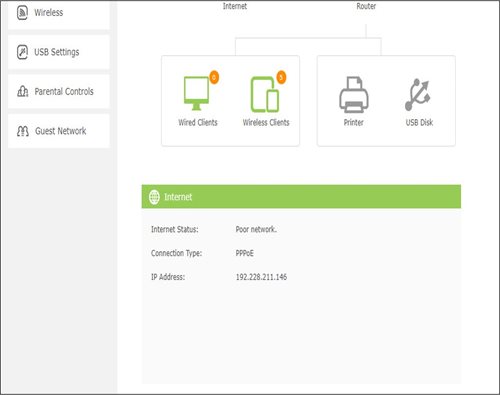
5. From the top menu, choose Basic and then click Wireless tab on the left menu to access to below screen.

6. Since this is a dual band router, you will have 2 Wireless Network Names (SSID) i.e. 2.4GHz and 5GHz. You may connect to any of the SSID, preferably with a stronger signal available.
7. You may change the Wireless Network Name (SSID) and the Password to follow your preferences, then click "Save" for the changes to take place.
Please reconnect to the new wireless name with the new password once completed.
Connect your Ultra Box/Ulti Box today and get the full value for your subscription. We believe we can provide you the best entertainment experience in Malaysia, and it all starts with connecting your box to the internet.
Want to enjoy these features for free?
- Continue watching Astro even when it’s raining.
- Binge-watch and catch-up to 110,000 videos on-demand from Malaysia, Hollywood, Korea, China, Bollywood and more anytime.
- Create multiple profiles in your house to enjoy a personalized Astro experience, with shows recommended to you based on your interest. There is a Kids-friendly version for your little ones as well.
- Rewind, pause and fast-forward shows and matches so that you will never miss another moment.
STEP 1
On your remote, press the HOME button and the home menu will be displayed on top of your screen.

STEP 2
Navigate to Settings.

STEP 3
Scroll to Network Settings and press "OK". Select New Wi-Fi Connection and press "OK".


STEP 4
Select your Wi-Fi network and press "OK". Please enter the password to connect to your network.


STEP 5
You have successfully connected when this screen appears.

Yes, you can upgrade your internet speed. However, speed downgrade is not allowed.

1. Please use a LAN ethernet cable and connect your computer/ laptop to the back of the Maxis Router.
2. You may open any web browser such as Google Chrome, Internet Explorer, Mozilla Firefox, etc.
3. On the address bar, please go to http://192.168.1.254 and the page below will appear.
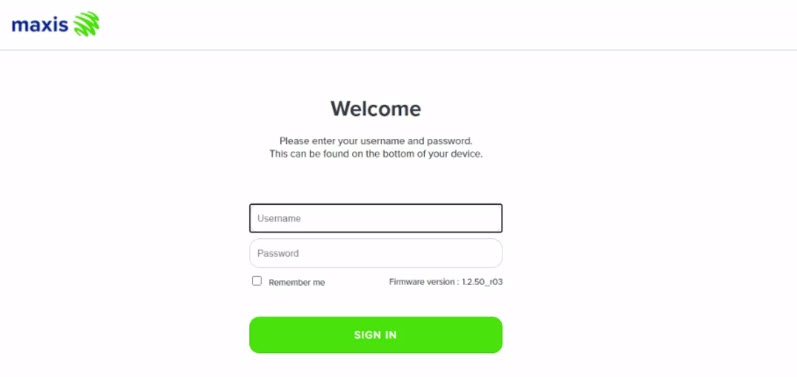
The default login of the router as below. If you have done a configuration on your router and changed your password previously, please use the password you have previously set.
Username: administrator
Password: Router S/N (Available on the sticker at the back of the router)
4. Once you have successfully login, the router's web-based setup page will appear.

5. From the left menu, select WIRELESS to access the screen below.

6. You may change the Channel selection by scrolling down to the Advanced Setup.
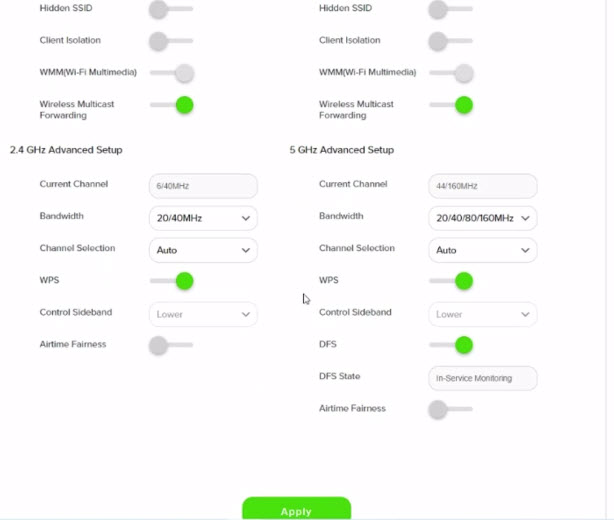
7. To change the channel on 2.4 GHz and 5 GHz, click the drop-down arrow for Channel, then select your desired channel.
Then, click "Apply" for the changes to take place.

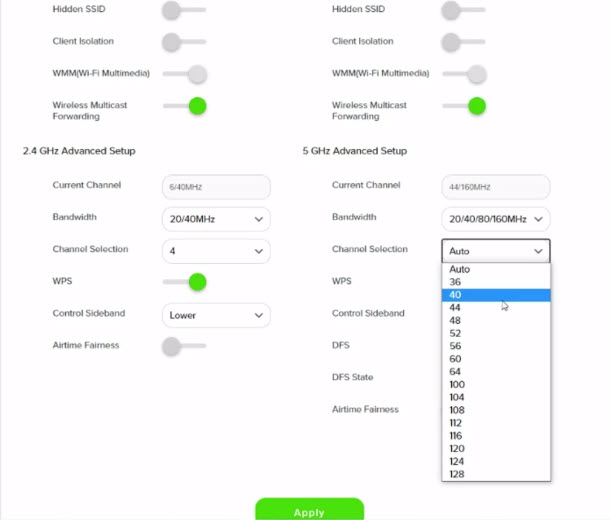
8. A warning box will popup, click "OK" for the changes to take place.

9. Please wait until the connection reestablish.

Customers with a Movies subscription via Movies, Premium 1, Premium 3 and Platinum packs will be able to access Disney+ Hotstar on the Ultra box.
Alternatively, customers can add on the 3-month Disney+ Hotstar pass for RM54.90. Subscribe to Disney+ Hotstar via astro.com.my/Disney.
For more support and options for your subscription, please WhatsApp us at 03 9543 3838 and type DH Help. Alternatively, you may visit astro.com.my/Disney for more information.
The default PIN is 0000. You may change your PIN to a secure one by doing this at Settings, under your Preferences, select PIN Management, enter your old PIN or default PIN and proceed to create a new PIN.

You will not be able to switch between channels, use the app as a remote control, view favorite channels and programmes, use programme showtime reminder, and remote record feature.
The Personal Video Recorder (PVR) is Astro's High Definition (HD)decoder which comes with a recording function and can be connected to Wi-Fi to access videos on demand. The PVR comes with the following features:
HIGH DEFINITION (HD):High Definition offers greater detail than Standard Definition including vibrant colour and multi-dimensional audio.
CONTROL LIVE TV: Record, Pause, Play & Rewind your favourite TV programmes at any moment. The PVR comes with storage capacity of 500GB (200 hours of HD recording)
ON DEMAND: Experience the new way of watching Astro. Gain access to a library of up to 50,000 On Demand titles that you can pick and watch instantly.
You can add a new Netflix account to your bill through CH 741 or clicking the Netflix button on the remote control. Please enter the email address you would like to use for Netflix subscription and ensure the Billing partner is Astro.
If you would like to transfer your existing Netflix Account to be charged under Astro bill, please follow the steps below:
- Cancel your existing subscription with Netflix
- Once the remaining duration of your existing subscription has ended, you may proceed to subscribe for Netflix via Astro bill
- To subscribe, go to CH 741 and enter the email address used for your previous subscription with Netflix
- Once successfully completed, all existing settings and watching history on your Netflix account will be brought over
STEP 1
Switch off the power for your box and make sure that the adapter's power light is off.

STEP 2A
Unplug the HDMI cable from your box and plug it back in securely. Do select the correct TV input.

STEP 2B
If you are connecting using RCA cable, please unplug the RCA cable from your box and plug it back in securely.

STEP 3
Switch on the power for your box and make sure that the adapter's power light is on.
Please wait for 5 minutes.

STEP 4
Turn on your box. You should no longer be experiencing this problem. If issue remain, replace to another HDMI cable.

If no improvement seen, please submit the issue in our Feedback Form and attach a picture of your smart card number for assistance.
Disney+ Hotstar is available to Astro customers on the Disney+ Hotstar app on Android and iOS devices and website (DisneyPlusHotstar.my) which is accessible on tablets and connected TVs. Unfortunately, Disney+ Hotstar is not available on Astro GO. However, customers can enjoy it on the big screen via the Ultra or Ulti Box.


You may proceed with the following troubleshooting steps and it shouldn’t take you much longer than 15 minutes.
1. Please standby computer/laptop to access to the internet and connection must be via LAN cable (connect the LAN cable to the blue port in Cisco Router and direct to computer/laptop).
2. You may open any web browser such as Google Chrome, Internet Explorer, Mozilla Firefox and etc.
3. On the address bar, please go to http://192.168.1.1 and below page will appear.

4. Type the Username and Password as below. Then click "OK". (These are the defaults, if you have done previous configuration on your router the password may be different).
Username: admin
Password: admin (or time123)

5. Click "OK" when a Warning prompt that says,” Using this advanced utility to change your router settings could disable your network” appears. Below display will appears.

6. On the setup page, click the Wireless tab then click on the Basic Wireless Settings sub-tab.

7. On the Configuration View section, click the Manual radio button. Choosing the Manual setup will allow you to adjust your wireless channel according to your preference.

8. Click Wireless Security to view the security settings of your wireless network. Take note of the Security Mode and the Passphrase.

For the example below, the Security Mode used is WPA2/WPA Mixed Mode.
The Wireless name is called Network Name (SSID) and the Passphrase is your wireless password.

9. Now that you have the Wireless name and Password, you are ready to connect your wireless computers and devices to the network.
10. You may change the Network Name (SSID) and the Passphrase to follow your preferences and please ensure save the changes made. Please reconnect to the new wireless name with the new password once completed.
Create your Astro ID anytime by following these simple steps:
- Step 1: Fill in your details at astro.com.my/astroID
STEP 1
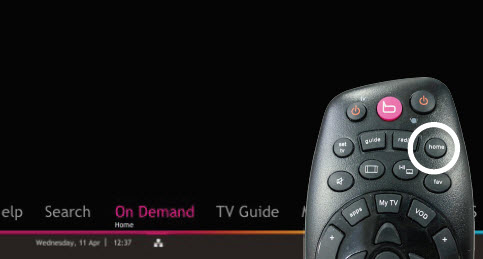
On your remote, press the “HOME” button and the home menu will be displayed at the bottom of your screen.
STEP 2
Navigate to SETTINGS and press “OK”.

STEP 3
Navigate to STB DIAGNOSTICS and press “OK”.

STEP 4
Refer to the signal strength % shown on the top left of your screen.

Information of the PPV CH200 cessation has been announced on CH200 from 1 - 7 October prior to the PPV cessation. Once again, we regret any inconvenience caused.
For existing Astro Fibre customers with the WiFi 6 Huawei K562e router, youwould need to upgrade to the latest RG21 router in order to access the AstroFibre with a one-off fee of RM300 (excluding SST). For any enquiries, please contact our Customer ContactCentre at 03 - 9543 1543and an Astro agent will be available to assist you immediately.

1. Please standby computer/laptop to access to the internet and connection must be via LAN (cable) [Connect the LAN (cable) to the yellow port in Maxis Router and direct to computer/laptop].
2. You may open any web browser such as Google Chrome, Internet Explorer, Mozilla Firefox and etc.
3. On the address bar, please go to http://192.168.1.254 and below page will appear.
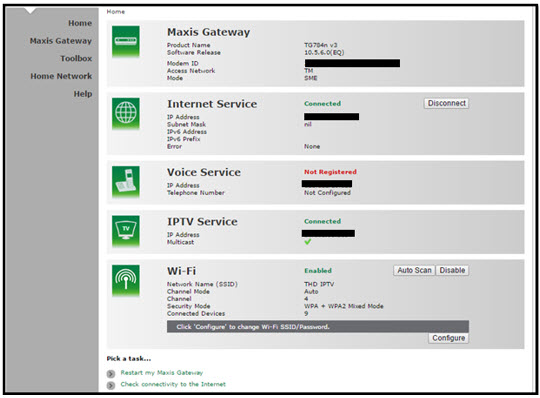
If below box appear, please enter required details:
USERNAME: Administrator
PASSWORD: (ACCESS KEY AT THE RGW STICKER)
(These are the defaults, if you have done previous configuration on your router the password may be different)
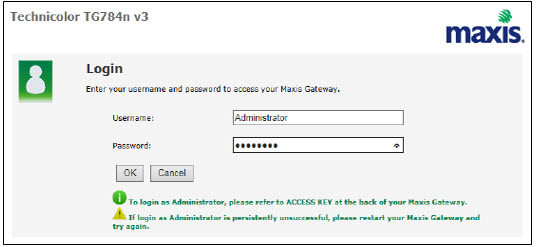
4. Once enter into the page "'TECHNICOLOR TG784N V3'', you may follow below steps to get the best wireless channel information.

A. Select "Home Network".
B. Click "WLAN: SSID" to proceed to next screen.
C. In order to get the best wireless channel, click "Wireless Scan" to scan available surroundings wireless Channel.

D. Please choose channel with lesser number of usage.
Example in below case, you may choose channel 4.

5. To configure wireless channel, please proceed with below steps.

A. Select "Home Network".
B. Click "WLAN: SSID" to proceed to next screen.
C. Then, click "Configure" to change the channel selection (automatic to manual) and other configuration option.

D. Please ensure below items:

i. WLAN Enable: Tick
ii. Interface Enable: Tick
iii. Change the Channel Selection to Manual
iv. Change the wireless Channel based on Step 4(D).
v. Once completed the selection, click the "Apply" button.
You may still be using an older version of the Astro GO. To resolve this issue, please go to your respective app store and update your Astro GO app.
If you are still having issues, proceed to submit report via WhatsApp or Feedback Form.
- Bundle Packs with Chinese Favourites: If you are currently on the Chinese Favourites selection, your selection will switch to Viu Premium at no additional cost progressively from 1 April 2024. Not to worry, you may still manually switch to other Asian Favourite selections if you wish via the My Astro app.
- Chinese Favourites Add-ons: There will not be any changes to your current subscription pricing. Furthermore, your subscription will now include additional channels on a free preview basis.
- Old Packs: There will not be any changes to your current subscription pricing. However, as we have recently made adjustments to the channel lineup in our packs, please call us at 03-7481 1000 (Monday to Friday, 9AM – 6PM exclude public holidays) to find out how you get more value from your subscription.
STEP 1
On your remote, press the Home button and the home menu will be displayed on your screen.
STEP 2
Navigate to Profile.
STEP 3
The Profile Selection Screen will be displayed.
STEP 4
Navigate to Edit Profile.
STEP 5
Choose a profile to edit.
STEP 6
Navigate to Name.
STEP 7
Enter your new Profile Name, navigate to DONE and press "OK".
STEP 8
Your new profile name will be shown in the Profile Selection Screen.
Please ensure that your Astro subscription comes with access to Disney+ Hotstar. You may visit astro.com.my/disney to learn more about the Packs that come with Disney+ Hotstar or to check if your Disney+ Hotstar access is activated.
Upon confirmation that your subscription comes with access to Disney+ Hotstar, if you still see an error screen on your TV with your Ultra or Ulti Box when logging in to Disney+ Hotstar, please call our Customer Contact Centre at 03 9543 3838 and an Astro agent will be available to assist you immediately.
Yes, customer may choose to have different billing method for each different account.
Physical bill charging will only apply to the account that has opted for paper bills.
Step 1: Separate Your Wi-Fi Network Name
First, you need to set up your Wi-Fi to Dual-band in order to be less susceptible to interference, and allows you to choose between the 2.4GHz or 5GHz bands when connecting a device. A Wi-Fi frequency of 5GHz is best when you are near your router, and 2.4GHz is best for when you are far from your router.
- Check the bottom of your router for a website or IP address, username, and password.
Below are details for a standard login based on a standard router issued by ISP (Telekom Malaysia, Maxis, and Time dot Com)

- Login to your account
- Identify your Wi-fi Settings (This could be in advanced settings)
- Identify both the 2.4GHz and 5GHz options.
- Split the signals by renaming the 2.4GHz and 5GHz signals respectively, and make sure both are enabled.
- For detailed instructions based on router model, on how to separate your Wi-Fi, click here and choose the option according to your ISP and router brand.
Step 2: Factory reset your Ultra Box by following the steps below.
a. Press the Home button on your remote

b. Go to your settings page

c. Scroll down and select Reset/Restore

d. Select restore factory settings and proceed

e. Enter your PIN to access restore factory settings (default pin: 0000)

f. Choose restore and wait until the box reboots automatically. This may take around 2 minutes and you will see the Astro logo again when it's done.

Please follow the steps in Q5, then continue with the steps below:
| Step 1: Click the “Email” or “Mobile Number” field to edit. Then, enter your updated detail(s). | Step 2: Complete the verification by entering the code sent to your new email address or mobile number. | Step 3: Congratulations! You have successfully updated your contact detail! |


Option 1
- Please turn off all devices (Modem and Router). By restarting your modem, you can isolate the possibility of overloaded processes in the modem, which would impact its performance.
- Ensure both cables on Modem (LAN Port 1) and Router (Internet Port) are properly connected.
Modem connection

Router connection


3. Please make sure the LAN cable is connected properly from router (Port 1-4 - LAN port) to PC/Laptop.
4. If you have change the password in Selfcare Time portal recently, please change the router configuration follows the new password made in Selfcare, but if you didn't make any changes, please go to Step 5.
5. If the issue persists, submit your feedback form and attach your modem light indicator picture/video for further assistance.
Option 2 / Option 3
1. Please turn off all devices (Modem and Router). By restarting your modem, you can isolate the possibility of overloaded processes in the modem, which would impact its performance.
2. Gently remove fiber optic cable and blow / wipe the tip of the fibre cable. This is to clean up the cable in order to avoid any interferences.
3. Re-insert the fiber cable to the optical port behind the modem.
4. Ensure both cables on Modem (LAN Port 1) and Router (Internet Port) are properly connected.
Modem Connection

Router Connection


5. Make Sure both cables on Modem (LAN Port 4 /LAN Port 3 for second decoder) and Astro Decoder (Network Port) are properly inserted.

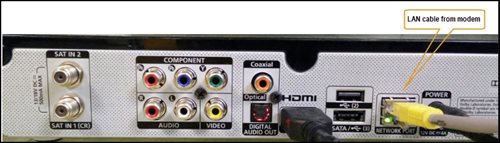
6. Switch on modem and router and please wait for 2 minutes to stabilise the devices after reboot.
5. If the issue persists, submit your feedback form and attach your modem light indicator picture/video for further assistance.
Option 4
1. Ensure Modem/Router are connected tightly to the power socket.

2. Try to use another power socket / power source to eliminate faulty power sockets/ power sources which could cause the issue.
3. If the issue persists, submit your feedback form for further assistance.
Option 5
1. Please ensure LAN cable is directly connected to modem port LAN 1.
2. Please use different LAN port if LAN 1 port is still off / not working.
3. If the issue persists, submit your feedback form for further assistance.
The recommended home internet speed for a smooth viewing is 10Mbps.
STEP 1
Switch off the power of your box and make sure that the adapter’s power light is off.
STEP 2
Unplug the HDMI cable from your TV and plug it back in securely to other available HDMI port.
STEP 3
Switch on the power for your box and make sure that the adapter’s power light is on.
Please wait for 5 minutes.
STEP 4
Turn on your box. Do select the correct TV input.
You should no longer be experiencing this problem.