
A free satellite TV service from Astro. Watch lifetime entertainment, news, learning & information and more.
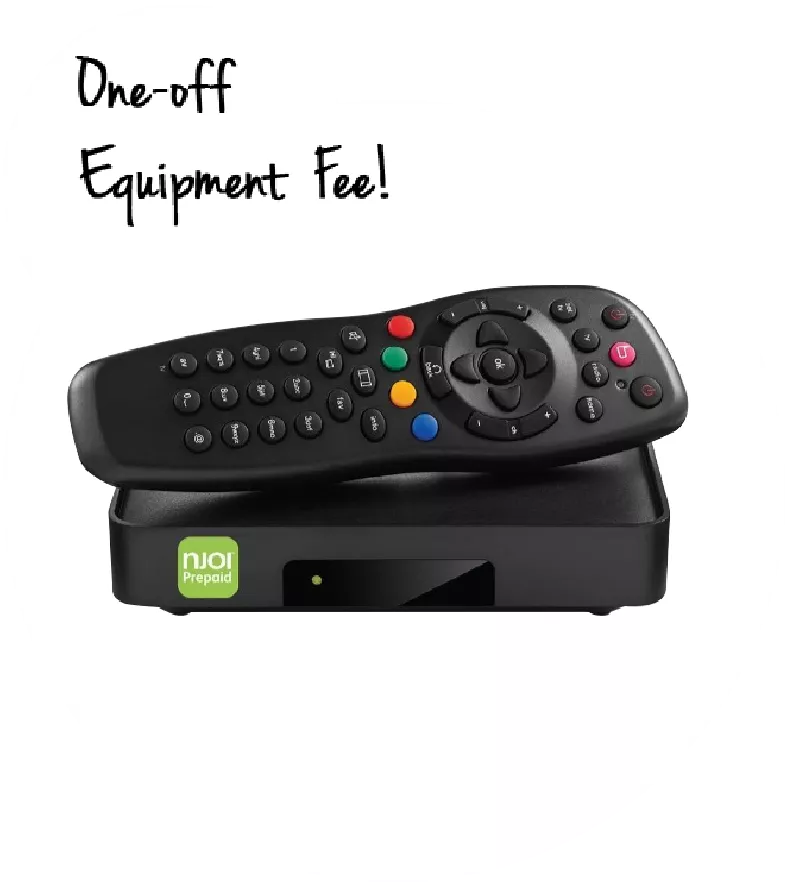
Pictures for illustration only.
Enjoy free access to 15+ TV channels & 10+ radio channels.
* Subject to Astro terms & conditions.


Step-1 |
Step-2 |
Step-3 |
Choose a plan & sign-up online. |
Sit back & wait for installation. |
Enjoy your new Astro / Broadband! |
A free satellite TV service from Astro. Watch lifetime entertainment, news, learning & information and more.
Pictures for illustration only.
New decoder only without satellite dish & cabling. You must have Astro/Njoi satellite dish and cable installed and working properly.
Including installation.
New decoder complete with satellite dish & cabling.
Including installation.
Applying for
| Njoi Astro UniFi Maxis |
Find your answers here.
We provide one stop service to apply Astro and Broadband for you.
You can avoid driving and queuing at the sales counter. We are the dealer that can help you to handle your application from the beginning to the end.
We do not charge you when you apply from us. There is no credit card information required to apply here. Charges are the same as you apply from the sales counter.
First, you can apply online, we will get back to you immediately during business hour. WhatsApp/Email/Fax us your Photocopy of IC (for malaysian) / Passport (for foreigners). When we receive all the information, we will proceed with your application immediately.
Once we receive your application with complete information, we will process your application immediately during business hour. The contractor from the service provider will then contact you for installation appointment once your application is approved.
Enjoy greater savings and hassle-free bill payment in one single bill for both Astro and Broadband. You get to enjoy Astro and Broadband at discounted price every month over the contract period of 24 months.
Astro offers multiple TV packs including Entertainment, Sports, Movies and Kids options. You can choose a pack that matches your viewing preferences and add optional streaming apps where available.
Yes, you may subscribe to Astro TV packs without bundling broadband. However, bundling Astro TV with Fibre Broadband may provide better monthly savings and convenience with a single bill.
For small households with light streaming and browsing, 100Mbps is usually sufficient. Larger families, gamers or heavy streamers may benefit from 500Mbps or 1Gbps plans for smoother performance across multiple devices.
Most Astro TV and Fibre broadband plans come with a 24-month contract. Early termination charges may apply if cancellation is made before the contract ends.
Yes, you may upgrade your TV pack or broadband speed at any time, subject to eligibility and coverage. A new contract period may apply depending on the upgrade.
Your monthly bill will be issued directly by Astro. You may receive it via email or access it through your Astro account. Bundled customers will receive a single combined bill for TV and broadband services.
Payment methods may include online banking, auto debit, credit card or other approved payment channels provided by Astro. Our team can guide you during the registration process.
If you experience any service interruption, you may contact Astro customer support for technical assistance. In many cases, issues can be resolved remotely or a technician will be arranged if necessary.
Yes, relocation is subject to service availability at your new address. Relocation charges and contract adjustments may apply depending on your plan.
No, you do not need a credit card to submit your application. Payment setup will be arranged directly with Astro after your service is approved.
Selected Astro TV packs allow optional add-ons such as streaming services depending on current promotions and availability. Additional monthly charges may apply.
Yes, a WiFi router is typically provided during fibre installation. The router model may vary depending on the selected broadband speed plan.
Yes, we will check the service coverage at your address before proceeding with your application to ensure broadband is available at your location.
For Malaysians, please provide a copy of your MyKad. For foreigners, provide a copy of your passport when submitting your broadband application.
After your application is approved, the service provider typically contacts you within 2 to 7 working days to arrange the broadband installation appointment.
Most Astro Broadband plans come with a 24-month contract starting from your installation date. If you relocate, a new 24-month contract may apply at your new address.
Yes, you can relocate your broadband service, subject to service availability at the new address. Your contract may reset for another 24 months from the new installation date.
Yes, you may request to relocate broadband devices within your home. Non-standard installation charges may apply and are payable to the installer directly after assessment.
Yes, you can switch to Astro Broadband. To avoid service interruption, it is recommended to activate the new service before terminating your current broadband contract.
Standard installations may be free during promotions, but non-standard installations (e.g., device relocation or complex wiring) may incur extra charges payable directly to the installer.
There is no contract for this subscription.
Advance payment can be made via credit/debit card or online banking.
Please ensure that you have subscribed to the mentioned channel.
If you're subscribed to this channel, follow below steps.
STEP 1
You need to refresh the signal on your box.
Refer to Refresh signal of your box guide.
STEP 2
If issue persist after 30 minutes, proceed to submit report via WhatsApp or Feedback Form.
Please ensure that you have subscribed to PVR recording service.
If you're subscribed to PVR recording service, follow below steps.
Let's check your hard disk connectivity.
STEP 1
On your remote, press the “HOME” button and the home menu will be displayed at the bottom of your screen.

STEP 2
Navigate to SETTINGS and press “OK”.

STEP 3
Navigate to STB DIAGNOSTICS and press “OK”.

STEP 4
From the General tab, take a look at the HDD Status.

If status is "Connected", press red button to reboot you decoder.
Wait until the box is on, then try to record any program.
If issue persist, please submit the issue on our Feedback Form and attach a picture of your General tab of the STB Diagnostics for assistance.
If status is "Disconnected", please submit your Feedback Form and attach a picture of your General tab of the STB Diagnostics for assistance.
Starting 27 September 2023, Astro customers may purchase Qalbox by Muslim Pro as an add-on for an exclusive price of only RM9.50/month inc. of SST (RRP: RM12.90/month). After successfully adding Qalbox to your subscription, all Ultra and Ulti Box customers can access the app on their Astro Box, the Muslim Pro mobile app, www.qalbox.com, as well as enjoy premium Muslim Pro features on the app. Please visit https://product.astro.com.my/apps/qalboxmuslimpro for more information.
1. What is Qalbox by Muslim Pro?
Qalbox by Muslim Pro is a Muslim-friendly entertainment streaming service that is accessible via the Muslim Pro app. It hosts an extensive library of content that celebrates Muslim identities and cultures worldwide and aims to create a global platform for Muslim creatives and filmmakers.
2. What is the difference between Muslim Pro and Qalbox?
Muslim Pro is the go-to Muslim lifestyle app, recognised by millions of Muslims globally ashaving the most accurate prayer time and athan/azan application for salah (prayer). Muslim Pro has a full suite of features that help Muslims practise their religion and deen more purposefully with features such as a Qibla finder, reading and listening to the Quran, a digital tasbih and more.Meanwhile, Qalbox is a streaming service by Muslim Pro to enjoy Muslim-friendly movies, TV series, animations and more. After purchasing Qalbox as an add-on, Astro customers can stream the app on their Ultra/Ulti Box, www.qalbox.com or via the Muslim Pro mobile app.
3. Why should I subscribe to Qalbox by Muslim Pro with Astro?
For an Astro-exclusive price of only RM9.50/month inc. SST (RRP: RM12.90/month), you can look forward to a wide range of content genres, including acquired and original scripted programmes, movies, documentaries, children's animations, as well as Quranic recitations and supplications (du'a). From classic movies on history, origins and civilizations of Muslims to titles that showcase modern Muslim life across the globe - viewers can immerse themselves in the experiences of other Muslims' varied journeys, struggles, and triumphs.
Additionally, you can also enjoy Premium Muslim Pro features on the mobile app which allow users to access all in-app features without any advertisements, download audio recitations of the Quran to listen offline, and add the Muslim Pro widget to their smartphone Home Page to view all prayer times, amongst many other features.
4. Where can I access Qalbox by Muslim Pro?
If you are subscribed to Qalbox by Muslim Pro, you can access your favourite Islamic content on your big screen TV via the Ultra/Ulti Box, www.qalbox.com or the Muslim Pro app.
5. What happened to my Qalbox by Muslim Pro Premium free trial?
Your free trial of Qalbox by Muslim Pro Premium subscription with Astro has ended on 26 September 2023. We hope you have enjoyed it! You may continue streaming the app by adding it to your bill for an exclusive price of only RM9.50/month inc. of SST (RRP: RM12.90/month).
6. How do I subscribe to Qalbox by Muslim Pro Premium as an Astro customer?
Astro customers may purchase Qalbox as an add-on via their Ultra or Ulti Box, My Astro app, www.astro.com.my, or by contacting our Customer Contact Centre at 03-9543 3838 (call/WhatsApp). Please follow the detailed steps below if you require guidance on how to purchase:
a) Ultra or Ulti Box
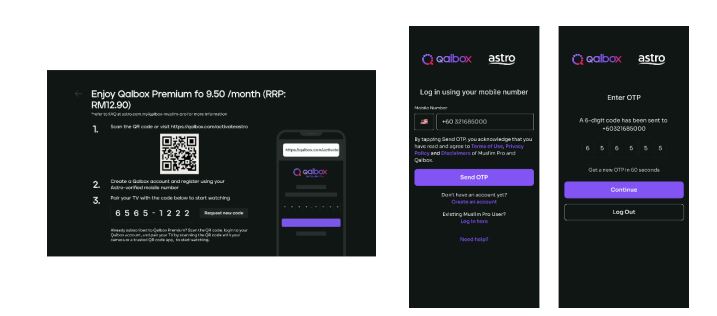
Step 1: Open œQalbox by Muslim Pro under the apps rail at your Home Page. Click on any show posters to proceed with the purchase.

Step 2: Provide your Astro verified mobile number and enter the OTP to proceed
*if you have activated your Qalbox Premium free trial, please ensure the same mobile number is used

Step 3: Scan the QR on screen to log in/create a new Qalbox account and pair it with your TV
b) My Astro app
Step 1: Open the My Astro app and select œAstro Store in the bottom menu. Then, select œApps > œQalbox by Muslim Pro > œGet it Now
Step 2: Log in with your Astro ID. Then, enter your Astro verified mobile number and perform the OTP verification to purchase

Step 3: Log in to the Qalbox mobile app using the same phone number as Step 2

Step 4: Once complete, launch Qalbox on your Ultra or Ulti Box and pair your account to your TV

c) Astro Website (www.astro.com.my)
Step 1: Visit www.astro.com.my and select œProduct & Services. Then, go to œApps > œQalbox by Muslim Pro > œGet it Now
Step 2: Log in with your Astro ID. Then, enter your Astro verified mobile number and perform the OTP verification to purchase
Step 3: Log in to the Qalbox mobile app using the same phone number as Step 2
Step 4: Once complete, launch Qalbox on your Ultra or Ulti Box and pair your account to your TV

7. I already have a Qalbox account from the free trial; how do I purchase the add-on with the same account?
Simply pick up where you left off by following the steps in Q6 and purchase the Qalbox by Muslim Pro add-on. Please ensure that the mobile number used to purchase the add-on is the same mobile number used when registering for the free trial.
8. I have my own Qalbox account outside of Astro; can I stream it on my Ultra/Ulti Box?
Yes, you can! Just follow these simple steps to stream your Qalbox account on your Ultra/Ulti Box:
Step 1: Open œQalbox by Muslim Pro under the Apps rail at your Box home page.
Step 2: Select œGo to Qalbox by Muslim Pro app then scan the QR code on screen to log in to your existing account.

Step 4: Finally, enter the pairing code displayed on your TV screen to pair your account to your Ultra/Ulti Box.
9. How do I enjoy Qalbox by Muslim Pro on the website and mobile app?
a) Qalbox Website: After subscribing through any of the methods under Q6, you will automatically be able to enjoy the app at www.qalbox.com.
b) Muslim Pro mobile app:
Step 1: Download the Muslim Pro app from the Apple App Store or Google Play Store
Step 2: Click œLog In at the bottom right corner. Then, select œContinue with Email/Phone
Step 3: Switch to the œPhone tab and enter your name and mobile number
Step 4: After clicking Continue, enter the OTP code sent to your device for verification purposes
Step 5: Enter your email address and create a password
Step 6: Now, enjoy Muslim-friendly shows on the app! Simply use the same email or phone number provided to log in in the future
10. How many devices can I use to stream Qalbox by Muslim Pro at the same time?
You can access your Qalbox by Muslim Pro account on up to five (5) devices at a time. To ensure a smoother streaming experience, please sign out from any unused devices.
11. Can I download content on Qalbox by Muslim Pro for offline viewing?
At the moment, offline downloading of content is not available.
12. Are there any subtitles or dubbing available for the content on Qalbox by Muslim Pro?
Presently, Qalbox offers subtitles in English, Bahasa Malaysia, Bahasa Indonesia, and French for selected content. Their commitment is to expand subtitle availability to encompass an even broader array of languages for all content. At this time, dubbing services are also available for selected content and they are actively exploring options to enhance accessibility and cater to the preferences of viewers.
13. Can I access Qalbox by Muslim Pro outside of Malaysia?
Yes, simply download the Muslim Pro app and log in using your registered mobile number for Qalbox. You may be required to provide your email address and password for additional security. Once done, you may access Qalbox immediately.
14. What is a Qalbox by Muslim Pro Premium subscription?
With the Qalbox by Muslim Pro Premium subscription, users can enjoy all the Muslim-friendly content on Qalbox and stream them on up to 5 devices at the same time. Additionally, users will also be able to enjoy Muslim Pro premium features on the mobile app which includes accessing all in-app features without any advertisements, download audio recitations of the Quran to listen offline, and add the Muslim Pro widget to their smartphone Home Page to view all prayer times, amongst many other features.
15. I don't have an Ultra/Ulti Box; can I still subscribe to Qalbox by Muslim Pro with Astro?
If you are not an Ultra or Ulti Box customer, you may still subscribe to Qalbox by Muslim Pro and enjoy:
a) Qalbox on the mobile app and website
b) Muslim Pro features via Muslim Pro app
16. Who may I contact if I encounter any problems with Qalbox by Muslim Pro?
Please reach out to the Qalbox team by emailing them at support@muslimpro.com if you have any enquiries or require assistance with the app.If you would like to contact Astro, you may reach out to our Customer Service Centre by:
1. Submitting a feedback form here: www.astro.com.my/contactus/form; or
2. Reaching to us via WhatsApp by typing œHi at 03-9543 3838 for assistance
17. Will my personal information be protected?
Yes, Astro is bounded by the PDPA. All information received will be used in accordance with our Privacy Notice
STEP 1
Switch off the power for your box and make sure that the adapter's power light is off.

STEP 2
Locate the Smartcard at the front or right side and gently pull it out make sure that the adapter's power light is off.

STEP 3
Wipe the Smartcard's gold chip clean using a dry soft cloth.

STEP 4
Make sure the gold chip is facing upwards and reinsert it all the way in.

STEP 5
Switch on the power for your box and make sure that the adapter's power light is on. Please wait for 5 minutes.

STEP 6
Turn on your box. You should no longer be experiencing this problem.
If issue persist, please submit the issue in our Feedback Form and attach a picture of your General tab of the STB Diagnostics for assistance.

STEP 1
On your remote, press the Home button and the home menu will be displayed on your screen.
STEP 2
Navigate to Profile.
STEP 3
The Profile Selection Screen will be displayed.
STEP 4
Navigate to Add Profile.
STEP 5
Choose your Profile.
STEP 6
Input the Profile Name and navigate to DONE.
STEP 7
Choose the Age Group of the new profile and press "OK".
STEP 8
Your new profile will be shown in the Profile Selection Screen.
We would need you to run few tests in order for us to understand your issue and to assist you in fixing the problem.
This will not take longer than 15 minutes.


We need you to run the Speed Test using both WiFi connection and LAN cable.

4. Once you've gathered all the results, attach in Feedback Form for further assistance.
Quick Info
You will require HD-PVR service in order to subscribe for a PVR. This service is included in all Starter Pack, Value Pack, Super Pack Lite, Super Pack and Super Pack Plus subscriptions.

You may proceed with the following troubleshooting steps and it shouldn't take you much longer than 15 min
1. Please standby a computer/laptop to access to the internet and connection must be via LAN cable (connect the LAN cable to the Yellow port at Tplink Router and direct to the computer/laptop).
2. You may open any web browser such as Google Chrome, Internet Explorer, Mozilla Firefox and etc.
3. On the address bar, please go to tplinkwifi.net and to access to below login page. Type the Username and Password, then click "Login".

The default login of the router is available on the sticker at the back of the router. If you have done a configuration on your router previously, the password may be different.

For example, below is the login details of the above router:
Username: admin
Password: TIMECE24
4. Once you have successfully login, the router's web-based setup page will appear. Please follow below steps for the configuration.
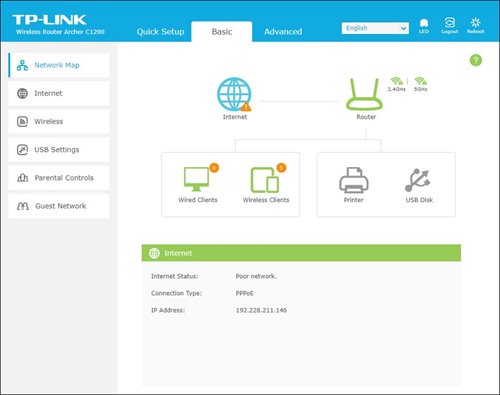
5. From the top menu, choose Advanced and click the Wireless tab on the left menu. Then, select Wireless Settings from the sub menu. Below screen will appear for 2.4GHz selection.

i. Please ensure to tick Enable Wireless Radio function.
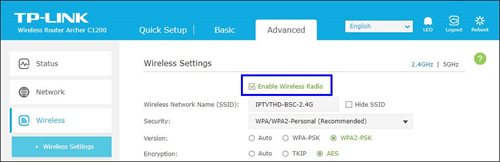
ii. To change the channel, click the drop-down arrow for Channel, then select your desired channel.
Choose between 1 to 13 (Suggested channels : 1,6,11). Then, click "Save" for the changes to take place.

iii. Click Save for the changes to take place. The router will auto reboot and connection will re-establish after few minutes.

iv. Next, select 5GHz to make changes on the wireless channel for 5GHz.
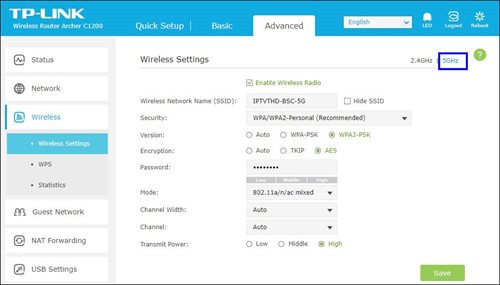
v. Click the drop-down arrow for Channel, then select your desired channel from the selection.

vi. Click Save for the changes to take place. The router will auto reboot and connection will re-establish after few minutes.

Customers subscribing to the following Astro packs will get to automatically enjoy Disney+ Hotstar as part of their newer, bigger and better packs
Customers with any of the above subscriptions with an Ultra or Ulti Box will also be able to enjoy Disney+ Hotstar on their big screen TV via their Astro Box, in addition to disneyplushotstar.my and the mobile app. Please click here on how to access Disney+ Hotstar on the Ultra/Ulti Box.
Astro customers who are not on the above Packs may upgrade to the Movies, Movies Plus, Premium 1, Premium 3 or Platinum Pack to receive access to Disney+ Hotstar at no additional cost. Alternatively, customers may visit www.astro.com.my/disney to subscribe to Disney+ Hotstar Premium through a 3-month plan via Astro at RM54.90 (NP: RM79.90 quarterly, Astro customer may see up to 30% savings in their Disney+ Hotstar Premium subscription)
For more information, please visit www.astro.com.my/disney. If you need further help, please WhatsApp “DH Help” to Astro or call them at 03-9543 3838 for assistance.
STEP 1
Press "HOME" button on your remote control.
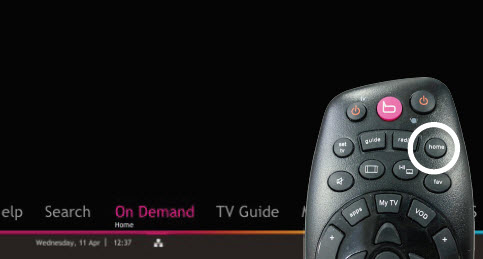
STEP 2
Navigate to Settings and press "OK".
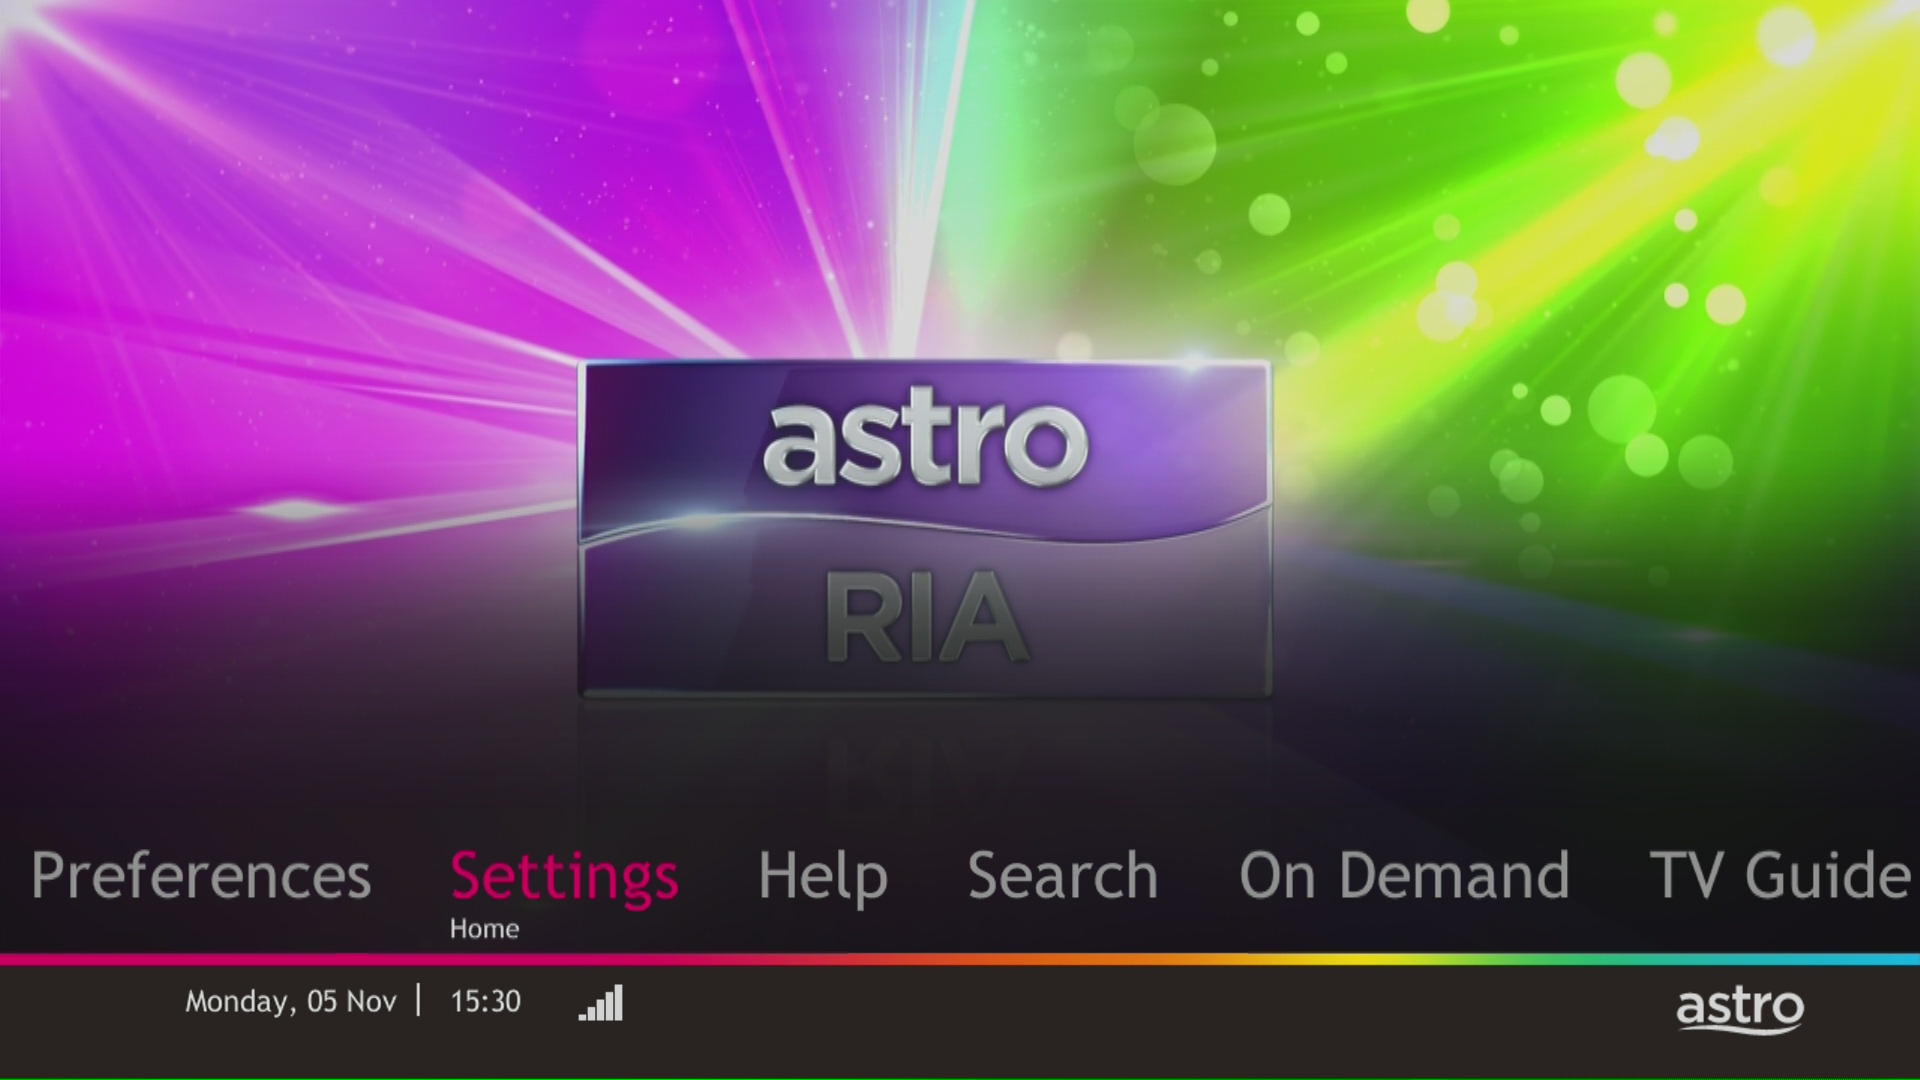
STEP 3
Navigate to Display and press "OK".

STEP 4
Navigate to Resolution and press "OK".

STEP 5
Navigate to your preferred selection and press “OK”.

STEP 6
Select Yes, continue and press "OK" to confirm on the changes.
Otherwise, select No, go back to cancel.

Payment via cheque will take 3 - 5 working days to be posted. If you require faster payment posting, we recommend you to pay online via Astro Quick Pay.
Discover thousands of movies and series you'll love, and we are continuously expanding. If you would like to enjoy more movies on top of your current subscription, press the Home button and select On Demand. Use the arrow keys to scroll to Store. Pick and choose to rent any movie for up to 48hours.
Currently the Multiroom (Smart TV) app is supported on four (4) brands with the software version listed below:
1. Sharp
2. Sony
3. LG
4. Samsung
Should there be any changes in plans we will keep our customers informed on any new development.
Customers who subscribe to the Movies, Premium 1, Premium 3 or Platinum Pack will be able to access Disney+ Hotstar immediately and start streaming all their favourite Global, Regional and Malaysian hits upon activation.
Connect your PVR to Wi-Fi and enjoy access to our library of Video On Demand. Replay old seasons, catch-up latest episodes of your favourite shows, anytime you want. To connect your PVR, follow the steps below depending on your box type:
(a) Wi-Fi Enabled PVR (DMT5)

· Press the “Home” button and select “Settings” > “Network” > “Wi-Fi”
· Allow the PVR to scan Wi-Fi networks available and subsequently choose your home Wi-Fi network > Enter your Wi-Fi password if required
· Once connected, the icon below will appear on the screen.

Tip: Use the alpha-numeric keyboard on your Astro Remote to key in your password
· Press the “Home” button and select “On Demand” to start watching videos on demand!
(b) Non-Wi-Fi Enabled PVR (HD PVR)

There are two ways to connect your HD PVR decoder to your home Wi-Fi
(i) Using the Ethernet (LAN) cable
· Plug in the LAN cable from your modem into the PVR network port
· Once connected, the icon below will appear on the screen
· Press the “Home” button and select “On Demand” to start watching videos on demand!
(ii) Using an Astro Wi-Fi dongle as per shown below

Step 1 - Plugin the Wi-Fi dongle into the front USB part of your PVR decoder.
Step 2 - A prompt will appear stating "Do you wish to connect to a wireless network?", select "Yes, continue."
Step 3 - Once connected, the Wi-Fi icon will appear on the screen. Now you are ready to download and enjoy Astro's on demand entertainment.
Step 4 - Press the “Home” button and select “On Demand” to start watching videos on demand!
*The Wi-Fi dongle is only applicable for the non-Wi-Fi enabled PVR (as per the picture).
To be eligible, you'll need to be an Active Astro Pay TV customer with a valid Astro ID.
An Active Astro customer refers to a subscriber of the Astro Service, whose account is current and active with no outstanding payments due and who has not breached the Astro subscription agreement nor given any instructions to terminate and/or suspend his/her subscription to the Astro Service.
Each account you hold is entitled to one (1) tier status based on the longest active smartcard.
Create your Astro ID anytime by following these simple steps:
The speeds shown under “My Network Map†are the WiFi speeds of your connected devices based on factors such as signal strength, distance of devices from your router, obstructing objects etc. This function allows users to know the signal strengths achievable from every room in their house or any distance from their router, giving users accurate indication If additional mesh is needed or if the placement of their router requires adjustment.
However, the speeds shown under “My Devices†are the recent WiFi consumption of your connected devices, which allows you to monitor every user’s internet consumption in your household.
Intermittent internet connection using LAN cable
Looks like there is something wrong with your service connection.
Please run a Ping Test, Traceroute Test and attach the picture or screenshot of both test results in the Feedback Form below, in order for us to provide further assistances.
Please make sure to attach the required screenshot(s) in ONE file (i.e. Microsoft Word document, PDF, Image file) before submitting the form.
Quick Info
A Ping Test shows how long it takes for packets to reach host.
A Traceroute Test traces the route of packets to destination host from our server.
Intermittent internet connection using Wi-Fi
1. Router Positioning
Most people underestimate the importance of picking a good spot for a Wi-Fi router. Even a small shift in positioning could end up being the difference between day and night.
i) High vs. Low
Put the router as high up as possible to extend the broadcasting range of the radio waves. This also helps clear the router of possible interferences.
ii) Concrete & Metals
Make sure your router isn't blocked by any other objects, especially devices that are electronic. Also, avoid placing your router in your basement as this area is usually enclosed by a lot of concrete, which can be almost impossible for Wi-Fi signals to penetrate.
iii) Distance to Router
The further away from your router you get, the weaker the Wi-Fi signal. Therefore, the best option is to place your router as close to your devices as possible, but this is only practical if you have one main area where you tend to use your devices.
Otherwise, you should place your router near the center of your home. After all, Wi-Fi broadcasts in 360 degrees, so it doesn't make sense to put it at one end of the house.
2. Wireless Interference & Noise
You've probably never noticed but there are wireless signals all around you wherever you go and they're passing through you all the time. From where? Electronic devices, Wi-Fi routers, satellites, cell towers, and more.
Although Wi-Fi is supposed to be on a different frequency than most of these devices, the amount of radio noise can still cause interference. Some common causes of interference include:
i) Microwaves
ii) Bluetooth Devices
iii) Cordless Phone
3. Surrounding Wi-Fi signals
A truth of the modern world is that every household has their own Wi-Fi network, which can cause issues with channel overlap. This can be somewhat problematic in a townhouse, but is especially problematic in housing complexes and apartments where there can be many routers within close proximity.
Which is why it's important that you pick a good channel in your router settings. Modern routers can choose channels for you automatically, but sometimes it's better to investigate and find the best channel yourself.
4. Usage
More likely, however, is that the people on your network such as friends, roommates, or family members are participating in bandwidth-heavy activities like gaming and streaming Ultrabox/Netflix.
Fortunately, if this is the case, you can prioritize your own network traffic by enabling Quality of Service in your router settings.
If the problem persists, please run a Ping Test, Traceroute Test and attach the picture or screenshot of both test results in the Feedback Form below, in order for us to provide further assistances.
Please make sure to attach the required screenshot(s) in ONE file (i.e. Microsoft Word document, PDF, Image file) before submitting the form.
Quick Info
A Speedtest is a service that provides free analysis of Internet access parameters, such as connection data rate.
A Ping Test shows how long it takes for packets to reach host.
A Traceroute Test traces the route of packets to destination host from our server.
STEP 1
Try to change channels on your Astro remote. Check the LED light.
If the LED is blinking 3 times or if it is not blinking, replace the batteries and proceed to STEP 2.
Otherwise, if the LED is blinking 1 time, your remote is working fine, let's proceed to STEP 3.
STEP 2
Check if you can change channels using your Astro remote control. You should no longer be experiencing this problem if is a battery issue.
If issue remain after batteries replacement, proceed to STEP 3.
STEP 3
You need to refresh the box setting manually from the box front panel.
Refer to Refresh Box setting (Clear NVRAM) - Ultra / Ulti Box.
If issue persist, please submit the issue on our Feedback Form.
You may verify if your speed plan has been successfully upgraded during the installation process with your Astro installer before sign-off. If you would like to confirm the status of your speed upgrade after installation, you may contact Astro’s Contact Centre at 03-9543 1543 and an Astro agent will be available to assist you immediately.
Please see the table below for the offers available for residential customers.

Notes:
· Installation fee includes Government tax.
· Monthly subscription fee does not include Government tax.
· The Ulti Box offers in the table above include a contract Period of 24 months with a pro-rated early termination fee of RM600 (excluding Government tax).
· The installation fees listed in the table above applies for a standard installation of the Ulti Box in your home. Additional charges may apply for non-standard installation.
· * Existing customers with monthly pack >RM100 are recommended to select Ultra Box @ FREE Installation fee with 24 months contract.
· ** New customers with monthly pack >RM100 are recommended to select Ultra box @ RM99 installation fee with 24 months contract.
· You may visit https://product.astro.com.my/box to find out more details about Astro Ultra Box.
· Ulti Box installation is free for Astro & Broadband customers for Starter Pack and above. A separate list of TNC’s will be applicable for this offer.
Yes, the current service tax law does not exempt services provided to customers residing in Labuan, Langkawi, and Tioman.
We noticed that you've recently requested for a change in your Astro account.
As this change will affect your overall monthly subscription, the expiry date for your Disney+ Hotstar (3-months Pass) subscription has been deferred to xxx (date) to consolidate the final monthly subscription pricing.
You will be charged 8% Service Tax on Astro Pay TV services rendered on or after 1st March 2024, whereas your Astro Fibre including Mesh will remain at 6% Service Tax.
Currently, My Astro app and web supports TV pack upgrade. You can go to "Account' and scroll to "Subscription' section and select "TV pack'. You may reach out to us via WhatsApp at 03-9543 3838 for more details.
For Ultra and/or Ulti box users, launch the My Astro app on your Home screen and you will land on the My Astro account dashboard. Press ">' remote button to go to your Subscription card and "OK' button to proceed with the TV pack upgrade.
Please refer to the table below:

Note:
Please find some examples (for Residential customers) as below:
Termination
Customer signed up for Entertainment Plus Pack (24-month contract) with Ultra Box. Customer decided to terminate the subscription 8 months into the contract. As the customer still has 16 months remaining, the maximum applicable fee will be RM41.67 x 16months = RM666.67
Pack downgrade
Customer signed up for Movies Pack (24-month contract) with Ultra Box. 18 months in, customer decides to downgrade to Primary Pack (24-month contract). As the customer still has 6 months remaining, the maximum applicable fee will be RM20.83 x 6months = RM125
Dropping off Netflix or Disney+ Hotstar within first 12 months
Customer signed up for Entertainment Plus (24-month contract) with Ultra Box and 12-month commitment on Netflix App. 6 months in, customer decides to upgrade to Premium Pack 1 (24-month contract) which does not include Netflix App. As the customer still has 6 months remaining in the first 12 months of commitment for Netflix App, the maximum applicable fee will be RM41.67 x 6 months = RM250. Upon upgrading to Premium Pack 1, a new 12-month commitment for Disney+ Hotstar App begins alongside the 24-month contract on the package.
Yes, you can switch to Astro Fibre and all the devices provisioned will be maintained (Fibre modem & WiFi router) with the new Astro Fibre subscription. However, your Astro TV package will be removed/terminated.
An early cancellation fee will be applied if you are still within the 24-month contract. Please refer to the Astro Fibre's cancellation details.
Step 1:
Type ASTRO<space>BAL<space>10-Digit Astro Account No.
Example: ASTRO BAL 08XXXXXXXX
*Standard telco charges and Terms and Conditions apply
Step 2:
Send SMS to 66688
No additional fees will be charged upon your relocation. However, you are required to notify Astro of your move. Please refer to Astro's General T&Cs for more information.
Once you have received the eKYC link via SMS/email/astro.com.my, you can proceed to follow the instructions on the screen. You can check out the step-by-step image below for more info.
For MyKad/MyPR/MyTentera :

For Passport :

Your Astro GO email will be delivered to you within an hour upon checkout. Please click the link provided to set up your password and download the Astro GO app on your device by clicking here (Google Play Store) or here (iOS App Store). If you want to stream it directly via your computer or laptop, Astro GO is also available at astrogo.astro.com.my. Log in with your Astro ID and start streaming!
Starting 1 April 2024, Astro’s Chinese content offering on our Primary & Family Pack is now bigger than ever with the addition of up to 10 channels featuring the latest Chinese primetime dramas, variety and current affairs programmes as well as great selection of movies and musical shows. These are the channels available in the Primary & Family Pack at no additional cost:
STEP 1
Switch off the power of your box and make sure that the adapter’s power light is off.
STEP 2
Unplug the HDMI cable from your TV and plug it back in securely to other available HDMI port.
STEP 3
Switch on the power for your box and make sure that the adapter’s power light is on.
Please wait for 5 minutes.
STEP 4
Turn on your box. Do select the correct TV input.
You should no longer be experiencing this problem.

1. Ensure power cable is connected tightly.
2. Try to use another power socket / power source to eliminate faulty power sockets/power sources which could cause the issue.

3. If the issue persists, submit your feedback form for further assistance.
STEP 1
Press "HOME" button on your remote control.

STEP 2
Navigate to My TV and press "OK".

STEP 3
Navigate to Bookings and press "OK".

STEP 4
Your list of your booking programs will be displayed.


1. Please connect your computer or laptop to your Astro Fibre router using WiFi or LAN cable. Your LAN cable must be connected from the yellow port of Astro Fibre router (Any available port).
2. Once connected, open any web browser such as Google Chrome, Internet Explorer, Mozilla Firefox and etc.
3. On the address bar, type http://192.168.100.254 and below page will appear.

Login using your username and password if you have changed the router login setting. Otherwise, your default router login is as per below.
Username: user
Password: user
4. Once you have successfully logged in, the router's web-based setup page will appear.

5. At the top of the page, click WLAN to configure the WiFi parameters.

6. You may change the Primary SSID (WiFI Name) and the WPA Passphrase (WiFi Password) to follow your preferences for 2.4G Wi-Fi Settings, then click "Save & Apply" for the changes to take place.

7. You may make the same changes for 5G Settings by change the Primary SSID (WiFI Name) and the WPA Passphrase (WiFi Password) to follow your preferences, then click "Save & Apply" for the changes to take place.

You can subscribe to new packs via
Not to worry, our representative will be contacting you within 24 hours.
Redemption should be done by the account holder. However, if the account holder is unavailable, immediate family members can make the redemption provided that the account holder has given them the permission to redeem using his account credentials.

You may proceed with the following troubleshooting steps and it shouldn’t take you much longer than 15 minutes.
1. Please standby a computer/laptop to access to the internet and connection must be via LAN cable (connect the LAN cable to the Black port at D-Link Router and direct to the computer/laptop).
2. You may open any web browser such as Google Chrome, Internet Explorer, Mozilla Firefox and etc.
3. On the address bar, please go to http://dlinkrouter.local./ and below page will appear. (These are the defaults and if you have done a configuration on your router previously, the password may be different).
Username: admin
Password: (Leave the field blank)
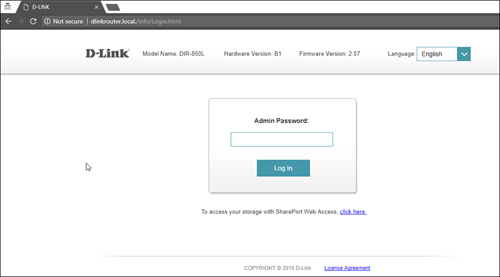
4. Once you have successfully login, the router's web-based setup page will appear. Please follow below steps for the configuration.

5. From the top menu, click Settings and then choose Wireless.

6. Below screen will appear to configure the wireless setting. Since this is a dual band router, you will have 2 Wi-Fi Names (SSID) i.e. 2.4GHz and 5GHz.
You may connect to any of the SSID, preferably with a stronger signal available.
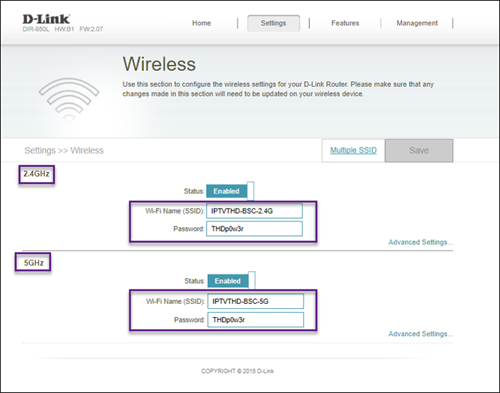
7. You may change the Wi-Fi Name (SSID) and the Password to follow your preferences, and then click "Save" for the changes to take place.
Please reconnect to the new wireless name with the new password once completed.
No, anyone can make payments on your behalf as long as the credit card is used by the owner themselves.
Your bill will be waived upon request.
For Platinum Pack and Multiroom Smart TV customers, Astro GO+ is included in your subscription at no extra charge. For customers on other packages, you will be able to add-on Astro GO+ to your subscription for RM 5.99/month.
Starting 9 November 2021, you will need to subscribe to the new packages to add on Multiroom to your subscription. Your new package will require a minimum primary subscription fee of RM100.
This is to ensure our customers receive the best possible attention and service via our new packages. We thank you for your understanding.

1. Please use a LAN ethernet cable and connect your computer/laptop to the back of the Maxis Router.
2. You may open any web browser such as Google Chrome, Internet Explorer, Mozilla Firefox, etc.
3. On the address bar, please go to http://192.168.1.254 and the page below will appear.

The default login of the router as below. If you have done a configuration on your router and changed your password previously, please use the password you have previously set.
Username: administrator
Password: Router S/N (Available on the sticker at the back of the router)
4. Once you have successfully login, the router's web-based setup page will appear.

5. From the left menu, select WIRELESS to access the screen below.

6. You may change the Network Name (SSID) and the Password to follow your preferences, then scroll to bottom and click "Apply" for the changes to take place.

7. A warning box will popup, click "OK" for the changes to take place and reconnect to the new wireless name with the new password once completed.

8. Please wait until the connection reestablish.