
A free satellite TV service from Astro. Watch lifetime entertainment, news, learning & information and more.
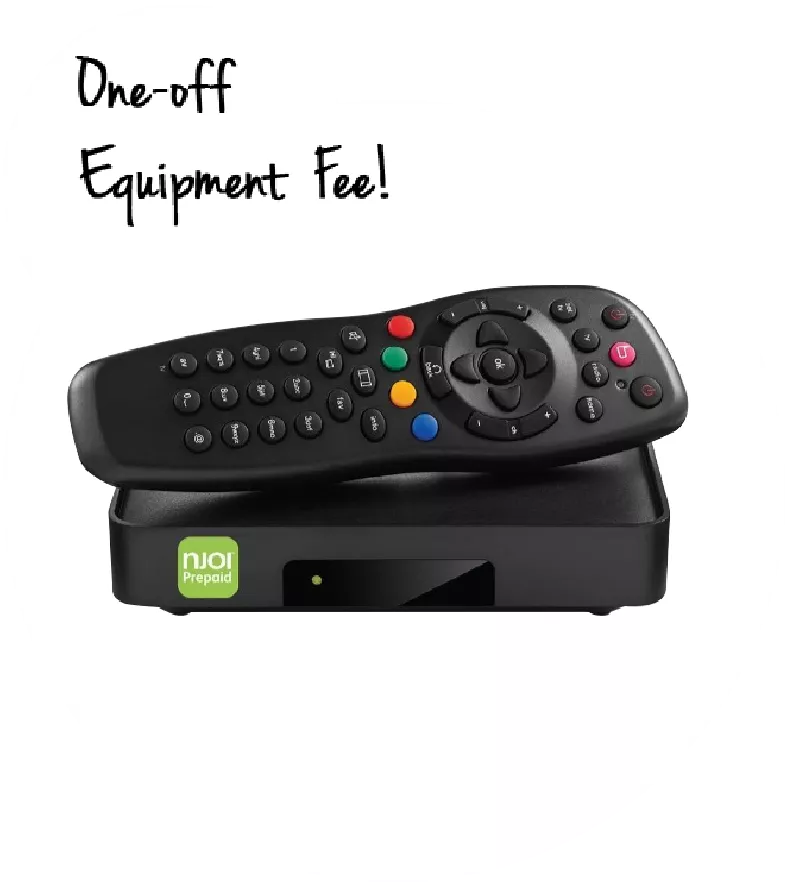
Pictures for illustration only.
Enjoy free access to 15+ TV channels & 10+ radio channels.
* Subject to Astro terms & conditions.


Step-1 |
Step-2 |
Step-3 |
Choose a plan & sign-up online. |
Sit back & wait for installation. |
Enjoy your new Astro / Broadband! |
A free satellite TV service from Astro. Watch lifetime entertainment, news, learning & information and more.
Pictures for illustration only.
New decoder only without satellite dish & cabling. You must have Astro/Njoi satellite dish and cable installed and working properly.
Including installation.
New decoder complete with satellite dish & cabling.
Including installation.
Applying for
| Njoi Astro UniFi Maxis |
Find your answers here.
We provide one stop service to apply Astro and Broadband for you.
You can avoid driving and queuing at the sales counter. We are the dealer that can help you to handle your application from the beginning to the end.
We do not charge you when you apply from us. There is no credit card information required to apply here. Charges are the same as you apply from the sales counter.
First, you can apply online, we will get back to you immediately during business hour. WhatsApp/Email/Fax us your Photocopy of IC (for malaysian) / Passport (for foreigners). When we receive all the information, we will proceed with your application immediately.
Once we receive your application with complete information, we will process your application immediately during business hour. The contractor from the service provider will then contact you for installation appointment once your application is approved.
Enjoy greater savings and hassle-free bill payment in one single bill for both Astro and Broadband. You get to enjoy Astro and Broadband at discounted price every month over the contract period of 24 months.
Astro offers multiple TV packs including Entertainment, Sports, Movies and Kids options. You can choose a pack that matches your viewing preferences and add optional streaming apps where available.
Yes, you may subscribe to Astro TV packs without bundling broadband. However, bundling Astro TV with Fibre Broadband may provide better monthly savings and convenience with a single bill.
For small households with light streaming and browsing, 100Mbps is usually sufficient. Larger families, gamers or heavy streamers may benefit from 500Mbps or 1Gbps plans for smoother performance across multiple devices.
Most Astro TV and Fibre broadband plans come with a 24-month contract. Early termination charges may apply if cancellation is made before the contract ends.
Yes, you may upgrade your TV pack or broadband speed at any time, subject to eligibility and coverage. A new contract period may apply depending on the upgrade.
Your monthly bill will be issued directly by Astro. You may receive it via email or access it through your Astro account. Bundled customers will receive a single combined bill for TV and broadband services.
Payment methods may include online banking, auto debit, credit card or other approved payment channels provided by Astro. Our team can guide you during the registration process.
If you experience any service interruption, you may contact Astro customer support for technical assistance. In many cases, issues can be resolved remotely or a technician will be arranged if necessary.
Yes, relocation is subject to service availability at your new address. Relocation charges and contract adjustments may apply depending on your plan.
No, you do not need a credit card to submit your application. Payment setup will be arranged directly with Astro after your service is approved.
Selected Astro TV packs allow optional add-ons such as streaming services depending on current promotions and availability. Additional monthly charges may apply.
Yes, a WiFi router is typically provided during fibre installation. The router model may vary depending on the selected broadband speed plan.
Yes, we will check the service coverage at your address before proceeding with your application to ensure broadband is available at your location.
For Malaysians, please provide a copy of your MyKad. For foreigners, provide a copy of your passport when submitting your broadband application.
After your application is approved, the service provider typically contacts you within 2 to 7 working days to arrange the broadband installation appointment.
Most Astro Broadband plans come with a 24-month contract starting from your installation date. If you relocate, a new 24-month contract may apply at your new address.
Yes, you can relocate your broadband service, subject to service availability at the new address. Your contract may reset for another 24 months from the new installation date.
Yes, you may request to relocate broadband devices within your home. Non-standard installation charges may apply and are payable to the installer directly after assessment.
Yes, you can switch to Astro Broadband. To avoid service interruption, it is recommended to activate the new service before terminating your current broadband contract.
Standard installations may be free during promotions, but non-standard installations (e.g., device relocation or complex wiring) may incur extra charges payable directly to the installer.
To allow customers to decide on their WiFi connection arrangement based on their preference upon being advised by the installer on-site.
User to manually connect their devices to different WiFi bands based on their usage and preference.
Yes, you can restrict programmes based on the age rating by going to "Settings” > “Parental Controls & Profiles” on your Astro Box and Astro GO app. Alternatively, you may also create a Kids Profile that provides security with a 4-digit PIN to exit and accessibility to kids-friendly channels and On Demand content only.
You need to identify your modem type by looking at the modem light indicator before proceeding with troubleshooting.
The type of modem is indicated as per below:
MODEM INDICATOR 1
MODEM INDICATOR 2
MODEM INDICATOR 3
BTS 1

3. Please ensure the LAN cable is securely connected from router to your devices (Astro Box/Laptop etc.)
Modem connection
Router connection
4. Now, power on modem and router, wait for 2 minutes to stabilise the devices after reboot. Your internet services should be restored.
5. If issue persists, please connect to our agent and attach your modem light indicator picture for further assistance.
BTS 2
1. Please power off your modem and router.
(This is to refresh your modem and router performance)
2. Make sure the fibre cable from your wall socket to modem is securely connected.
3. Please ensure both LAN cables on the Modem (LAN Port 2) and Router (Port 1) are properly connected.
Modem connection
Router connection
4. Power on your modem and router, wait for 2 minutes to stabilise the devices after reboot. Your internet services should be restored.
5. If issue persists, please connect to our agent and attach your modem light indicator picture for further assistance.
BTS 3
1. Please ensure your modem and router power plugs are securely connected to the power socket.
2. Alternatively, try to connect the power plug to a different power socket or power source. This step is to eliminate the possibility of faulty power socket which could cause the issue.
3. If issue persists, please connect to our agent for further assistance.
We try to make as many movies and TV shows available for download. However, for some titles, while we may have the rights to offer them via streaming, we may not be able to offer them for download.
STEP 1

Try to change channels on your Astro remote.
INDICATOR: LED blinking 3 times / NO LED blink
SOLUTION: Replace new battery
Proceed to Step 2.
INDICATOR: LED blinking 1 time
Confirm it's not your Astro remote faulty, let's proceed to Step 3.
STEP 2
If issue remain after the battery replacement, this might be due to a faulty Astro remote.
Try changing the channel manually directly from the box front panel (If any).
If it's working, you might need to replace your Astro remote.
You may walk-in to our nearest Customer Service Center for the replacement.

STEP 3
You need to refresh the box setting by initiate manually from box front panel.
Refer to Refresh Box setting Guide steps here.
When you have reached the duration (years) needed for the upgrade, we will upgrade you into your new tier and your shiny new rewards will appear in the My Astro app. You are still eligible for all the rewards from previous tiers too.
If you would like more information or to provide feedback, kindly log in to our support page via support.astro.com.my. For more questions regarding Astro Pack, you may reach out to us via call at 03-7481 1000 (Monday to Friday, 9AM – 6PM exclude public holidays).
Having trouble with your phone line ?
You may proceed to contact dedicated service provider directly - 1 800 8211 23
Mesh WiFi network refers to a unified wireless network that is formed by utilizing inter-connected WiFi nodes (Mesh devices) placed throughout the house.
Yes, all Astro customers with a Disney+ Hotstar subscription can access the app on the Ultra/Ulti Box. To access the app, please refer here.
We have taken into account customer feedback when introducing these new packs. While we understand the value customers see in purchasing their preferred channels individually, the packaging of media drives the economies of scale necessary to offer content at an affordable price to all our customers.
Other than the New Astro Packs that offer great value, customers may purchase selected channels or packages as content add-on such as Korean Pack, Horror Pack etc.
Regular (DTH) customers can watch Astro without an Internet connection. If you have selected Plug & Play setup option, a minimum speed of 10Mbps/device is required to enjoy a good HD viewing experience on Ultra/Ulti¯Box and 30Mbps/device for 4K UHD viewing on Ultra Box. However, if you have selected the Regular (DTH) option, the internet speeds above are recommended to enjoy a good viewing experience for On Demand and Astro Cloud services.
The Astro Fibre app is a newly introduced mobile application exclusively for Astro Fibre customers to allow them to schedule when each user can access the internet, share network access to guests in a secure manner, easy device management, amongst many other features for a better WiFi experience. For more information about this app, please visit here.
Settlement of total outstanding balance is to be made prior to any of the request.
You may register for auto-debit via: -
1.My Astro website.

2.MyAstro App.

3.Any of our AstroExperience Store.
(i) Head over to My Astro Portal and go to 'Bill & Payment'. Click on 'Payment History'
(ii) Contact us via one of these platforms. Please ensure you include your Astro Account Number.
We would need you to run few tests in order for us to understand your issue and to assist you in fixing the problem.
You may proceed with the troubleshooting steps below which should not require any longer than 15 minutes.
Quick Info
A Speedtest is a service that provides free analysis of Internet access parameters, such as connection data rate.
A Ping Test shows how long it takes for packets to reach host.
A Traceroute Test traces the route of packets to destination host from our server.
No, you will not be charged 8% Service Tax for paper billing option.
Yes, as long as it is compatible with Open Mesh standards and Astro Fibre equipment. However, Astro will not be responsible for managing or configuring the device. For the optimum WiFi experience, please pair your Astro Fibre with Astro's Mesh WiFi.
Please contact your issuing bank to enable card-not-present (CNP) transactions. This security measure helps us to protect your card information from being misused in fraudulent transactions.
Unfortunately, only Astro Fibre customers who subscribe from 24 November 2023 to 31 May 2024 are eligible for this free speed upgrade. However, you may still get the speed boost by calling in to our Customer Contact Centre at 03-9543 3838 and re-contracting with us. Kindly note that your account will restart with a new 24-month contract.
For any technical issues, you may visit Astro's Help & Support page or contact Astro via WhatsApp at 03-9543 3838 by typing PNP.
Yes, you are entitled to a free Ultra/Ulti box with free standard installation upon signing up Astro Fibre with a new 24-month contract.
STEP 1
Identify your remote control:

a) Remote control with Astro logo at the bottom of the remote, proceed to STEP 2.
b) Remote control with Astro logo at the top of the remote, proceed to STEP 4
STEP 2 (Astro Logo at the bottom of the Remote)
On your remote, press the “set tv” button and set tv instructions will be displayed on top of your screen:

STEP 3
Follow the steps appear on the TV screen to sync your Astro remote and complete the setup.

STEP 4 (Astro Logo atthe top of the Remote)
Press and hold “tv input” key on bottom left of the remote for 3 seconds until the LED blinks twice.

STEP 5
Enter the 2-digit TV Code of your TV Brand and the LED will blink twice:

STEP 6
Try out the TV controls (TV Standby or adjust Volume) to check if they are working correctly.

STEP 7
Press ok and wait for the LED to blink twice to save the settings.
To set up a Mesh WiFi network around your house, the Mesh unit will need to be paired with the WiFi router. Steps to pair these two devices are as follows:
i. Place the Mesh unit close to the WiFi router (within 2 meters) and power it on
ii. After the Mesh unit starts up, press and hold the WPS buttons of the Mesh unit and the WiFi router for 3 - 5 seconds in turn within 2 minutes
iii. After the WLAN and Internet indicators of the Mesh turns steady blue, the Mesh is connected to the Internet
iv. Move the Mesh to the desired place where you need to expand WiFi and power it on. After the Internet indicator turns steady blue, WiFi is expanded successfully.
We would recommend the following browsers for a smooth verification process:
• Google Chrome
• Microsoft Edge
• Mozilla Firefox
• Safari
STEP 1
On your remote, press the Home button and the menu will be displayed on top of your screen.
STEP 2
Navigate to Settings.
STEP 3
Navigate to Restore and press "OK".
STEP 4
Navigate to Restore Factory Settings and press "OK".

STEP 5
Enter your PIN to access this setting. (Default PIN is 0000).
STEP 6
Navigate to Restore and press "OK" to confirm your selection.
Otherwise, navigate to Cancel, go back to remain the settings.
STEP 7
Please wait while the box restoring defaults and will reboot once complete.
STEP 8
Your box will automatically restart and display this screen.
Click here to follow New Installation Settings guide for Satellite
Click here to follow New Installation Settings guide for Plug and Play
Mesh WiFi devices are available as an add-on subscription from RM10/month across all Astro Fibre speeds. You may subscribe to a maximum of 5 units of Mesh WiFi per Astro Fibre subscription.
You can contact Astro's Contact Centre (03 - 9543 1543) to subscribe to the Mesh WiFi.
Multiroom discount rates will be removed upon splitting the account.
BYOND / PVR / Ultra Box
To dismantle ONLY - FOC
To reinstall ONLY – RM65
To dismantle and reinstall - RM65
Broadband / IPTV
Relocation within 6 months of contract start will be charged a RM500.00 relocation fee, and the contract will be renewed to a new 24-month contract.
Relocation after 6 months of contract start will have their contract renewed to a new 24-month contract.
Note For IPTV Customers:
1. Upon relocation request, all exiting IPTV customers will be converted to our Astro & Broadband service. Customers can choose to have standard Astro service with satellite dish, or unicast Plug & Play without satellite dish.
2. If customers choose to have satellite dish, an additional RM150.00 will be charged for satellite installation. If customers choose to have unicast Plug & Play service, no satellite dish is required, hence no extra charge will be incurred.
*Please note that additional charges may apply if the reinstallation process requires extra cables/fixings.
SST of 6% and 8% will be applied accordingly to your bundle services:
Activate your Disney+ Hotstar access with your Astro subscription, using the steps below:
1. Ensure power cable is connected tightly.
2. Try to use another power socket / power source to eliminate faulty power sockets/power sources which could cause the issue.

3. If the issue persists, submit your feedback form for further assistance.
Your current additional RM20 rebate will be removed. However, you will still get to enjoy the standard bundle rebate accordingly.
There are no switching fees apply when existing Astro customer move to new packs.
Please make sure that:
To find out which Astro ID is currently linked to your account, you may submit a feedback form. Kindly select feedback type "I have an enquiry/issue with Apps
No, the quality of your video depends on the speed and reliability of your internet.
Yes, until 31 August 2022, customers can subscribe to the Movies Pack for only *RM59.99/month or the Platinum Pack for only *RM99.99/month for 6 months as well as the Premium 1 or Premium 3 Pack for only *RM99.99/month for 6 months until 30 October 2022 and be entitled to access Disney+ Hotstar as part of their Astro subscription. To find out more about our latest promotions, please visit promotions.astro.com.my.


You may proceed with the following troubleshooting steps and it shouldn’t take you much longer than 15 minutes.
1. Please standby computer/laptop to access to the internet and connection must be via LAN cable (connect the LAN cable to the blue port in Cisco Router and direct to computer/laptop).
2. You may open any web browser such as Google Chrome, Internet Explorer, Mozilla Firefox and etc.
3. On the address bar, please go to http://192.168.1.1 and below page will appear.

4. Type the Username and Password as below. Then click "OK". (These are the defaults, if you have done previous configuration on your router the password may be different).
Username: admin
Password: admin (or time123)

5. Click "OK" when a Warning prompt that says,” Using this advanced utility to change your router settings could disable your network” appears. Below display will appears.

6. On the setup page, click the Wireless tab then click on the Basic Wireless Settings sub-tab.

7. On the Configuration View section, click the Manual radio button. Choosing the Manual setup will allow you to adjust your wireless channel according to your preference.

8. Click Wireless Security to view the security settings of your wireless network. Take note of the Security Mode and the Passphrase.

For the example below, the Security Mode used is WPA2/WPA Mixed Mode.
The Wireless name is called Network Name (SSID) and the Passphrase is your wireless password.

9. Now that you have the Wireless name and Password, you are ready to connect your wireless computers and devices to the network.
10. You may change the Network Name (SSID) and the Passphrase to follow your preferences and please ensure save the changes made. Please reconnect to the new wireless name with the new password once completed.
Astro wants to give our members the convenience of having all their favourite series, exciting originals, vernacular signatures, live sports and local blockbuster movies in one place. Astro customers will be able to enjoy greater convenience by having Netflix bundled with their Astro subscription, consolidating the subscriptions, and providing easy access for payment in a single bill, at the best value.

1. Please standby computer/laptop to access to the internet and connection must be via LAN (cable) [Connect the LAN (cable) to the yellow port in Maxis Router and direct to computer/laptop].
2. You may open any web browser such as Google Chrome, Internet Explorer, Mozilla Firefox and etc.
3. On the address bar, please go to http://192.168.1.254 and below page will appear.
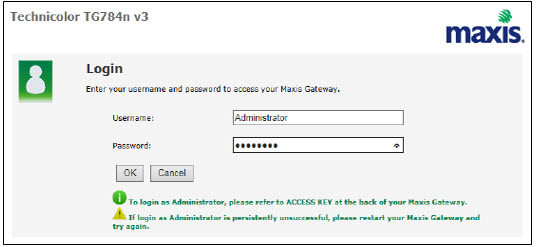
If below box appear, please enter required details:
USERNAME: Administrator
PASSWORD: (ACCESS KEY AT THE RGW STICKER)
(These are the defaults, if you have done previous configuration on your router the password may be different)
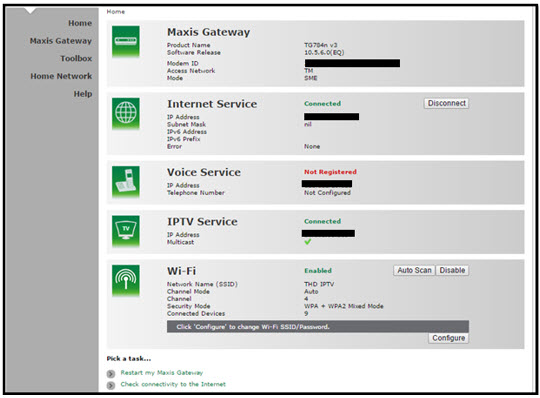
4. Once enter into the page "'TECHNICOLOR TG784N V3'', you may follow below steps to get the best wireless channel information.

A. Select "Home Network".
B. Click "WLAN: SSID" to proceed to next screen.
C. In order to get the best wireless channel, click "Wireless Scan" to scan available surroundings wireless Channel.

D. Please choose channel with lesser number of usage.
Example in below case, you may choose channel 4.

5. To configure wireless channel, please proceed with below steps.

A. Select "Home Network".
B. Click "WLAN: SSID" to proceed to next screen.
C. Then, click "Configure" to change the channel selection (automatic to manual) and other configuration option.

D. Please ensure below items:

i. WLAN Enable: Tick
ii. Interface Enable: Tick
iii. Change the Channel Selection to Manual
iv. Change the wireless Channel based on Step 4(D).
v. Once completed the selection, click the "Apply" button.
Please ensure you:
a. Have your original identification card “MyKad” (Front & Back) with you (Malaysian).
b. Have your original Passport & Visa with you (Non-Malaysian).
c. Are in a brightly lit environment
No, there are no penalty fees for the Mesh WiFi devices should you wish to terminate Astro Fibre within/after 24 months.
Visit https://product.astro.com.my/box or check out our user guide for a quick and easy way to get started!
This error indicates that you have reached the maximum number of simultaneous video streams across devices for one (1) account. To stop seeing this error, please stop streaming on one of your other devices.
• If you have recently purchased your Astro pack or made any changes to your pack on or after 9th November you can stream on two (2) concurrent screens
• If you have not made any changes you can stream on four (4) concurrent screens.
If you are still having issues, proceed to submit report via WhatsApp or Feedback Form.
1. Ensure Modem/Router are connected tightly to the power socket.

2. Try to use another power socket / power source to eliminate faulty power sockets/power sources which could cause the issue.

3. If issue persists, submit your Feedback Form for further assistance.
Real-time payments are posted almost instantaneously. However, daily system maintenance occurs between 12AM to 3AM - any payment made during this period will be delayed until system maintenance is complete.
Please ensure that you are using the correct ID for eKYC submission.
For Malaysians :
1. Please ensure you are using MyKad or MyTentera.
2. Capture the front and back of your ID.
3. Ensure that there is no glare when capturing the photo.
4. Ensure that are capturing it in a bright room to have the highest picture quality.
5. Please do not cover your ID when capturing it, as it may impact the OCR Optical Character Recognition accuracy.
For Malaysian Permanent Resident and Other Nationality :
1. Please use Passport only.
2. Please capture your whole passport, which has your personal information on it and your signature.
3. Ensure that there is no glare when capturing the photo.
4. Please do not cover your ID with your when capturing it, as it may impact the OCR Optical Character Recognition accuracy.

3. Click the Network Utility icon to open the Network Utility window.
4. For Ping Test, select the Ping tab and then type the address you'd like to ping in the text box. Click Ping and wait for the ping results.

5. For Traceroute Test, select the Traceroute tab and then type the address you like to traceroute in the text box. Click Trace and wait for the traceroute results.

1. Click the Search icon (magnifying glass) in the bottom left-hand corner and type "cmd" into the search bar.

2. Select the Command Prompt app - it will be at the top of the list of search results as the best match.

3. A black box with a flashing cursor will open; this is the Command Prompt.
For Ping Test, type "ping" and then hit the Space bar on your keyboard. Type in the address you like to ping and then hit the Enter key on your keyboard. Wait for the ping results.

For Traceroute Test, type "tracert" and then hit the Space bar on your keyboard. Type in the address you like to trace and then hit the Enter key on your keyboard. Wait for the tracert results.

1. Open the Start menu by clicking the Windows icon at the bottom left-hand corner of the screen.
2. Type "cmd" in the search bar at the bottom of the menu.
3. Click cmd found in the search results for Programs.

4. A black box with a flashing cursor will open; this is the Command Prompt.
For Ping Test, type "ping" and then hit the Space bar on your keyboard. Type in the address you like to ping and then hit the Enter key on your keyboard. Wait for the ping results.

For Traceroute Test, type "tracert" and then hit the Space bar on your keyboard. Type in the address you like to trace and then hit the Enter key on your keyboard. Wait for the traceroute results.

1. Move the mouse to the right-hand corner of the screen to make the vertical menu bar (charm bar) appear. Click Search.
2. Type "cmd" in the search bar and hit the Enter key on your keyboard.

3. Click cmd that found in the search results for Programs.
4. A black box with a flashing cursor will open; this is the Command Prompt.
For Ping Test, type "ping" and then hit the Space bar on your keyboard. Type in the address you like to ping and then hit the Enter key on your keyboard. Wait for the ping results.

For Traceroute Test, type "tracert" and then hit the Space bar on your keyboard. Type in the address you'd like to trace and then hit the Enter key on your keyboard. Wait for the traceroute results.
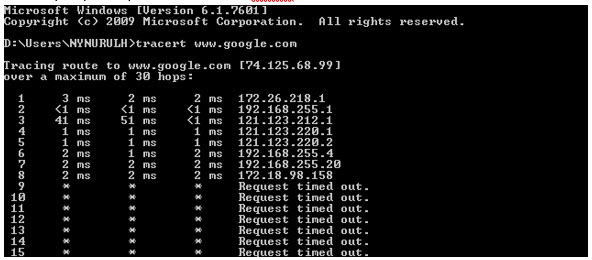
1. Click the Start button in the bottom left-hand corner of the screen.
2. Click the Run option in the right-hand column.

3. Type "cmd" in the text box and then hit the Enter key on your keyboard.
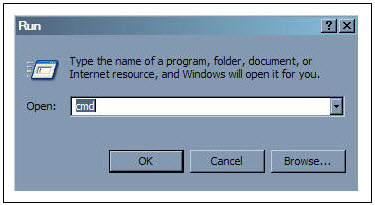
4. A black box with a flashing cursor will open; this is the Command Prompt.
For Ping Test, type "ping" and then hit the Space bar on your keyboard. Type in the address you'd like to ping and then hit the Enter key on your keyboard. Wait for the ping results.

For Traceroute Test, type "tracert" and then hit the Space bar on your keyboard. Type in the address you'd like to trace and then hit the Enter key on your keyboard. Wait for the tracert results.